

Standing in a new suite with bare floors, marked walls, and a delivery schedule on your phone can feel like the easy part is over and the risky part is about to begin. Most first-time facility managers don't struggle with picking desks. They struggle with coordinating trades, controlling sequence, keeping the building happy, and making sure the finished office works on day one.
That's where commercial office furniture installation turns into a project management job, not just an assembly job. If the schedule is loose, the site isn't ready, or the vendor communication breaks down, even good furniture can end up installed badly.
Commercial Office Furniture Installation
Your Guide to a Flawless Office Furniture Installation
A successful install starts long before anyone opens a carton. By the time the crew arrives, the important decisions should already be made. Access routes should be confirmed, floor plans frozen, electrical rough-ins coordinated, and responsibility assigned for every handoff. If those pieces aren't in place, the job usually slows down in ways that are expensive and avoidable.
The stakes in commercial office furniture installation are larger than many teams expect. The global contract furniture market was valued at USD 154.10 billion in 2024, and installation typically accounts for 5% to 15% of the total furniture purchase price according to Freeform Spaces' commercial furniture industry overview. That makes installation a meaningful part of the budget, not a minor afterthought.
What managers usually underestimate
The first surprise is that furniture installation touches almost every part of a workplace project. It affects move timing, IT readiness, fire and life safety, employee onboarding, and warranty protection. A missed detail in one area often shows up later somewhere else. A misplaced floor box becomes a desk relocation. A late paint crew becomes idle installers. A rushed sign-off becomes a warranty dispute.
The second surprise is that the floor rarely fails all at once. It fails in small ways. One row is slightly off. A panel run isn't level. A drawer binds. A cable path gets improvised. None of that looks dramatic during install, but your staff will notice it every day after occupancy.
Practical rule: Treat the installation like a controlled sequence of approvals, not a one-day delivery event.
The mindset that keeps projects on track
The cleanest projects usually share the same habits:
- One approved plan: Everyone works from the same current drawing and product list.
- One decision-maker: Someone on your side can answer field questions quickly.
- One communication path: Building management, IT, electricians, and installers know who approves changes.
- One quality standard: The team checks alignment, fit, finish, and function before close-out.
If you're furnishing team neighborhoods, custom office cubicles, workstation cubicles, glass office partitions, or denser layouts like call center cubicles, the same principle applies. The products change. The need for control doesn't.
Strategic Planning Before the First Box Arrives
Most installation problems aren't created on install day. They show up earlier, during the weeks when everyone assumes there's still plenty of time. That's when dimensions get taken from an old PDF instead of the field. That's when a layout changes but the electrical plan doesn't. That's when nobody confirms whether the loading dock is reserved.
Start with a field reality check
Take a site walk with the latest plan in hand and mark what the drawings don't tell you well enough. Check door swings, column locations, ceiling drops, sprinkler lines, floor outlets, and where staged product can sit without blocking other trades. If your team is still refining layout concepts, a planning tool like the Cubicle By Design space planning guide helps turn square footage into a buildable workstation plan.
Then check access in sequence, not casually. Truck to dock. Dock to freight path. Freight path to elevator. Elevator to suite. Suite to final installation zone.
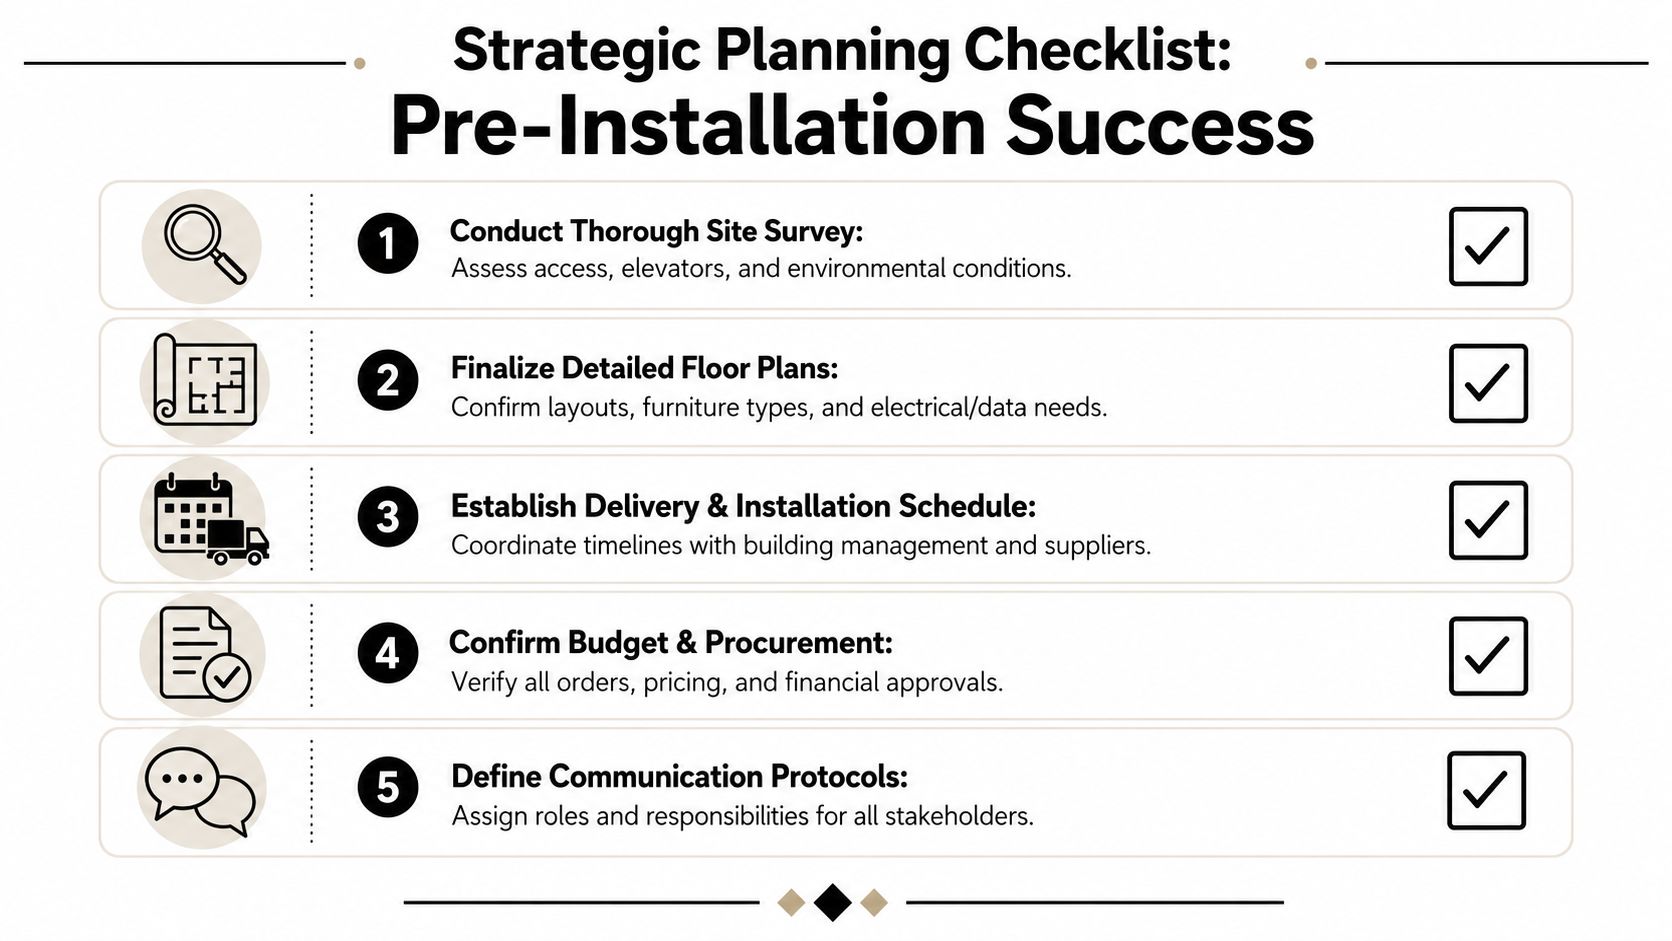
Build the budget the way the work happens
A lot of buyers understand furniture pricing but not installation pricing. That gap creates tension at approval time, especially when a quote includes delivery, staging, assembly, punch work, debris removal, and coordination with power or data trades.
The useful benchmark is this. Professional installation fees commonly fall in the 9–12% range of the sale price, and proper installation can reduce long-term maintenance costs by up to 30%, as explained in SPR Furniture's delivery and installation breakdown. That percentage isn't arbitrary. It reflects labor complexity, build accuracy, liability, and the cost of doing the project once instead of twice.
If a lower bid depends on skipping staging, compressing quality control, or pushing field fixes onto your staff, it usually isn't the low-cost option.
A practical planning budget should separate:
- Furniture cost
- Delivery and receiving
- Installation labor
- Electrical and data trade work
- Protection and disposal
- Contingency for approved field changes
Vet the installer like a project partner
Don't stop at "Can your crew assemble cubicles?" Ask whether they've installed modular systems, handled occupied offices, worked with building restrictions, and coordinated punchlist close-outs. If your project includes relocation as part of the sequence, a specialist such as Melbourne's Get n Go office movers is a useful example of the kind of logistics partner that understands commercial timing, access limits, and staged business moves.
Use a short decision table before award:
| Question | Why it matters |
|---|---|
| Have they installed this furniture line before? | System familiarity reduces field mistakes |
| Who runs site communication daily? | You need one accountable lead |
| How do they handle damaged or missing parts? | Delays grow fast without a process |
| What is required from electricians and IT? | Scope gaps cause the worst handoff failures |
| What is their close-out process? | Good crews don't disappear after assembly |
For layout exploration before procurement, Cubicle By Design's online cubicle designer is one practical way to test dimensions, privacy levels, storage, and power options before the plan reaches the field.
Preparing Your Space for a Smooth Installation
The schedule often slips before a single desk is assembled. A crew arrives at 7:00 a.m., but the freight elevator is still booked by another contractor, paint touch-up is happening in two offices, and old workstations are stacked in the corridor. By lunch, the installation is already behind, even though the furniture order was correct and the labor crew was ready.

Clear the floor before the crew arrives
A ready site means more than "mostly empty." The suite should be cleared, broom clean, and released by every other trade that can block access or damage new product. If existing furniture still needs to come out, treat that as its own project with its own sign-off date. For teams closing a location, reducing footprint, or replacing older systems, professional office decommissioning should be completed before delivery day is on the calendar.
Access should be verified in the field, not assumed from a floor plan. Measure doors, elevator cabs, loading paths, turns into corridors, and any point where long worksurfaces or tall panels could bind up. The General Services Administration's office move guidance also stresses early planning for access, staging, and building coordination because those decisions affect cost, downtime, and the pace of installation on site, as outlined in the GSA's relocation planning resources.
That check takes less than an hour. It can save a full day.
Confirm site readiness in writing
Furniture crews lose time waiting on work that should have been closed before delivery. I tell facility managers to use a written readiness checklist and require a yes or no answer for each item 48 to 72 hours before the first truck.
Include these checkpoints:
- Electrical rough-ins are complete: Floor boxes, wall feeds, and dedicated circuits match the latest furniture plan.
- Paint, flooring, and ceiling work are released: No wet finishes, curing adhesive, ceiling tile replacement, or active punch work in installation zones.
- Data pathways are ready: IT has confirmed outlet locations, device counts, and any coordination needed for powered furniture.
- Building access is approved: Dock times, elevator reservations, COIs, after-hours permissions, and security access are confirmed.
- Receiving and trash plans are assigned: Someone knows where cartons go, what gets saved, and how debris leaves the floor.
This is project control, not paperwork for its own sake. If one of those items is unresolved, decide whether to delay delivery, split the install into phases, or pay for return trips. Each option has a cost.
Protect the building before product hits the floor
The first few hours create most of the avoidable damage. Cartons drag across finished tile. Panel frames clip freshly painted corners. Pallets get parked in front of fire exits because no one marked a staging boundary.
Walk the route in advance and identify where protection is required. That usually includes elevator pads, masonite or ram board on finished floors, corner guards at tight turns, and taped staging zones that keep exits and corridors open. Building management notices this. So does your installer. A protected route usually signals that the rest of the job will be run with the same discipline.
Stage for install flow, not temporary storage
A good staging plan supports sequence, quality control, and labor efficiency. Product should be grouped by zone, room, or workstation cluster using the same naming convention shown on the drawing set and packing list. Hardware stays with its matching components. Exception items, such as damaged cartons, missing parts, or field-change pieces, should be tagged and pulled aside immediately so they do not get mixed into active inventory.
Poor staging hides problems until installers are already on the clock and waiting. Organized staging lets the site lead check counts, spot shortages early, and keep the crew building instead of hunting through cartons.
That is the main goal in this phase. Remove surprises before the installation team has to solve them in the field.
Managing the Installation Staging and Sequence
At 8:00 a.m., the crew is on site, cartons are open, and one simple sequencing mistake can put three trades in each other's way for the rest of the day. That is usually where budgets start slipping. Labor waits, supervisors make field decisions without full information, and small layout errors spread across the floor before anyone stops the work.
A controlled sequence prevents that. The goal is not just to get furniture assembled. The goal is to move product through the site in a way that supports inspections, follow-on trades, client approvals, and clean handoff by zone.
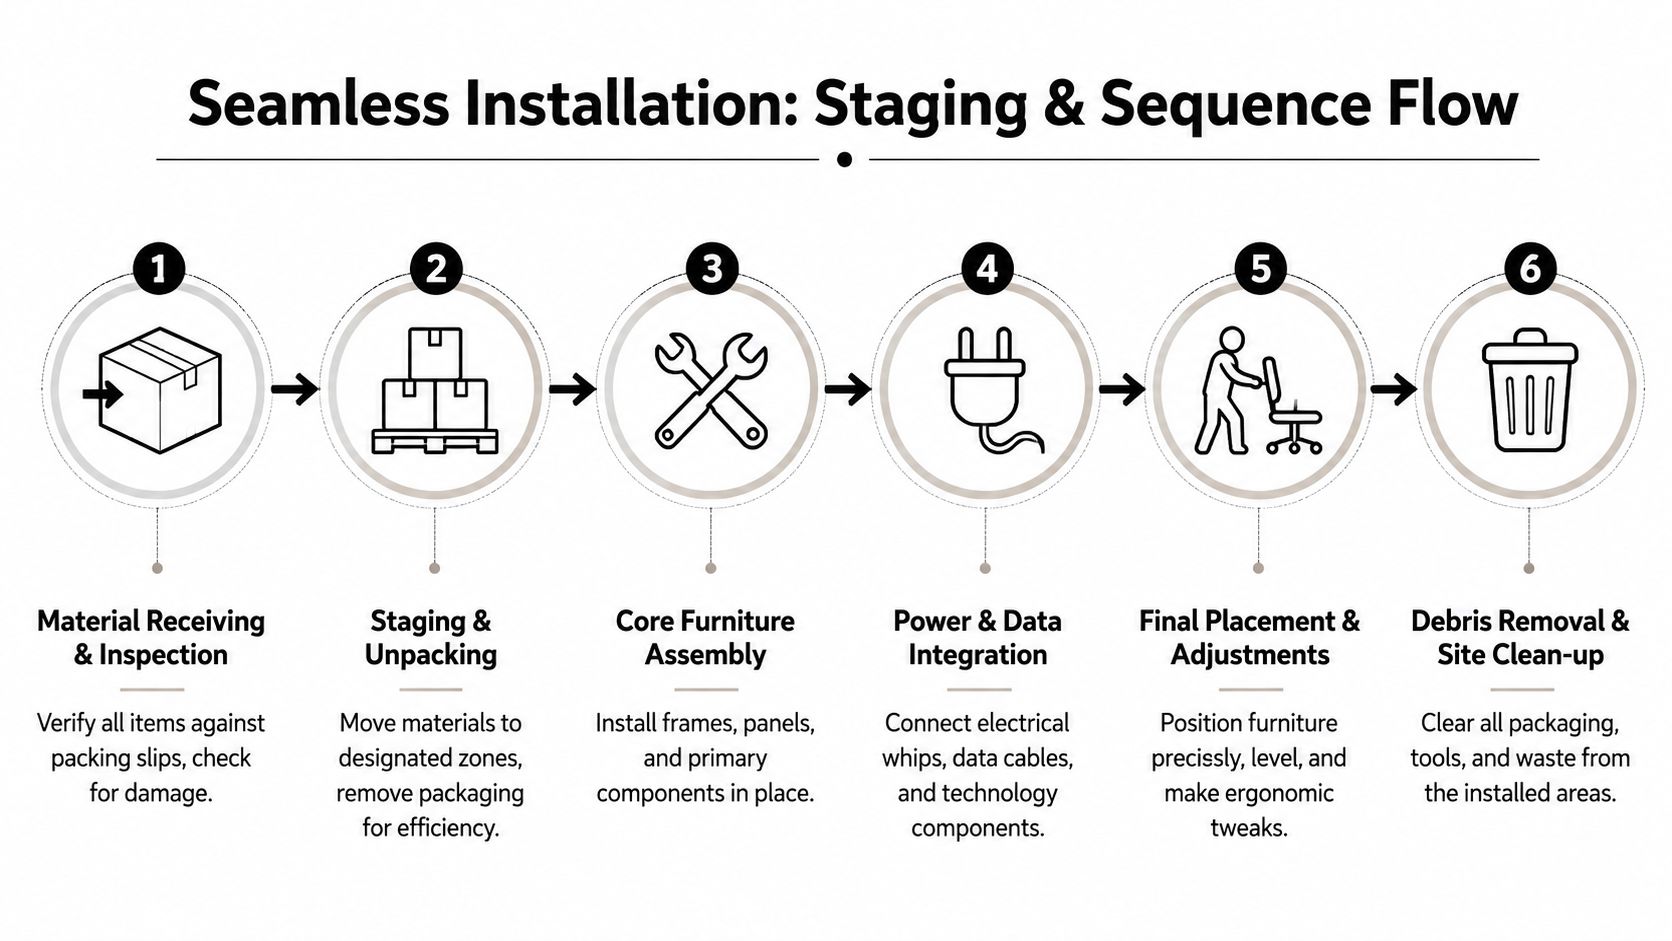
Start with the components that set the layout
Install order should follow the drawing set, not the order cartons came off the truck. On most projects, crews start with the largest fixed elements that define room lines and circulation. That can include modular walls, framing, or architectural features that establish the boundaries for the rest of the plan. Once those are confirmed in place, installers can build panel systems, benching, desks, and storage with fewer field adjustments.
The first completed station or office should be treated as the control sample for the rest of the floor. Check dimensions, handedness, finish selection, and clearances there before the crew repeats that setup fifty times. I have seen a minor miss on the first workstation turn into a half-day reset across an entire department.
Run the install by zone
Zone-based sequencing gives the project manager something useful to measure. Instead of asking whether the whole floor is "almost done," you can ask whether Zone A is fully installed, inspected, and ready for the electrician, IT team, or client sign-off.
That matters because downstream trades work better with defined release points. If one area is complete, licensed trades can enter on schedule, punch items stay contained, and occupancy planning becomes realistic. If the crew jumps around for convenience, every trade inherits partial access and incomplete information.
A structured installation project management process helps keep those handoffs clear, especially when the schedule includes phased occupancy or multiple vendor teams.
What to check during active install
The facility manager does not need to supervise assembly step by step. The better use of time is a short daily field review with the site lead and a written exceptions log.
Focus on these items:
- Layout accuracy: Major runs should match the approved plan and maintain intended aisle widths and door clearances.
- Template approval: The first office, station, or conference setup should be reviewed before volume installation continues.
- Crew flow: Product should feed the active work area without blocking completed zones or access routes.
- Exception control: Missing parts, damage, and field changes should be tagged, photographed, and assigned to an owner that day.
- Trade coordination: Areas that need floor cores, power feeds, or final electrical connection should be released in the order other trades need them.
One scheduling mistake shows up often. Furniture gets closed up before electrical scope is ready. If you are still confirming trade responsibilities, this reference on choosing the best commercial electrical contractor Brisbane is a useful example of the planning questions to settle before crews overlap on site.
A short installation walkthrough is worth seeing in action:
Sequence by completion status, not by carton access
The cartons closest to the staging area are not always the right ones to open next. Good site leads work from the release schedule, the drawing priorities, and the dependencies between trades.
| Build stage | What should happen |
|---|---|
| Layout-defining elements | Confirm room lines, boundaries, and major dimensions |
| Core systems furniture | Build workstation clusters and storage in approved zones |
| Access-dependent coordination | Hold or release areas based on power, data, and other trade needs |
| Freestanding furniture | Place private office, conference, and reception pieces after core runs are stable |
| Seating and final accessories | Complete ergonomic adjustments and user-ready details near the end |
A clean sequence reduces labor waste, but the bigger gain is control. You can see what is complete, what is blocked, who owns the next action, and whether the project is still on the timeline you approved.
Integrating Power Data and Technology
A workstation isn't finished when the desk is assembled. It's finished when a person can sit down, plug in, connect, and work without hunting for an outlet or crawling under a surface to untangle cables.
Power and data planning often fails because teams assume the furniture crew and the electrician are handling the same scope. They aren't. Furniture installers may route components and prepare paths, but code-governed electrical connections belong to licensed trades.
Draw the line between furniture work and electrical work
You want this distinction settled before installation starts. Ask for a written scope that identifies who handles base feeds, whips, receptacles, data routing, under-desk trays, monitor arm pass-throughs, and final device readiness.
Ensuring electrical whips are connected by licensed electricians reduces fire and compliance risks by over 60%, as noted in the earlier fit-out guidance. That's why experienced project managers won't let that step blur into general install labor.
If you're validating contractor responsibilities or comparing trade partners, a guide on choosing the best commercial electrical contractor Brisbane gives a useful example of the qualifications and planning questions to look for in commercial electrical work.
Plan cable paths before furniture closes them off
A clean installation depends on cable paths that are intentional. Once panel runs, credenzas, and benching legs are in place, retrofitting gets harder fast. That's especially true in denser workstation layouts.
Use this checklist before final power-up:
- Confirm outlet location against actual furniture placement
- Reserve paths for monitor, dock, and charging cables
- Keep service access reachable after install
- Avoid loose cords crossing circulation paths
- Document future capacity for adds and changes
For panel-based systems, a component such as a cubicle power pole helps route service in a way that's cleaner and easier to maintain than improvised post-install cabling.
Organized cable management isn't cosmetic. It affects maintenance access, daily usability, and how easily your team can reconfigure later.
Future-proof the layout without overbuilding
The right power plan supports current occupancy but leaves room for realistic change. That doesn't mean wiring for every possible scenario. It means identifying where churn is likely, such as hybrid team pods, touchdown areas, or growth seats, and leaving sensible access for adds or swaps.
One mention is enough here: Cubicle By Design offers configurable systems with electrical options that let teams plan around privacy, storage, and power needs during design, which can reduce late coordination surprises when the install reaches the field.
Meeting Accessibility and Building Code Requirements
A layout can pass the drawing review and still fail on the floor. I see it happen when a last-minute furniture swap steals a few inches from an aisle, a pedestal blocks chair pullback, or a reception arrangement narrows the entry more than anyone expected.
That is why this part of the project needs active field verification, not just design approval. Facility managers do not need to replace the architect, landlord, or code consultant. They do need to confirm that the installed furniture matches the approved plan, the building rules, and the way people will use the space.
What to verify before you accept the install
Start with circulation, reach, and usable clearances. Check the finished condition with furniture in place, chairs tucked and pulled out, doors open, and shared areas set the way they will be used on day one.
Focus your site check on:
- Primary circulation paths: Confirm clear access through workstation runs, entries, and common spaces.
- Accessible routes: Make sure furniture placement does not pinch paths at corners, door approaches, or transitions between zones.
- Worksurface and storage reach: Verify that desks, return surfaces, overheads, and filing units are practical for the intended users.
- Chair pullback and task space: Users should be able to sit down, stand up, and move without hitting storage, panels, or adjacent seats.
- Shared-use areas: Print stations, meeting rooms, reception, and break areas often create the first real bottlenecks.
Bring a tape measure, the latest approved furniture plan, and the final product list. If those three do not match, treat it as a project issue, not a minor field adjustment.
Density creates the highest compliance risk
Tight plans leave little room for substitutions. In high-seat-count areas, including banks of call center cubicles, a deeper worksurface, thicker panel, or added storage unit can reduce usable clearance enough to create access problems and frustrate users from the first day of occupancy.
That trade-off matters during value engineering. Saving space on paper can create operational headaches later, especially if your team needs service access, frequent chair movement, or accommodation flexibility after move-in.
A simple review table keeps the field check disciplined:
| Area | What to verify |
|---|---|
| Workstation rows | Clear path, chair pullback space, access to end stations |
| Enclosed offices | Door swing, guest chair clearance, storage access |
| Shared filing or print zones | Users can approach and use equipment without blocking circulation |
| Reception and waiting | Seating and tables do not narrow entry or check-in access |
Code problems usually start as coordination problems
Furniture compliance issues rarely come from one big mistake. They usually come from several small decisions made by different parties. A facilities team approves a denser layout. The dealership substitutes a different lateral file. The electrician shifts a floor box. The installer centers furniture in the room instead of holding the planned clearance at one side. Each choice looks reasonable by itself. Together, they create a layout that no longer performs as approved.
Set responsibility before installation starts. Decide who will verify dimensions in the field, who can approve substitutions, and who signs off on accessibility-impacting changes. That project control step saves rework.
For close-out, make sure the handoff includes warranty terms and service contacts. A documented office furniture warranty handoff process helps your team know what qualifies for correction, what falls under manufacturer coverage, and who to call if a compliance-related adjustment is needed after occupancy.
Good compliance review is practical. Put the plan, the product schedule, and the built condition in the same room, then check what was installed.
The Final Walkthrough Punchlist and Warranty Handoff
At 8:00 a.m. on move-in day, the floor can look finished and still be far from ready. One pedestal lock is missing a key. Three sit-stand desks are unpowered. A panel run is shifted two inches, which leaves one aisle tighter than planned. Those are not installer details. They are close-out issues, and if they are not documented before sign-off, your team inherits them.
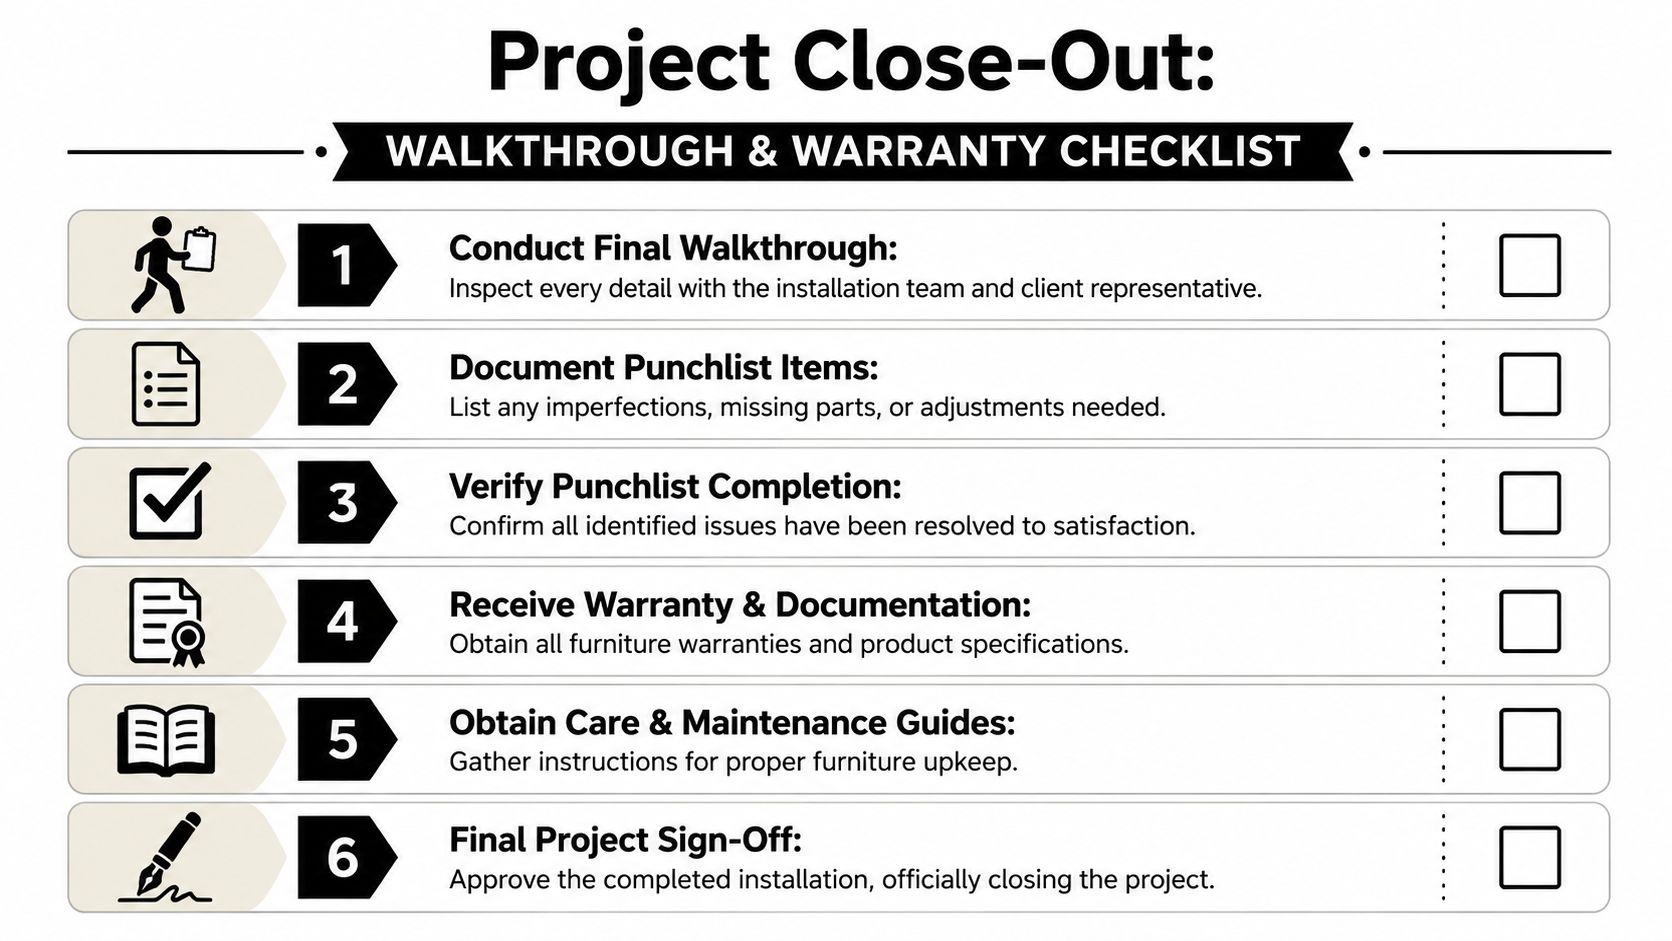
Run the walkthrough with a punchlist, not memory
Use the final furniture plan, finish approvals, and a live issue log. Walk the space with the installer or dealer project lead, then check the floor in a fixed sequence so nothing gets skipped. I usually start at the entry, move zone by zone, and finish in support areas such as copy rooms, huddle rooms, and storage.
The goal is simple. Confirm that the installed condition matches what was approved, what was delivered, and what your staff will use on day one.
Your punchlist should cover:
- Cosmetic issues: Scratches, chips, fabric pulls, laminate damage, finish mismatches
- Functional issues: Drawers that bind, locks that do not work, task lights, monitor arms, leveling feet, height-adjustable desk operation
- Layout issues: Wrong handedness, misplaced components, clearance conflicts, units set off plan
- Technology issues: Stations without power, loose access covers, exposed cabling, missing grommets
- Missing items: Keys, shelves, caps, tackboards, hardware packs, spare parts promised at delivery
Quality problems at close-out usually come from coordination gaps, not one dramatic failure. A substituted component may fit the order but not the room. A field adjustment may solve one conflict and create another. The walkthrough is where you catch those trade-offs while the installer, dealer, and building contacts are still engaged.
What to collect before sign-off
Do not treat paperwork as admin cleanup. The handoff package is what lets facilities manage service calls, replacement parts, and warranty questions without rebuilding the project history from email threads.
Collect:
- Warranty documentation by product line
- Care and maintenance instructions
- Attic stock or spare parts list
- Keying schedule for locking storage
- Record of field modifications or approved substitutions
- Primary service contacts for dealer and manufacturer follow-up
Keep those records in one place and review them before final acceptance. A clear office furniture warranty handoff process makes it easier to separate installer punch items from manufacturer warranty claims and routine maintenance.
Close the job cleanly
Final sign-off should happen after punch items are corrected or logged with written ownership, target dates, and a completion path. If a replacement top, panel, or power component is backordered, note the exact location and who is responsible for closing it.
I tell facility managers to leave the walkthrough able to answer three questions without hesitation. What was installed. What is still open. Who owns each next step.
That is what turns an installation into a controlled close-out instead of a slow drip of post-occupancy complaints.
If you're planning a new office, expansion, reconfiguration, or cleanout, Cubicle By Design can support the process from layout planning through installation coordination, power guidance, and project close-out. The value isn't just in supplying furniture. It's in making sure the floor is ready, the sequence is controlled, and the finished workspace works the way your team needs it to.