
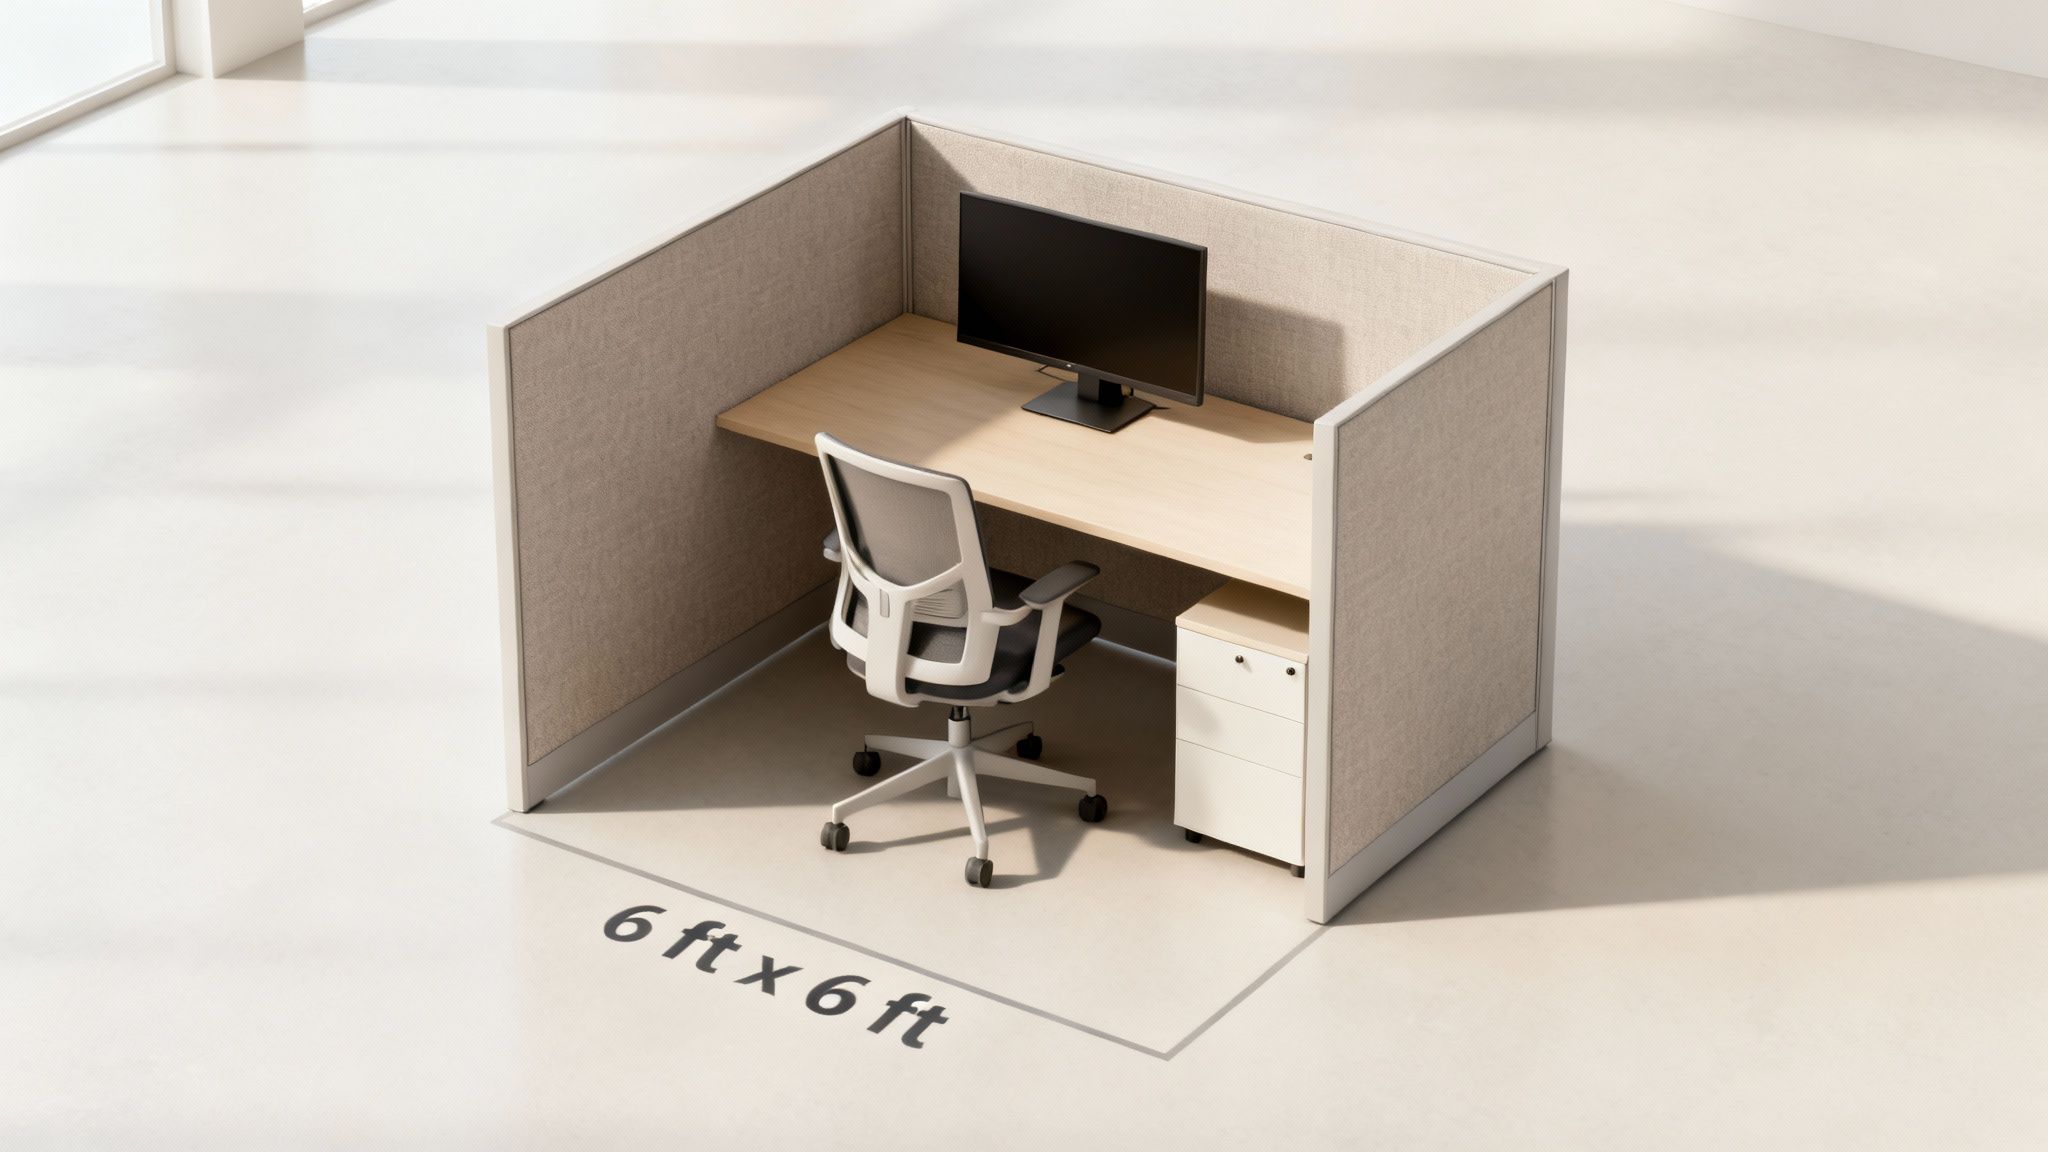
When you start planning a new office layout, the first question that almost always comes up is, "How big should the cubicles be?" For years, the industry has settled on a sweet spot: the typical office cubicle size is 6'x6' (six feet by six feet). This gives each person a solid 36-square-foot personal workspace. It's become the standard for a good reason—it perfectly balances giving an employee enough personal room without eating up the entire floor plan. Here at Cubicle By Design, we help businesses find that perfect balance every day.
Decoding the Standard Office Cubicle Footprint
For decades, the 6'x6' cubicle has been the go-to for office managers setting up spaces for everyone from administrative staff to IT pros and other general office roles. It provides enough room for a desk, a chair, and all the essential tech without making people feel boxed in. At the same time, it allows you to create a pretty dense and efficient layout. This size really took off as businesses began moving away from the much larger 8'x8' or 10'x10' stations that were common in the past.
What drove this shift to a more compact footprint? Mostly technology. Think about it: the rise of personal computers and digital documents meant we didn't need those huge, bulky filing cabinets and massive desktops for paper storage anymore. As offices went digital, the 6'x6' dimension just made sense.
Of course, a 6'x6' is a fantastic starting point, but it's not the only option. Understanding the different cubicle configurations and their overview can open your eyes to even more possibilities for your workspace, helping you find that perfect mix of comfort and cost-effectiveness. Our full range of cubicles can be tailored to fit any need.
Common Office Cubicle Sizes at a Glance
To give you a clearer picture, we've put together a quick reference guide for the most common cubicle dimensions and what they're best used for. This table should help you match the right footprint to the different roles within your company.
| Cubicle Size | Square Footage | Ideal For | Typical Panel Height |
|---|---|---|---|
| 5'x5' | 25 sq. ft. | Call Centers, Telemarketing, Data Entry | 42" – 53" |
| 6'x6' | 36 sq. ft. | General Office, Administrative, IT Support | 53" – 65" |
| 6'x8' | 48 sq. ft. | Developers, Accountants, HR Professionals | 53" – 65" |
| 8'x8' | 64 sq. ft. | Managers, Supervisors, Executive Staff | 65" or higher |
Think of this as the first step toward creating an office that’s both functional and genuinely productive. Whether you just need a few stations or you're outfitting an entire floor, getting the size right from the start makes all the difference.
Matching Cubicle Dimensions to Job Functions
A one-size-fits-all approach just doesn't cut it in a modern office. While the typical office cubicle size of 6'x6' is a great starting point, the reality is that different roles have vastly different needs. Tailoring the dimensions of a workstation is one of the easiest ways to boost comfort and productivity.
Think about a call center agent. They need a compact, focused station. A 5'x5' cubicle acts like a cockpit, keeping everything—phones, headsets, scripts—within immediate reach for fast, repetitive tasks.
On the other hand, software developers, analysts, and other knowledge workers need room to breathe. A 6'x8' layout gives them the space for multiple monitors, stacks of reference materials, and maybe even a few code printouts. That extra real estate prevents a cramped, frustrating work environment.
Call Center Workstations
For call centers, the name of the game is high density and low distraction. Using smaller footprints is a smart way to manage real estate costs without sacrificing function.
- Space Efficiency: A 25-square-foot station lets you maximize your headcount per square foot.
- Acoustic Control: Lower panel heights (42-53 inches) are perfect for dampening background chatter without making agents feel completely isolated.
- Minimal Storage: A simple under-desk pedestal is usually all that's needed to hold personal items and keep the work surface clear.
Just be sure your layout leaves enough room for people to move. Even in a high-density setup, you have to maintain at least 36 inches of aisle width to meet ADA guidelines and ensure smooth traffic flow.
Now, let's shift gears to the folks who spend their days juggling data, design, and complex problems.
"A developer’s cubicle is like a designer’s studio—it needs room to spread out ideas and tools."
Developer and Knowledge Worker Spaces
Developers and similar knowledge workers often feel most comfortable with 48 square feet of space, typically in a 6'x8' layout. That extra 12 square feet over a standard cubicle makes a world of difference.
- Dual Monitors: It provides enough width for an ergonomic multi-monitor setup, which means fewer head twists and less neck strain.
- Document Spread: There's enough desktop area for blueprints, notebooks, and tablets to coexist without feeling cluttered.
- Personal Touch: It leaves room for a whiteboard, a plant, or other personal items that can foster creativity and focus.
For more inspiration on how to get these layouts just right, check out our guide on Office Cubicle Design Ideas.
| Role | Cubicle Size | Square Footage | Panel Height |
|---|---|---|---|
| Call Center Agent | 5'x5' | 25 sq. ft. | 42"-53" |
| Knowledge Worker | 6'x8' | 48 sq. ft. | 53"-65" |
| Manager | 8'x8' | 64 sq. ft. | 65"-84" |
Manager Cubicles
Managers often need a space that pulls double duty: a private office for focused work and a mini-conference room for small huddles. An 8'x8' cubicle can serve as a command center, with enough space for meetings, storage cabinets, and a guest chair. Our Private Office Cubicles are perfect for this.
- Privacy and Presence: Tall panels (65-84 inches) offer the confidentiality needed for sensitive phone calls or one-on-one performance reviews.
- Collaboration Zone: The larger footprint easily accommodates two additional chairs, inviting quick brainstorming sessions with team members.
- Multi-Use Storage: You can outfit these spaces with overhead bins and lockable pedestals to keep important materials organized and secure.
Practical Planning Tips
When you're mapping out cubicles for different roles, don't just think about the footprint. You also have to consider things like natural light, traffic flow, and access to shared resources like printers.
Always measure from the center of each workstation to ensure you have adequate clearance.
- Aisle Clearances: Standard aisles require a minimum of 36 inches, but main corridors need 60 inches to be fully ADA compliant.
- Light Access: Try to place developers and other visually-focused workers near windows to take advantage of daylight, which is proven to help focus.
- Equipment Zones: Leave at least 2 feet of clearance behind chairs so people can move around safely without bumping into things.
Remember to account for the little things, too, like the space a chair needs to swivel or where all the cables will go. Office chairs typically need a 30-inch turning radius, so make sure your workstations can handle that.
- Panel Heights: Tailor the walls to the task. Use shorter 42-inch panels to encourage collaboration or taller 65-inch walls for deep-focus privacy.
- Power Access: Plan your power poles or base feeds so every single cubicle has at least two outlets. Nobody wants to fight over a power strip.
- Cable Management: Allot about 6 inches of under-desk tray space to neatly tuck away cords and network cables.
Before you order a single panel, sketch everything out on a floor plan. This simple step can save you from a world of headaches and costly reconfigurations down the road. By following these strategies, you'll be able to align your cubicle dimensions perfectly with each role's workflow and your building's codes.
How Cubicle Sizes Have Evolved Over Time
The cubicle sizes we think of as "standard" today didn't just appear overnight. Their dimensions tell a story, reflecting decades of change in how we work, the technology we use, and even our management philosophies. Knowing this backstory helps you understand why a 6'x6' or an 8'x8' footprint isn't just a random measurement—it's a strategic choice.
Think back to the mid-20th century, before the cubicle even existed. Offices were often huge, open rooms packed with identical desks, a scene straight out of Mad Men. It was an era of total transparency and zero privacy, where rows of clerks worked under the constant watch of supervisors.
The Birth of the Action Office
The real game-changer arrived in the mid-1960s with Herman Miller's "Action Office" line. This was the true beginning of the modern cubicle, a concept designed to give employees a little bit of their own turf. These first modular workstations, often 6'x8' and 8'x8', were a direct answer to the cold, impersonal factory-floor style of older offices.
These early designs were surprisingly spacious. They recognized that professional work required room to spread out papers, house equipment, and actually focus. For the first time, an employee’s personal workspace was seen as a tool for getting things done, not just a spot to clock in and out.
The Shrinking Footprint and the Tech Boom
As cubicles caught on in the 70s and 80s, panel heights shot up to an average of 60-84 inches, creating genuine semi-private offices. The workstations themselves were often 66 inches deep to make room for the massive CRT monitors that came with the first personal computers. By the 1990s, nearly 50% of employees were using these early PCs, solidifying the cubicle's place in office life. To dig deeper into this history, you can read more about the evolution of the office cubicle and see how it shaped the way we work.
But the tech boom that made cubicles essential also started their next transformation. As computers got smaller and flatter, the need for huge, deep desks began to fade. Laptops took over, and digital files meant fewer filing cabinets. This drive for efficiency and cost savings is what eventually gave us the standardized 6'x6' cubicle we see everywhere today.
This isn't just a history lesson—it shows that cubicle sizes have always adapted to the tools and workflows of the time. Choosing the right size for your office is about continuing that tradition.
The journey from sprawling 10'x10' stations to modular 6'x8' systems, and finally to the efficient 6'x6' footprint, is a direct reflection of workplace innovation. Each size represents a different era of work, from the paper-and-pencil past to our digital-first present.
Planning Your Office Layout With Standard Cubicles
Knowing the typical office cubicle size is just the first step. The real art is in arranging those individual footprints into a cohesive, functional floor plan that actually works for your team. This is where you transform measurements on paper into a living, breathing workspace that flows efficiently and keeps everyone productive.
Good planning prevents frustrating bottlenecks, ensures safety, and frankly, creates an environment where people can do their best work without feeling cramped.
This infographic really puts the evolution of office design into perspective, showing the shift from chaotic open plans to the more focused, personal workstations we rely on today.
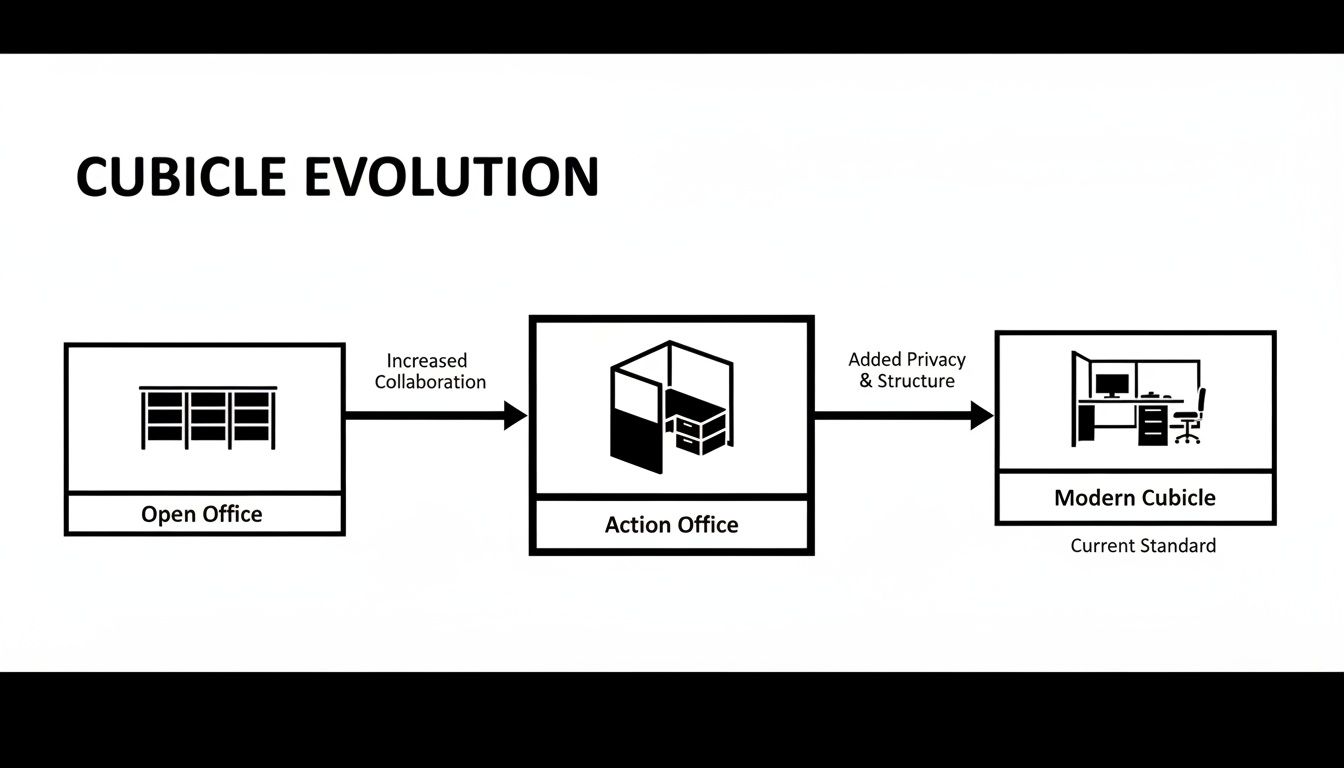
There's a clear trend here: finding that sweet spot between personal space and an efficient layout. That’s pretty much the core principle of modern office design.
When you're knee-deep in planning a new office, it’s easy to get tunnel vision on the cubicles themselves. But a smooth move involves a lot more. For a seamless transition, it's worth following a comprehensive office relocation checklist to make sure no detail gets missed and your layout plan translates perfectly into the new space.
Essential Walkway Clearances
The space between the cubicles is just as critical as the space inside them. Walkways are the arteries of your office, and they need to be wide enough for comfortable movement, wheelchair access, and safe emergency exits. Anything less, and you've got a problem.
Think of your office layout like a small city grid. You’ve got your main streets and your smaller side alleys, and each needs a different amount of clearance.
The table below breaks down the key measurements you'll need to create a layout that is safe, accessible, and easy to navigate.
Office Layout Clearance and Spacing Guidelines
| Area Type | Minimum Recommended Width (Standard) | Minimum ADA Compliant Width | Planning Notes |
|---|---|---|---|
| Minor Walkways | 36 inches (44" preferred) | 36 inches | Paths between individual cubicles or small clusters. 44" feels much less cramped. |
| Major Thoroughfares | 44-48 inches | 60 inches | Main arteries to exits, break rooms, restrooms. 60" is required for two-way traffic and wheelchair turns. |
| Seated Employee Aisle | 36 inches | 36 inches | The space behind a seated person's chair to allow others to pass by. |
| Workstation Entrance | 32 inches | 32 inches | The opening into the cubicle itself must be wide enough for clear entry and exit. |
Getting these clearances right isn't just about ticking a box for compliance; it's about creating a stress-free environment. No one wants to feel like they're squeezing through a crowded maze just to get to the printer.
Strategic Layout Patterns
Once you've nailed down your clearances, you can start arranging your cubicles into patterns that actually make sense for your workflow. Don't just line them up in boring rows. Consider configurations that encourage teamwork and make the most of your square footage.
- Quad Clusters: Grouping four cubicles in a square is a classic for a reason. It creates a natural team pod, making it easy for colleagues to communicate while still having their own defined space.
- Pinwheel Layouts: This is a smart twist on the quad cluster where desks are offset. It creates a more dynamic look and gives each person a bit more privacy. It’s a great way to break up the monotony of a large office floor.
- Spine-and-Ribs: In this setup, a central "spine" of panels runs down a line, with individual workstations branching off like ribs. This layout is incredibly efficient for organizing power and data cabling.
For a deeper dive into these and other smart setups, our guide to office space planning and design offers expert advice to help you find the perfect fit.
The Role of Panel Height
Panel height is one of the most powerful—and often overlooked—tools you have for shaping your office culture. The height of the walls dictates the level of privacy and collaboration, and you can use different heights to your advantage.
- Low Panels (42 inches): These are perfect for highly collaborative teams. They create a sense of personal territory without blocking sightlines, so asking a quick question or sharing an idea is effortless. You'll often see these in sales or creative departments.
- Mid-Height Panels (53 inches): This is the sweet spot for many general office roles. It offers seated privacy, letting employees focus without visual distractions, but they can still easily see and talk to colleagues just by standing up.
- Tall Panels (65 inches or higher): For roles that demand deep concentration or confidentiality, like HR or finance, tall panels are a must. They create a true semi-private office, blocking both visual and auditory distractions far more effectively.
By mixing and matching panel heights, you can create distinct zones within your office—an open, buzzing area for teamwork alongside quiet, focused sections for individual work. This kind of thoughtful approach ensures every team has the right environment to thrive.
Looking Beyond Dimensions to Essential Features
A truly effective workstation is more than just its footprint. While the typical office cubicle size sets the foundation, the real magic happens when you get the features inside that space right. Planning for these details from the start is what separates a frustrating setup from a productive one.
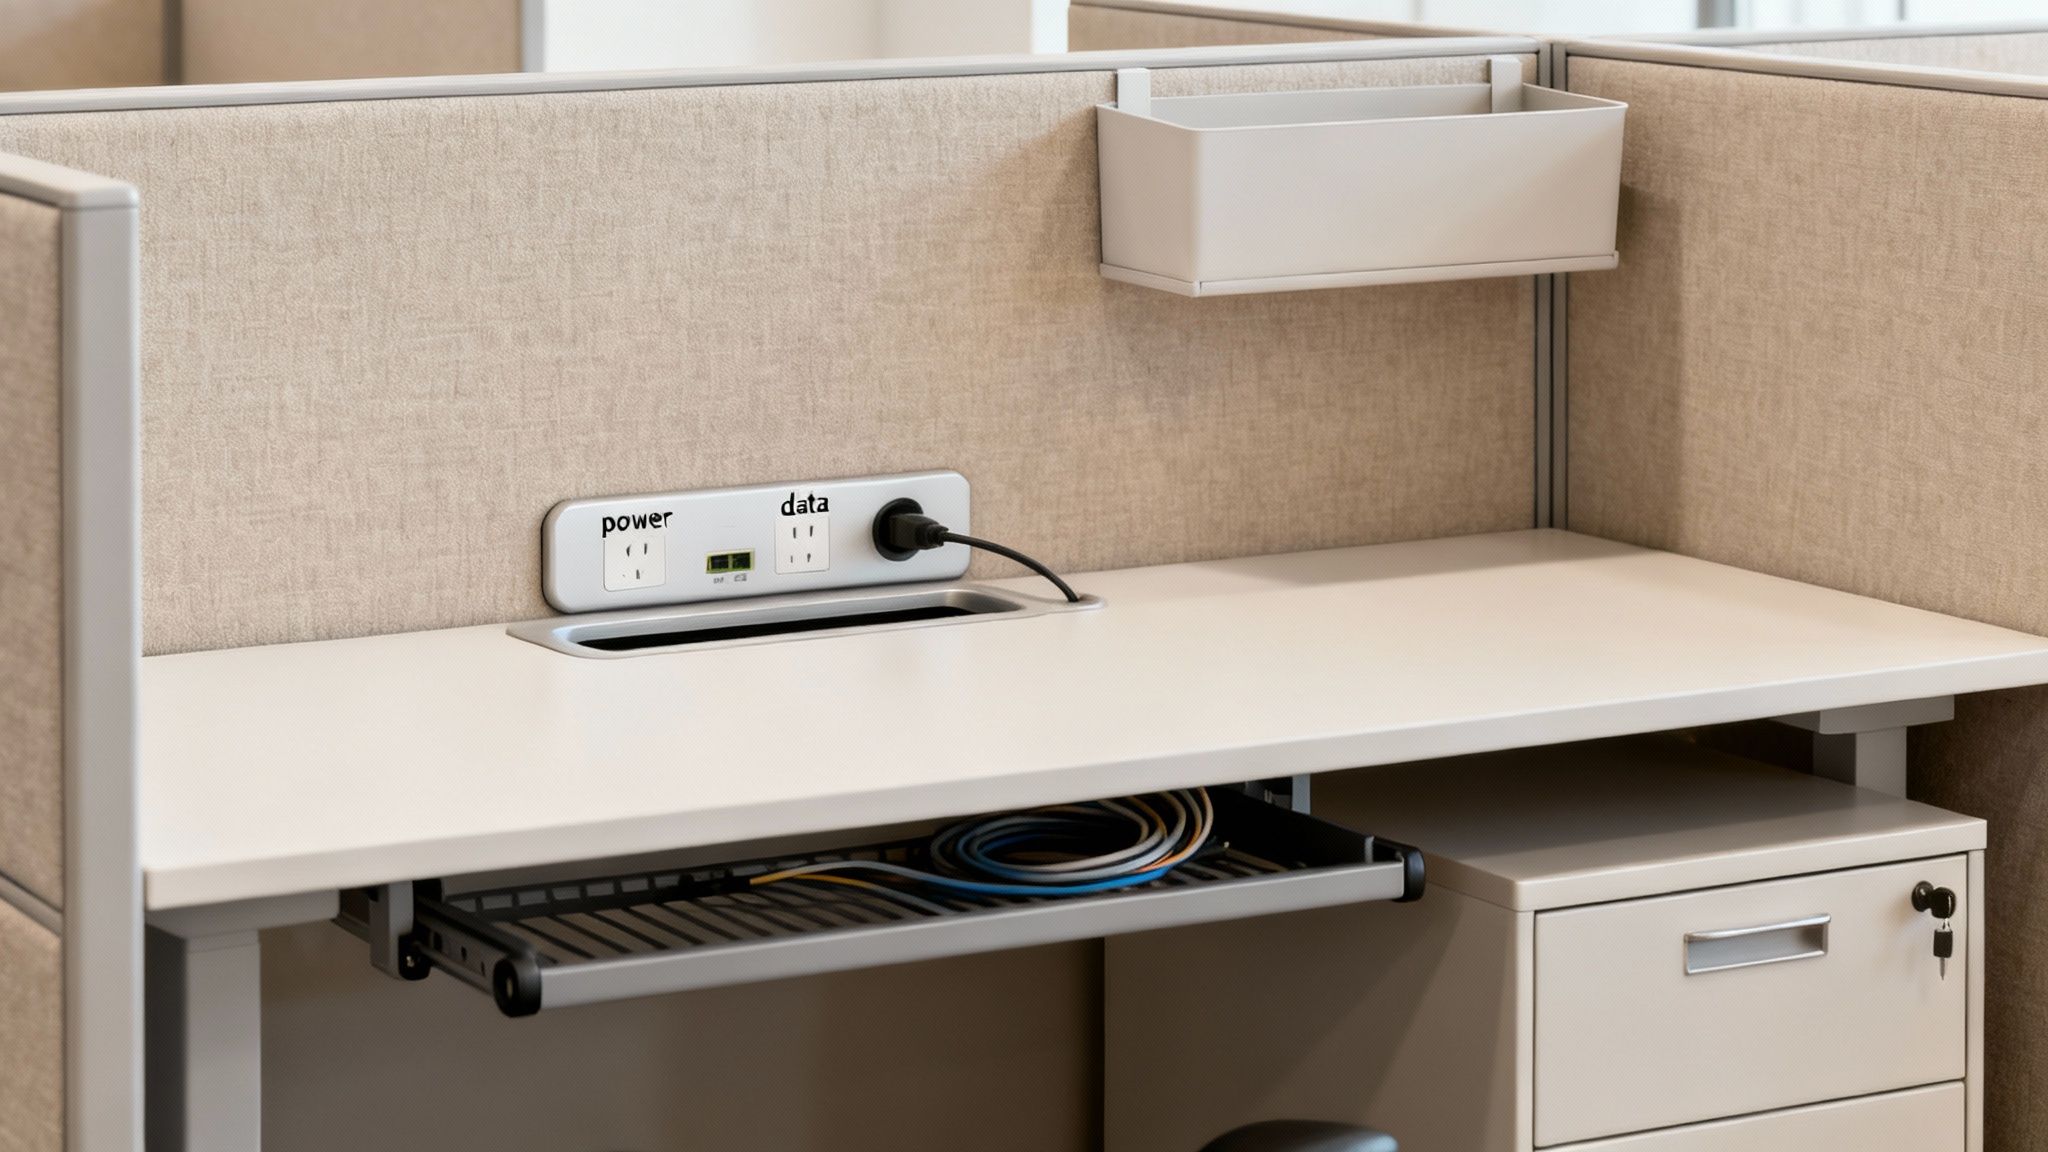
The single most common oversight? Power and data. In any modern office, seamless connectivity is completely non-negotiable. Waiting until after the cubicles are installed to figure out wiring is a surefire recipe for messy extension cords, tripping hazards, and a whole lot of headaches.
Planning for Power and Data
Integrating power from day one ensures every employee has the juice they need to stay productive. It’s a make-or-break decision that impacts both the cleanliness of your layout and your final budget.
There are two main ways to get power and data flowing to your cubicle clusters:
- Power Poles: Think of these as vertical channels that run from the ceiling down to the cubicle panels. They're a fantastic solution for open office plans where wall outlets are nowhere in sight, offering a clean, direct power source.
- Base-In Feeds: This approach brings power and data in from the wall or floor right through the base of the cubicle panels. It’s often a more discreet option that keeps every wire completely hidden from view for a tidier, more professional look.
Both methods can be configured to support multiple electrical circuits, making sure that power-hungry equipment doesn't trip a breaker. Talking through your team's specific needs with a specialist like Cubicle By Design can help you figure out the most efficient and code-compliant solution for your building.
Maximizing Space with Smart Storage
Even in a roomy 6'x8' workstation, bad storage can make the space feel cluttered and chaotic. The real goal is to build in storage that works with the cubicle's dimensions, not against them.
Think of smart storage as a way to reclaim precious desktop real estate. Instead of letting papers and supplies pile up, integrated solutions keep everything organized and within easy reach.
A well-planned storage system can increase a cubicle's functional workspace by up to 30%, transforming a standard footprint into a highly efficient command center.
Here are some of the most effective storage workhorses for any cubicle size:
- Pedestals: These under-desk filing cabinets, often called "peds," are the backbone of cubicle storage. A box/box/file setup is perfect for everyday items, while a file/file configuration is better for roles that handle a lot of documents.
- Overhead Bins: Going vertical with your storage is the smartest move you can make. Overhead bins and shelves get less-used items like binders and manuals off the desk but keep them easily accessible.
- Wardrobe Towers: For larger cubicles, a wardrobe tower is a great addition. It provides a dedicated spot for coats, bags, and personal items, keeping the main work area free of clutter.
Working these solutions into your initial plan helps create a more organized and productive environment from the get-go. For instance, our Private Office Cubicles and versatile Workstation Cubicles can be fully customized with the perfect mix of storage for any job.
The Impact of Materials and Finishes
Finally, don't underestimate how much your choice of materials can shape the entire atmosphere of your office. The fabrics, laminates, and glass you pick for your cubicle panels do a lot more than just add color—they affect light, sound, and the overall vibe of the workspace.
- Fabric Panels: Fabric is a champ at sound absorption, helping to muffle ambient noise in a busy office. With a huge range of colors, it’s also an easy way to bring your brand identity into the space.
- Laminate Surfaces: Durable and a breeze to clean, laminate desktops and panels offer a sleek, modern look. You can add warmth with wood grain finishes or go for a clean, contemporary feel with solid colors.
- Glass Panels: Adding frosted or clear glass panels to the top of cubicle walls is a game-changer. It lets natural light filter through the office, making the whole space feel brighter and more open without sacrificing privacy.
Visualize Your Perfect Layout with Our Cubicle Designer
Alright, you've done the homework on typical office cubicle sizes. Now for the fun part: bringing your vision to life. Moving from ideas on paper to a concrete plan can feel like a big step, but it doesn't have to be intimidating. This is exactly why we created the free Cubicle Designer tool right here at Cubicle By Design.
Think of our designer as your personal digital sandbox for laying out your office. It’s a completely risk-free environment where you can play around with different workstation footprints, test-drive various configurations, and see exactly how your choices will look and feel—all before spending a dime.
Turn Ideas into Actionable Plans
The real magic of a tool like this is that it completely eliminates guesswork. Instead of just trying to imagine how a pod of 6'x6' workstation cubicles might fit into a corner, you can actually build it out virtually. This hands-on approach helps you dial in your budget, get buy-in from stakeholders, and just feel more confident in your decisions.
As you get into the design phase, it's always a good idea to explore features of office planning tools to see what's possible. Our designer makes it simple by letting you tweak all the important details in real-time.
- Experiment with Dimensions: Want to see how a standard 6'x6' compares to larger private office cubicles? Drop them into your floor plan and see how it affects traffic flow and overall space.
- Select Finishes and Materials: Browse through a huge palette of fabrics, laminates, and glass options to find the perfect match for your company's vibe.
- Configure Storage and Power: Add the practical stuff that makes a workstation actually work, like overhead bins, filing pedestals, and integrated power, with just a few clicks.
This screenshot from our Custom Cubicle Designer gives you a peek at how easy it is to select panel fabrics and worksurface finishes to create a cohesive, professional look.
Seeing these details come together visually ensures the final product is a perfect fit for both your brand and your team's day-to-day needs.
From Visualization to Reality
Once you’ve nailed down the perfect design, turning it into a real-world office is a seamless next step. The tool lets you submit your creation directly to our team, and we'll get a fast, no-obligation quote right back to you. We designed this direct path from learning to creating to save you a ton of time and make the whole process smoother.
Ready to start building? For a deeper dive into getting the most out of this powerful tool, check out our guide on how to transform your office with our interactive cubicle designer.
Common Questions About Office Cubicle Sizes
Even with a solid plan in hand, a few last-minute questions always seem to pop up before you finalize an office layout. Getting these details right is what turns a good design into a great one that's not just efficient, but genuinely functional for the long haul.
We've pulled together the most common queries we hear. These usually revolve around the space between the cubicles, how to encourage teamwork without creating a free-for-all, and whether you can mix and match different sizes. Let's get you the clarity you need to move forward with confidence.
How Much Space Do I Need Between Cubicles?
This is one of the most critical parts of any layout. Walkway clearance isn't just a "nice-to-have"—it's a non-negotiable for safety, accessibility, and the simple comfort of moving around the office. If you skimp here, you'll end up with a cramped, frustrating environment nobody wants to work in.
To keep it simple, just stick to these rules of thumb:
- Standard Walkways: For the smaller paths between individual workstations or small groups, you need a minimum of 36 to 44 inches. This gives one person enough room to walk by comfortably without bumping into someone who's seated.
- Main Pathways & ADA: For any main artery—think paths to exits, the break room, or conference areas—you must provide at least 60 inches of clearance. This wider space is an ADA requirement to accommodate wheelchair turning and ensures your office is accessible to everyone.
Planning for generous walkways from the start is one of the smartest (and free-est) investments you can make in your office design. It pays huge dividends in daily comfort and safety.
What's the Best Cubicle Size for Collaboration?
You don't have to tear down all the walls to get people talking. The trick is to find that sweet spot where communication can happen organically, but people can still get their focused work done. The best setups for collaboration are usually a smart mix of the right cubicle size and panel height.
For teams that need to be in constant contact, like a sales or marketing group, a 6'x6' cubicle is often perfect. It gives everyone enough personal space to breathe but keeps them close enough to connect. The real secret weapon, though, is using lower panel walls, typically between 42 and 53 inches high. This height gives you privacy when you're sitting down but makes it easy to pop your head up for a quick, over-the-wall conversation.
Check out our workstation cubicles to see some great examples of these collaborative setups.
Can I Mix Different Cubicle Sizes in the Same Office?
Absolutely! In fact, we highly recommend it. Mixing cubicle sizes is one of the most effective ways to create a dynamic workspace that actually reflects how your company operates. A varied layout lets you match the workstation to the job, which makes for a more efficient and visually interesting office.
For instance, you could line the perimeter with larger 8'x8' private office cubicles for managers who need space for private meetings. Then, in the middle, you could arrange pods of 6'x6' cubicles for teams that work together all day. This approach not only supports different work styles but also helps create a natural flow and hierarchy in the office. Just make sure you keep those walkway clearances consistent to keep the whole floor plan feeling cohesive.
Ready to turn these ideas into a concrete plan? The team at Cubicle By Design is here to help you navigate every step, from the first sketch to the final installation. Get started by exploring our solutions or jump right in and start building your ideal layout.
Design Your Dream Office with Our Free Cubicle Designer Tool