
When you’re laying out an office, there are a few standard cubicle sizes that have become the go-to for a reason. The most common footprints you’ll see are 6’x6′ (36 sq. ft.), 6’x8′ (48 sq. ft.), and 8’x8′ (64 sq. ft.). These three sizes are pretty much the industry standard, giving you a solid, scalable starting point for anything from a high-density call center to more spacious setups for managers.
Getting the size right from the beginning is one of the most important first steps you can take in planning your office space. It impacts everything that comes after. At Cubicle By Design, we help businesses find the perfect fit every day.
Why Standard Dimensions Matter for Your Office
Sticking with standard dimensions when you’re planning an office layout has some major upsides, especially when it comes to cost, flexibility, and just plain efficiency. There’s no need to reinvent the wheel. These tried-and-true footprints give you a reliable foundation for building a productive work environment. For most businesses, cubicles are going to fall somewhere in that 36 to 64 square foot range.
Planning an Office Upgrade? Design Your Ideal Workspace in 3D.
From space-saving collaborative benches to high-privacy acoustic cubicles, you don’t have to guess how your new furniture will fit. Skip the generic floor plans and visualize your exact layout instantly with our interactive tool.
Choosing from these common sizes makes everything easier, from figuring out your budget to planning for future growth. It creates a modular, predictable system that can change right along with your team or workflow.
This infographic gives a quick breakdown of which roles are typically best suited for each standard cubicle size.
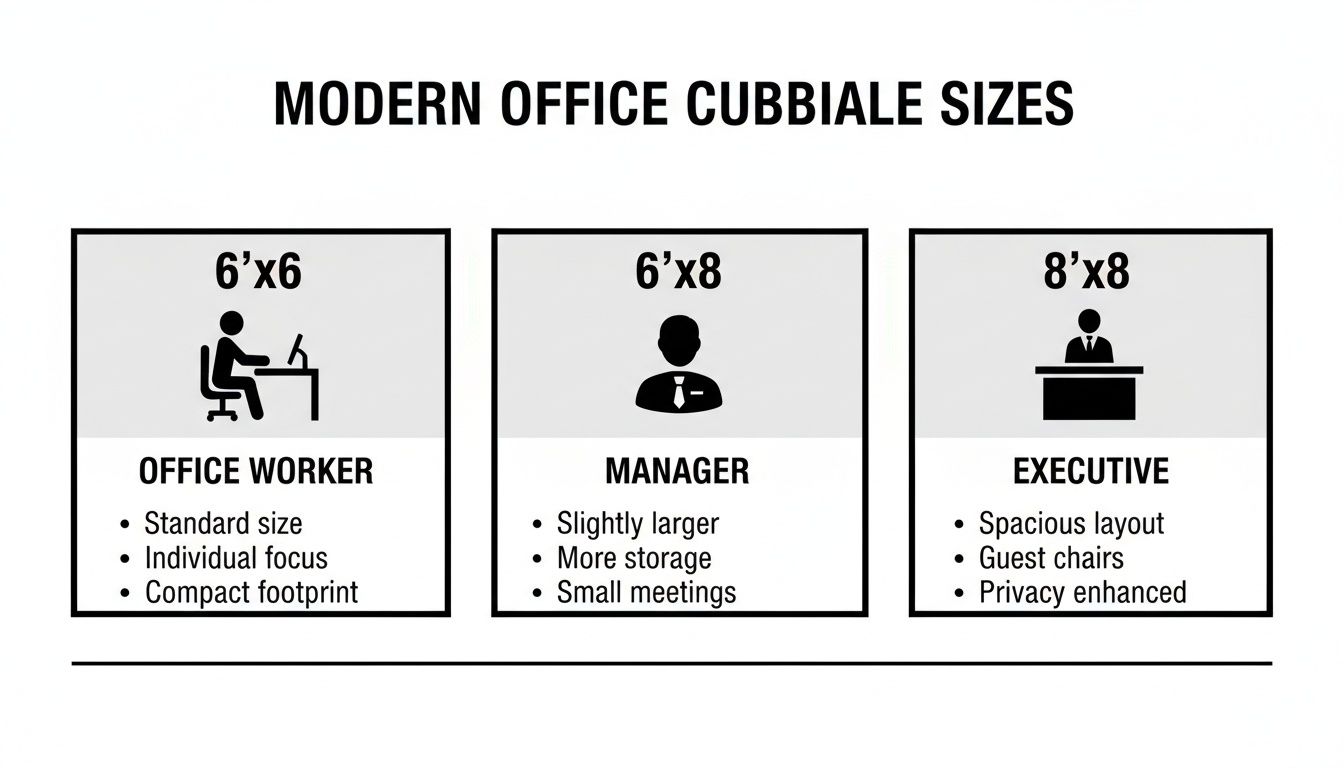
As you can see, the workstation’s footprint grows with the needs of the job, scaling up from a compact, efficient space to one large enough for holding small, private meetings.
For a quick reference, here’s a simple table summarizing the most common footprints.
Standard Office Cubicle Footprints At A Glance
| Footprint (Width x Depth) | Square Footage | Common Use Case | Recommended Panel Height |
|---|---|---|---|
| 6′ x 6′ | 36 sq. ft. | Call centers, data entry, high-density task work | 42″ – 53″ |
| 6′ x 8′ | 48 sq. ft. | Administrative staff, cubicles with guest seating | 53″ – 65″ |
| 8′ x 8′ | 64 sq. ft. | Managers, supervisors, employees needing more storage | 65″ or higher |
This table gives you a great starting point for matching a cubicle’s physical space to the actual work being done inside it.
The Benefits of Using Standard Sizes
Working with established dimensions brings some real advantages for anyone managing a facility or running a business.
- Cost-Effectiveness: Manufacturers produce standard-sized panels and surfaces in massive quantities. That volume almost always means a lower cost per station compared to fully custom solutions.
- Simplified Space Planning: When you’re working with predictable footprints, laying out a floor plan is much faster and more straightforward. You can easily figure out your office’s capacity and make sure you have proper walkways.
- Future-Proof Flexibility: A modular system based on standard sizes means you can reconfigure, add on, or move workstations with way less hassle as your business needs change down the road.
At the end of the day, getting a handle on these core dimensions is the first real step toward creating a workspace that works for you now and can adapt for the future. For a deeper look at all the layout possibilities, check out our guide on cubicle configurations.
A Practical Look at Core Workstation Footprints
Numbers on a floor plan are one thing, but understanding how a cubicle footprint actually works in a real office is what matters. Each standard size isn’t arbitrary; it’s been refined over years to suit specific roles, balancing how much space you use with how comfortable your team is. The goal is simple: match the cubicle’s square footage to the day-to-day tasks of the person using it.
Getting this right affects everything—from an employee’s workflow and focus to office acoustics and even team dynamics. A layout that’s too tight can kill concentration, but one that’s too spread out is just a waste of expensive real estate. Let’s break down the three most common office cubicles standard dimensions to see how they play out in the real world.
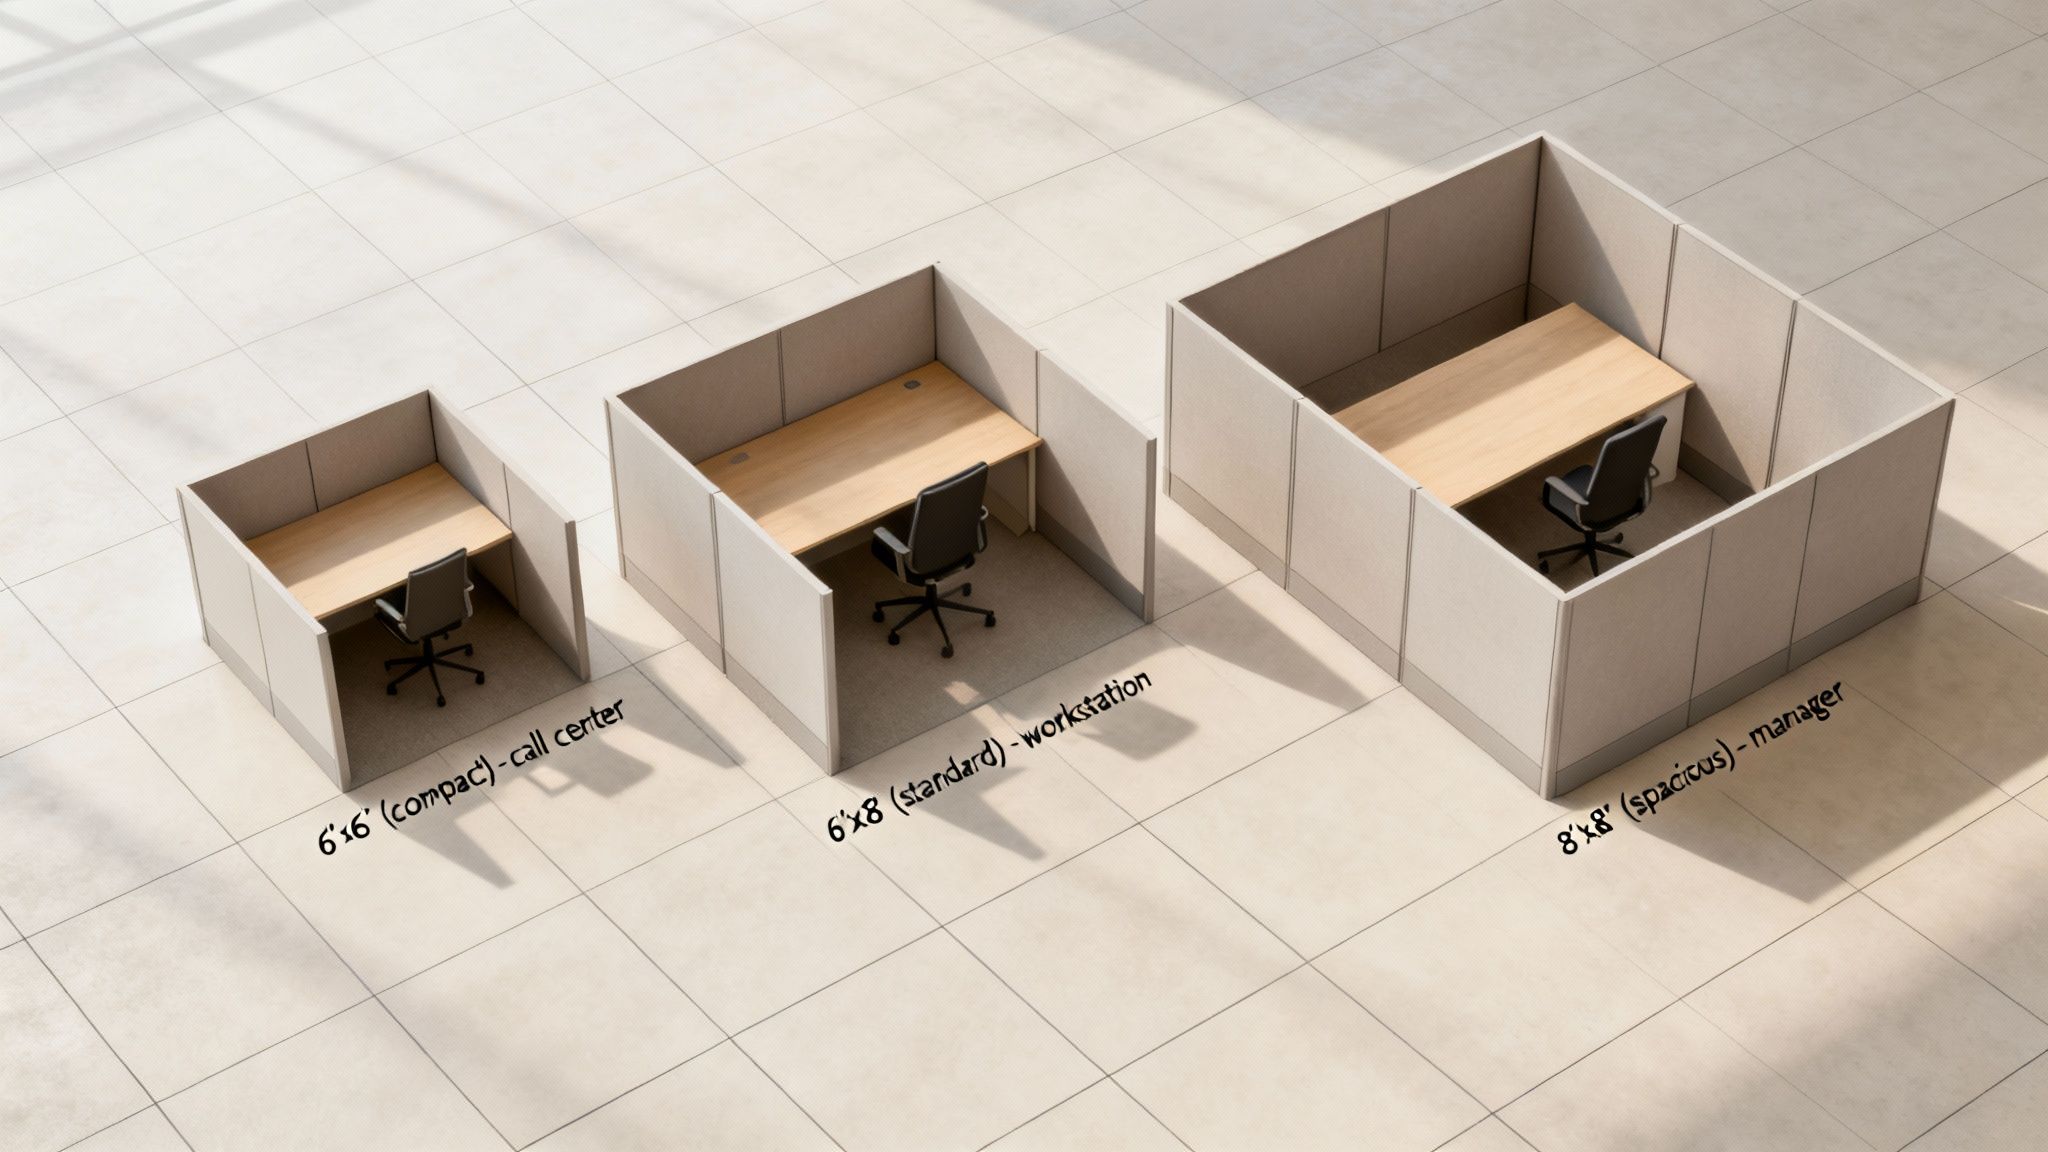
The Compact And Efficient 6×6 Cubicle
There’s a reason the 6’x6′ cubicle is the workhorse of the modern office. Clocking in at 36 square feet, it hits that sweet spot for high-density setups where getting the most out of your floor plan is the top priority.
- Best For: Call centers, data entry teams, and touchdown stations for hybrid or remote staff who are only in the office part-time.
- Pros: It’s the most space-efficient option, period. You can fit more people per square foot, which keeps costs down and makes planning layouts for large, open offices much simpler.
- Cons: The compact space can feel a bit tight for anyone who juggles a lot of paperwork or needs multiple large monitors. There’s also not much room left over for personal items or a guest chair.
This footprint is really designed for focused, heads-down computer work where collaboration isn’t the main event. We see a lot of companies use the 6×6 as their go-to for general workstation cubicles because it’s such a versatile and practical starting point.
The Versatile 6×8 Workstation
By adding just 12 more square feet, the 6’x8′ cubicle delivers a serious upgrade in both comfort and utility. This size is often considered the perfect middle ground, adaptable enough for a huge range of professional roles.
That extra two feet of depth or width makes a world of difference. It easily allows for an L-shaped desk, more filing cabinets, or even squeezing in a small guest chair without making the space feel cramped. It’s a fantastic choice for employees who need a bit more elbow room to spread out their projects or keep reference materials handy.
The Spacious 8×8 Managerial Hub
At a generous 64 square feet, the 8’x8′ cubicle is a major step up. We typically see these reserved for managers, supervisors, or team members with specialized equipment needs. In practice, this size functions almost like a mini-office right on the main floor.
An 8×8 can comfortably house a U-shaped worksurface, plenty of storage, and proper seating for one-on-one meetings. The larger footprint is also what you need if you’re creating private office cubicles with taller panels, making them ideal for roles that demand confidentiality and frequent private conversations. When you start laying out these larger stations, it’s a good idea to consult an office space planning guide to make sure you’re leaving enough room for people to move around them comfortably. And while you’re thinking about footprints, don’t forget the floor itself; for anyone setting up a workspace at home, this guide to the Best Flooring for Home Office has some great pointers.
Choosing The Right Panel Height For Privacy And Collaboration
While a cubicle’s footprint defines the physical workspace, it’s the panel height that really dictates the atmosphere. This single dimension has a massive impact on privacy, ambient noise, and whether your teams collaborate naturally or stay siloed. Picking the right height is more than just a design choice—it’s a strategic move that directly shapes your company’s workflow and culture.
Generally, panel heights for office cubicles fall into three standard dimensions, each serving a different function. The most effective office layouts I’ve seen usually mix and match all three to create dedicated zones for different kinds of work. Getting a handle on these categories is the secret to balancing individual focus with team synergy.
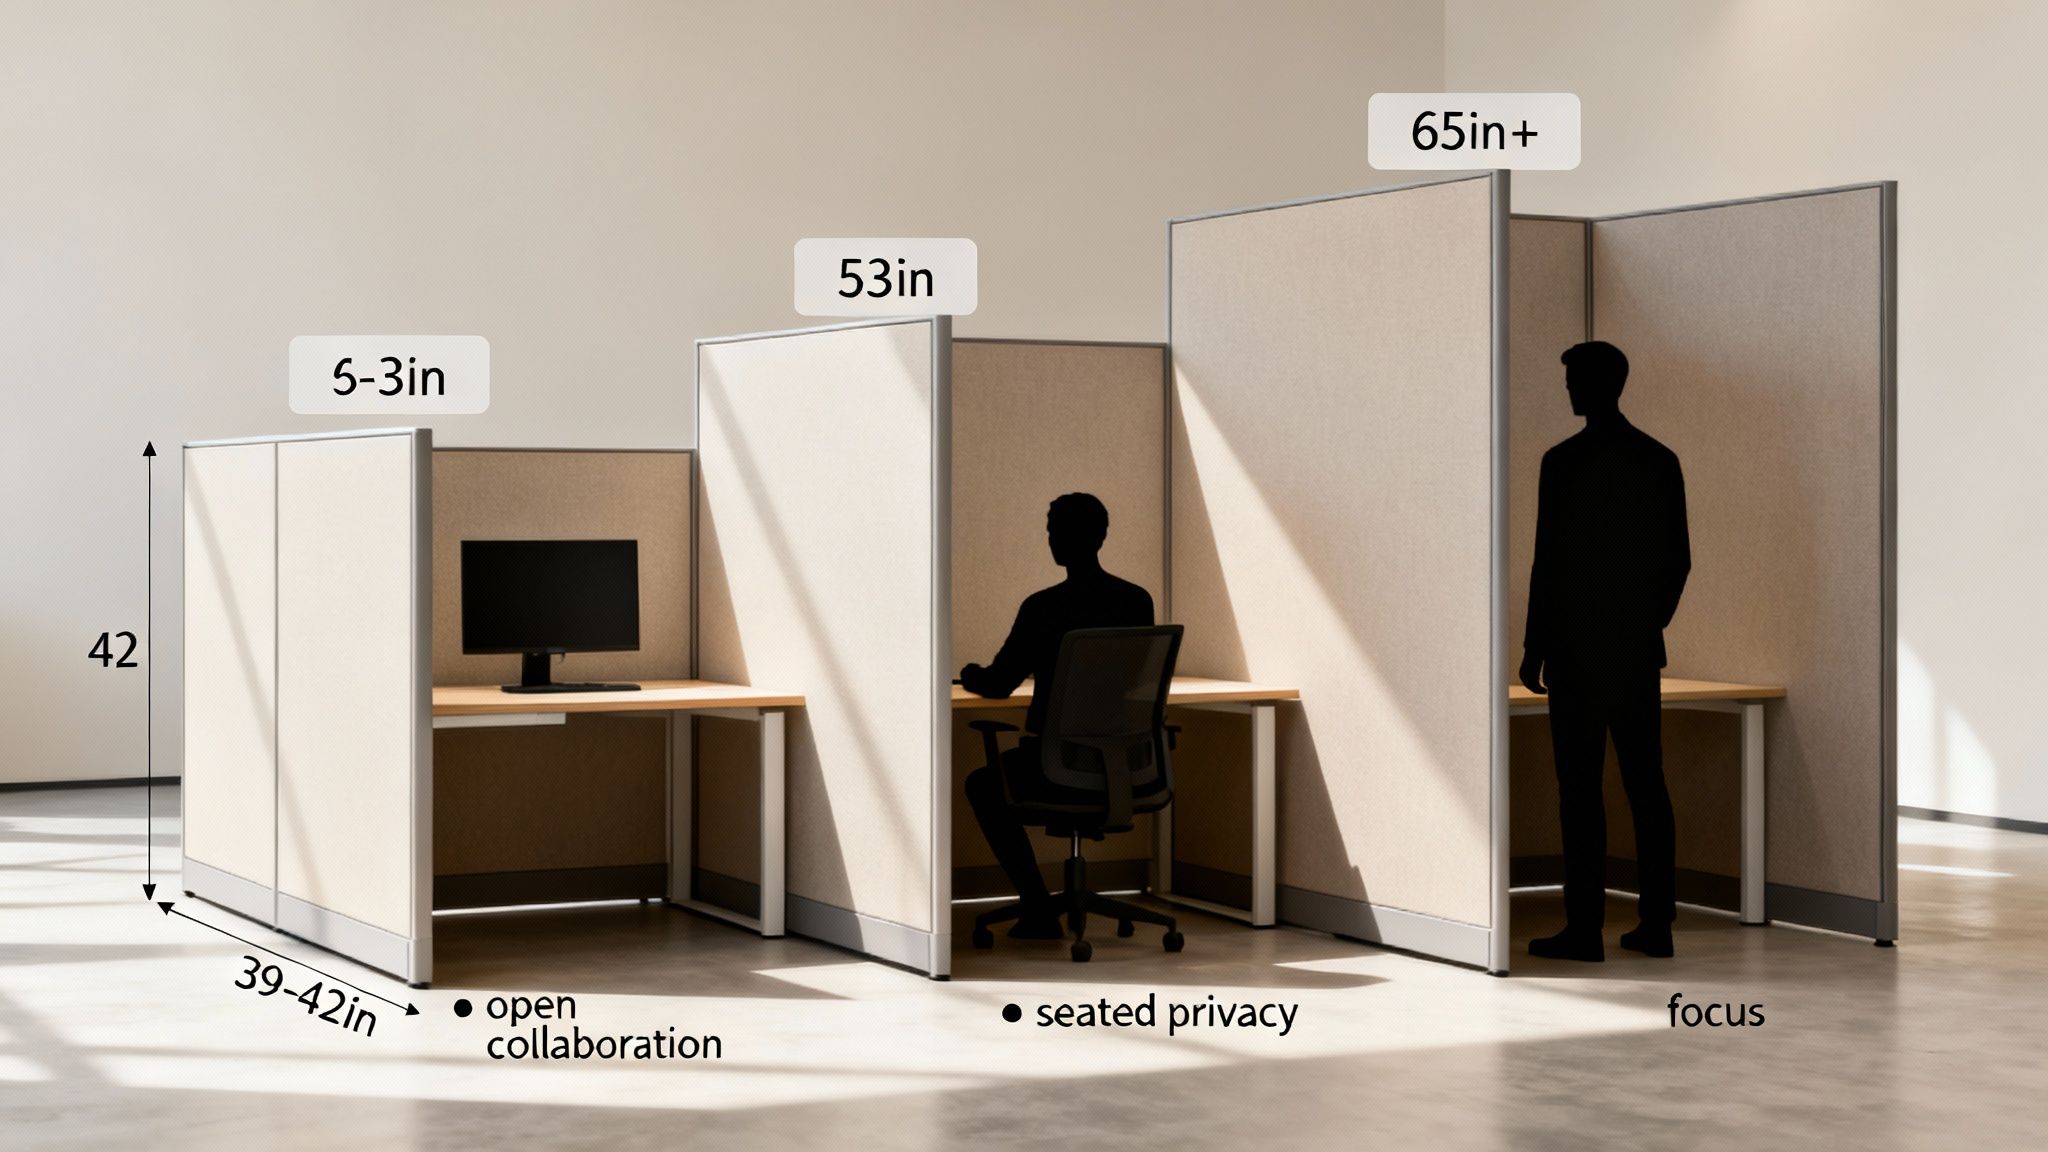
Low Panels For Open Collaboration
Low panels, which typically stand between 39 to 42 inches tall, are all about creating an open, connected environment. At this height, employees can easily see and talk to colleagues right from their chairs, making it a perfect fit for teams that run on constant communication.
- Best For: Sales teams, creative departments, and any project group that needs to bounce ideas off each other constantly.
- Key Benefit: These panels don’t just encourage teamwork; they also let natural light flow freely across the office, which makes the whole space feel brighter and more energetic.
- Consideration: The trade-off is pretty clear: you get minimal acoustic and visual privacy. This can be a major source of distraction for anyone trying to do deep, focused work.
Mid-Height Panels For Seated Privacy
Striking a great balance, mid-height panels usually measure around 53 inches tall. We often call this the “seated privacy” height because it blocks sightlines when an employee is sitting down but still allows them to see across the office when they stand up.
This is the sweet spot for many modern offices. It gives people the ability to concentrate on their own tasks without feeling totally walled off from their team. It’s a design that supports both focused work and easy accessibility.
This versatility makes 53-inch panels our most popular choice for general workstations, administrative roles, and any department that juggles independent tasks with occasional teamwork. It’s a simple, effective way to reduce visual clutter while keeping everyone connected. For a deeper look at creating the right level of separation, check out our guide on office cubicle privacy.
High Panels For Maximum Focus
When deep concentration is non-negotiable, high panels are the only way to go. Ranging from 65 inches and up, these walls provide serious visual and acoustic separation from the rest of the office.
High panels are essential for roles dealing with sensitive information or requiring long stretches of uninterrupted focus—think finance, HR, or legal departments. They effectively create a private bubble, minimizing both noise and visual distractions. Many companies use these taller panels to build out dedicated quiet zones or even full private office cubicles without the expense and hassle of permanent construction.
Navigating ADA Compliance For Accessible Workspaces
When you’re mapping out cubicle dimensions, you have to think beyond just comfort and productivity. Office layouts are governed by some very real legal requirements, namely the Americans with Disabilities Act (ADA) and local building codes. This isn’t just about being considerate—it’s a non-negotiable part of creating a workspace that’s safe and functional for every single employee. Trying to cut corners here is a recipe for hefty fines and expensive redesigns later on.
The smartest move is to plan for accessibility right from the get-go. This means looking past the footprint of a single workstation and thinking about how people actually move through the entire office. A layout that’s designed to be compliant from the start ends up benefiting everyone, creating a more open, spacious, and easy-to-navigate environment.
Key ADA Dimensional Requirements
While your local building codes might have their own quirks, the ADA sets a clear baseline for accessible design. As you plan your cubicle layout, these are the critical numbers you need to have baked into your design to make sure your space is truly open to all.
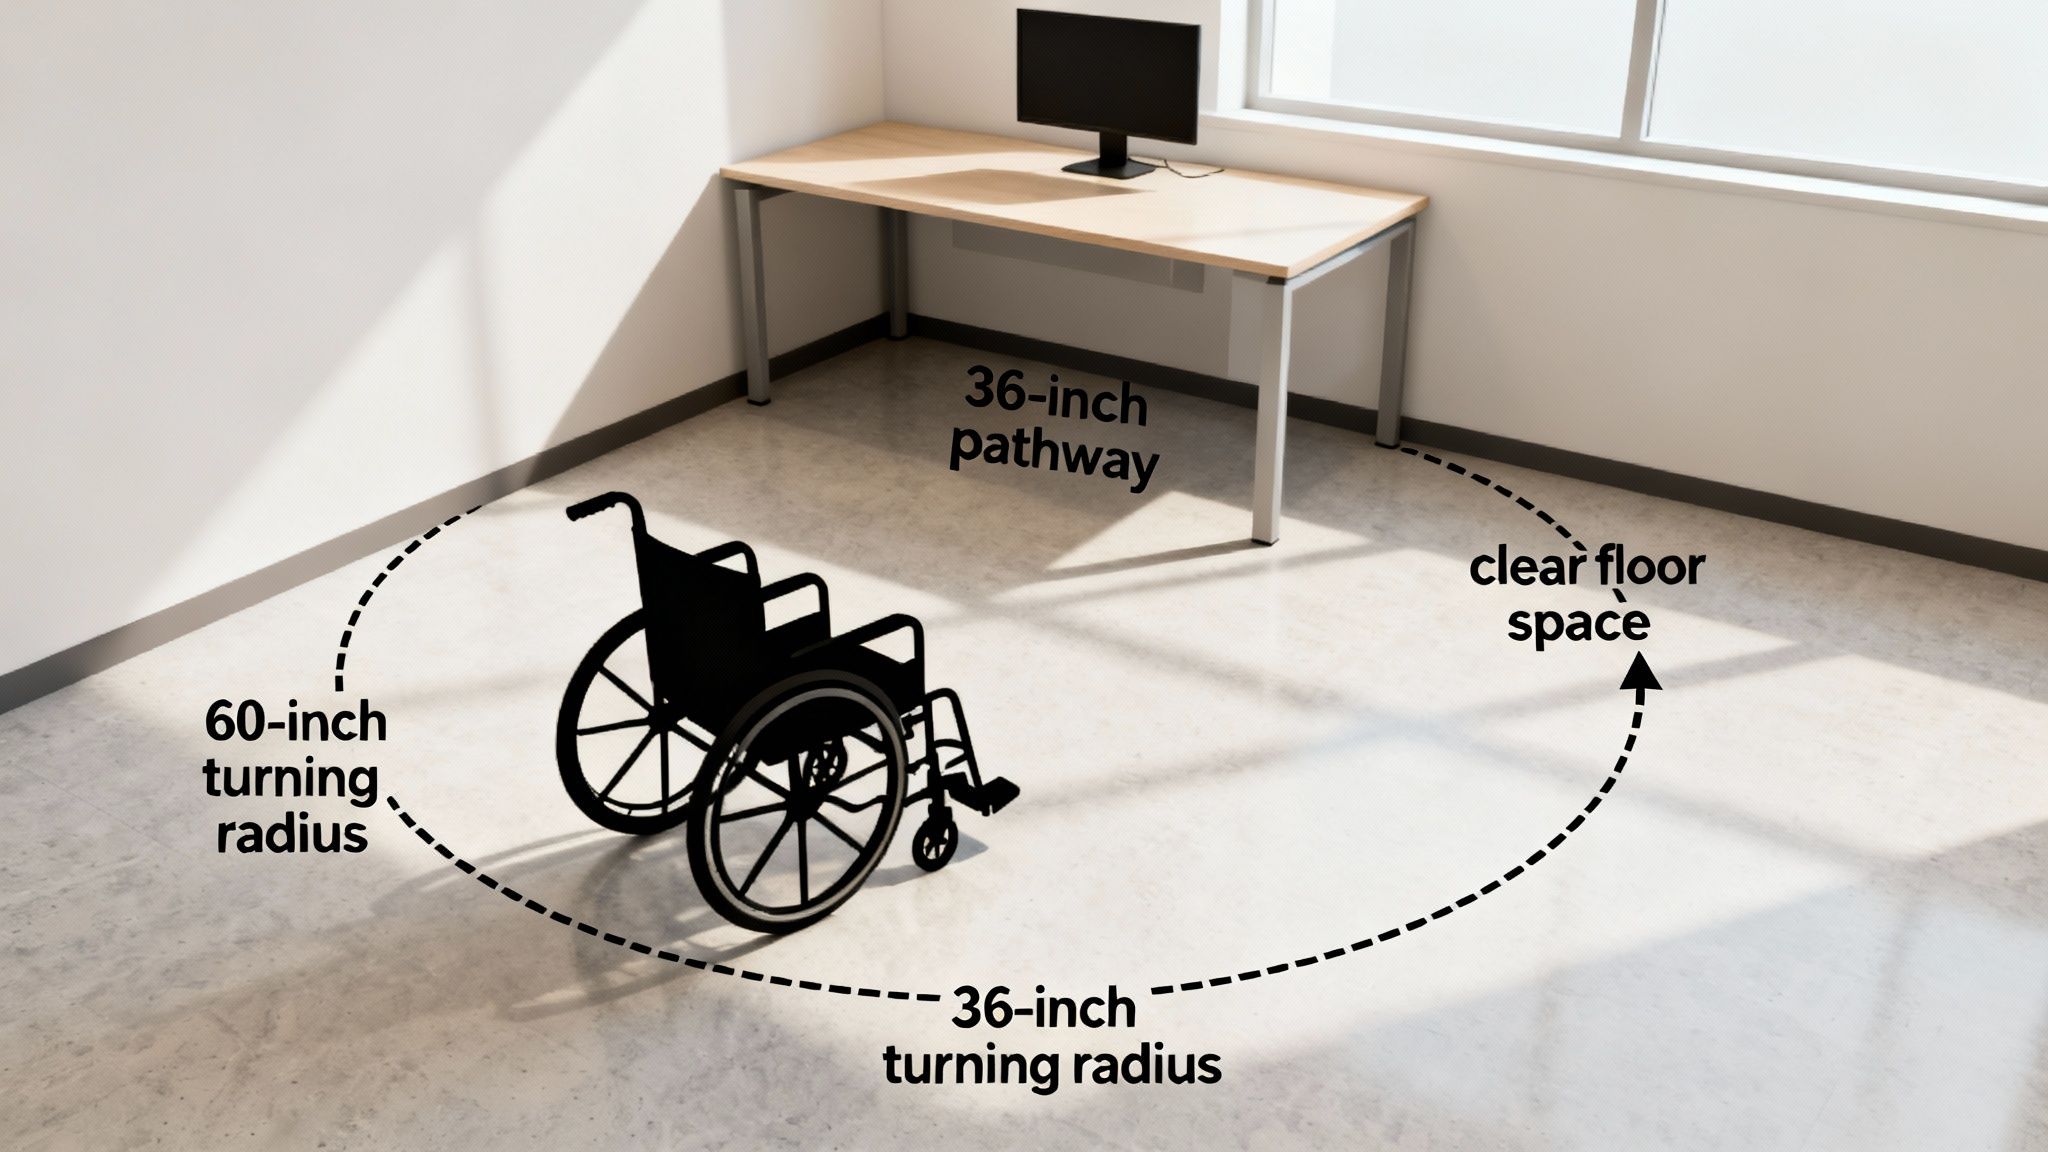
- Clear Pathway Width: Your main walkways and corridors need a minimum clear width of 36 inches. This is the absolute minimum to allow for wheelchair passage. For busier areas where people are likely to pass each other, we always recommend going up to 48 inches.
- Turning Space: Every accessible workspace needs a clear spot for turning around. The standard is a 60-inch diameter circle, which gives a person using a wheelchair enough room to complete a 180-degree turn without bumping into anything.
- Accessible Routes: The path to an accessible workstation has to be just as clear as the workstation itself. Make sure furniture, filing cabinets, or other items don’t jut out into that required clear width.
These rules have a direct impact on how small you can realistically make an accessible workstation. To accommodate the necessary clearances for turning and movement, you’re often looking at a footprint of at least 8’x8′ (64 sq. ft.) or larger. It’s simply what’s needed to create a usable, unobstructed space.
Weaving Accessibility Into Your Floor Plan
Getting these standards into your design is more than just dropping a bigger cubicle in a corner somewhere. It requires a holistic look at your entire office. You have to ensure that shared resources—like printers, break rooms, and conference areas—are all located along accessible routes.
An accessible office is simply a more effective office. When you design for everyone, you end up with a less cluttered, more functional environment that improves traffic flow and usability for the whole team, not just for those with mobility challenges.
Nailing these guidelines can be a complex job. Working with experts can take the guesswork out of the process and ensure your layout is fully compliant from day one. If you need some hands-on help, check out our professional office space planning and design services to make sure your workplace is set up for success.
Essential Space Planning Rules For Office Layouts
Getting the dimensions of a single cubicle right is one thing, but how your entire office flows is what truly makes or breaks the space. Good space planning isn’t just about cramming in as many desks as possible. It’s about creating an environment where people can move around, collaborate when they need to, and get their work done without constant interruption. This all starts with clear walkways and smart placement of common areas.
If you don’t nail down the basics of circulation, even the most thoughtfully designed cubicles will feel cramped and clumsy. Planning these paths correctly prevents bottlenecks and ensures your office is safe and accessible for every single person.
Defining Walkways And Clearances
To keep foot traffic moving smoothly, office layouts really need two different kinds of walkways, and each has its own minimum width.
- Major Walkways: Think of these as the main arteries of your office. They’re the primary routes from the entrance to different departments or to the emergency exits. A minimum width of 48 inches is the standard here. This gives enough space for two people to pass by each other comfortably and meets most accessibility codes.
- Minor Walkways: These are the smaller paths you find between rows of cubicles or between a desk and a wall. You absolutely need at least 36 inches of clearance to give a single person a clear path and allow employees to push their chairs back without blocking the way.
Sticking to these minimums is non-negotiable for a functional layout. Squeezing walkways to fit one more desk almost always backfires, leading to daily frustration and a cluttered feel that can hurt productivity.
As you map out your office and choose cubicle sizes, it’s critical to have a solid financial plan. For a deeper look into the costs involved, it’s worth reading up on understanding tenant improvement costs per square foot.
Strategically Placing Common Resources
Where you put shared equipment like printers, copiers, and break areas has a huge impact on your office’s workflow. It’s tempting to stick them in any open corner, but they really need to be in central, easy-to-reach spots.
The trick is to also keep them away from zones where people are trying to do deep, focused work. This simple step prevents noise and foot traffic from becoming a constant headache for employees who need to concentrate.
This table is a handy reference for the most critical clearances you’ll need to create a successful and code-compliant office design.
Minimum Clearance Checklist For Office Layouts
| Area/Element | Minimum Recommended Clearance | Reason |
|---|---|---|
| Main Aisle/Corridor | 48 inches (4 ft) | Allows for two-way traffic and wheelchair accessibility. |
| Minor Aisle | 36 inches (3 ft) | Provides a clear path for a single person. |
| Behind Seated Employee | 36 inches (3 ft) | Ensures enough room for chair pushback without blocking a walkway. |
| Facing a Wall/File Cabinet | 42 inches (3.5 ft) | Allows an employee to work and access drawers without feeling cramped. |
Customizing Your Space With The Cubicle Designer Tool
Standard dimensions are a great starting point, but let’s be honest—they’re just that, a start. Your office has its own quirks, its own workflow, and its own personality that an off-the-shelf solution can’t fully capture. This is where customization really makes a difference, letting you move beyond the basics to build an environment that truly works for you.
True optimization happens when you fine-tune your workstations to fit your team’s specific needs. By adjusting dimensions, finishes, and storage, you design a space that actively supports productivity and comfort, ensuring every square foot is pulling its weight.
Bringing Your Vision to Life
It’s one thing to read about different footprints and panel heights; it’s another to actually picture how they’ll look and feel in your own space. That’s a tough gap to bridge, which is why we offer a powerful, free online tool to put you in the driver’s seat. The interactive Cubicle Designer lets you experiment with layouts in real-time.
With this tool, you can take everything you’ve learned here and build a tangible plan. It lets you drag and drop components, play around with different configurations, and see exactly how your choices will come together.
Being able to pre-visualize your layout is a game-changer. It gets rid of the guesswork, prevents costly measurement mistakes, and makes sure the final installation is exactly what you envisioned.
Benefits of Using the Designer Tool
Hopping on a digital planning tool before you commit to an order offers some serious advantages for any office manager or business owner.
- Experiment Freely: You can test out different layouts for collaborative workstation cubicles or build high-privacy setups without any risk. See what fits and what doesn’t.
- Select Finishes: Browse through a wide range of fabrics, laminates, and trim colors to make sure everything lines up with your company’s brand and style.
- Generate a Precise Plan: When you’re done, you’ll have a detailed design our team can use to give you an accurate quote and make the installation process a whole lot smoother.
This tool is the essential bridge between knowing the standard sizes and creating a personalized, highly functional office. For a deeper dive, check out our guide on how to transform your office with our interactive cubicle designer.
Common Questions About Cubicle Dimensions
When you’re trying to figure out the world of office cubicle standard dimensions, it’s easy to get bogged down in the details. Getting straight answers to your questions is the key to designing a workspace that actually works—one that’s efficient, comfortable, and up to code. We get these questions all the time from office managers and business owners, so we’ve gathered the most common ones here.
Think of this as your quick reference guide. It builds on everything we’ve covered and acts as a final check to make sure you’ve thought through all the critical angles before you commit to a layout.
What’s The Most Popular And Versatile Cubicle Size?
Hands down, the 6’x8′ cubicle is the industry go-to. It’s seen as the most versatile and popular choice for most modern offices, and for good reason. At 48 square feet, it hits that sweet spot between giving an employee enough personal workspace without eating up your entire floor plan.
A 6’x8′ footprint can easily handle a standard desk, a good ergonomic chair, and necessary storage like a filing pedestal. There’s even plenty of room for a dual-monitor setup without making things feel tight. Its adaptability makes it a solid starting point for all kinds of general office roles, from administrative staff to project managers. It’s the footprint many of our clients begin with for their general workstation cubicles.
How Much Space Should I Leave For Walkways Between Cubicles?
This one is absolutely critical for both safety and accessibility, so don’t eyeball it. For any main walkways that get a lot of foot traffic, you need to plan for a minimum width of 48 inches. This gives enough room for two people to pass by each other without issue and keeps you in line with most ADA guidelines.
For smaller, secondary walkways—like the path between a row of cubicles and a wall—the absolute minimum is 36 inches. This ensures a clear, safe path for one person. But always, always double-check your local building codes. They have the final say and may have specific requirements for your building.
Can I Combine Different Panel Heights In My Office Layout?
Yes, you absolutely can, and you should! Mixing different panel heights is a smart and effective office design strategy. People often call it “zoning,” and it lets you create different kinds of work environments for different teams, all within the same open-plan office.
For instance, you could use tall panels (65″ or higher) to build quiet, focused zones for your finance or development teams. At the same time, you can use low panels (around 42″) for more collaborative groups like sales or marketing to keep communication open and easy. Mid-height panels are perfect for creating a transition between these areas.
This kind of strategic mix helps you support different work styles, which directly impacts productivity and keeps your team happy. If you’re planning zones that require high walls for real concentration, our private office cubicles can be a great modular option.
At Cubicle By Design, we know from experience that the right dimensions are the foundation of a better workplace. You don’t have to stick with standard sizes—let’s create a layout that’s perfectly suited to your team’s unique needs. Start bringing your ideal office to life today with our free, interactive tool.