Standard Office Cubicle Dimensions: A Practical Guide | Cubicle By Design

Choosing the right cubicle is one of the most important decisions when designing an office. What are the most common cubicle sizes? In the world of office furniture, the big three are 6'x6', 6'x8', and 8'x12'. You can think of these as the small, medium, and large options that have become industry standards over time. They didn't just become popular by chance; they represent the sweet spot between giving an employee enough personal space and making the most of your office floor plan. At Cubicle By Design, we help businesses find that perfect balance.

Decoding Standard Office Cubicle Dimensions

Picking the right cubicles can feel like a high-stakes game of Tetris, but it gets a lot easier once you understand the logic behind standard office cubicle dimensions. Don’t just see them as numbers on a page; these are the foundational building blocks of a productive, comfortable office. The footprint you choose has a ripple effect on everything, from individual focus to how easily your teams can collaborate.

Each of these standard sizes was designed with a specific type of work in mind. A compact 6'x6' is often perfect for focused, heads-down tasks, while a more spacious 8'x12' might be necessary for a manager who needs a small meeting area within their own space. It all comes down to the day-to-day reality of your team's roles and the gear they need to do their jobs.

(If you ever get stuck on the lingo, our handy guide to cubicle terminology is a great resource to keep in your back pocket.)

The Evolution of the Modern Cubicle

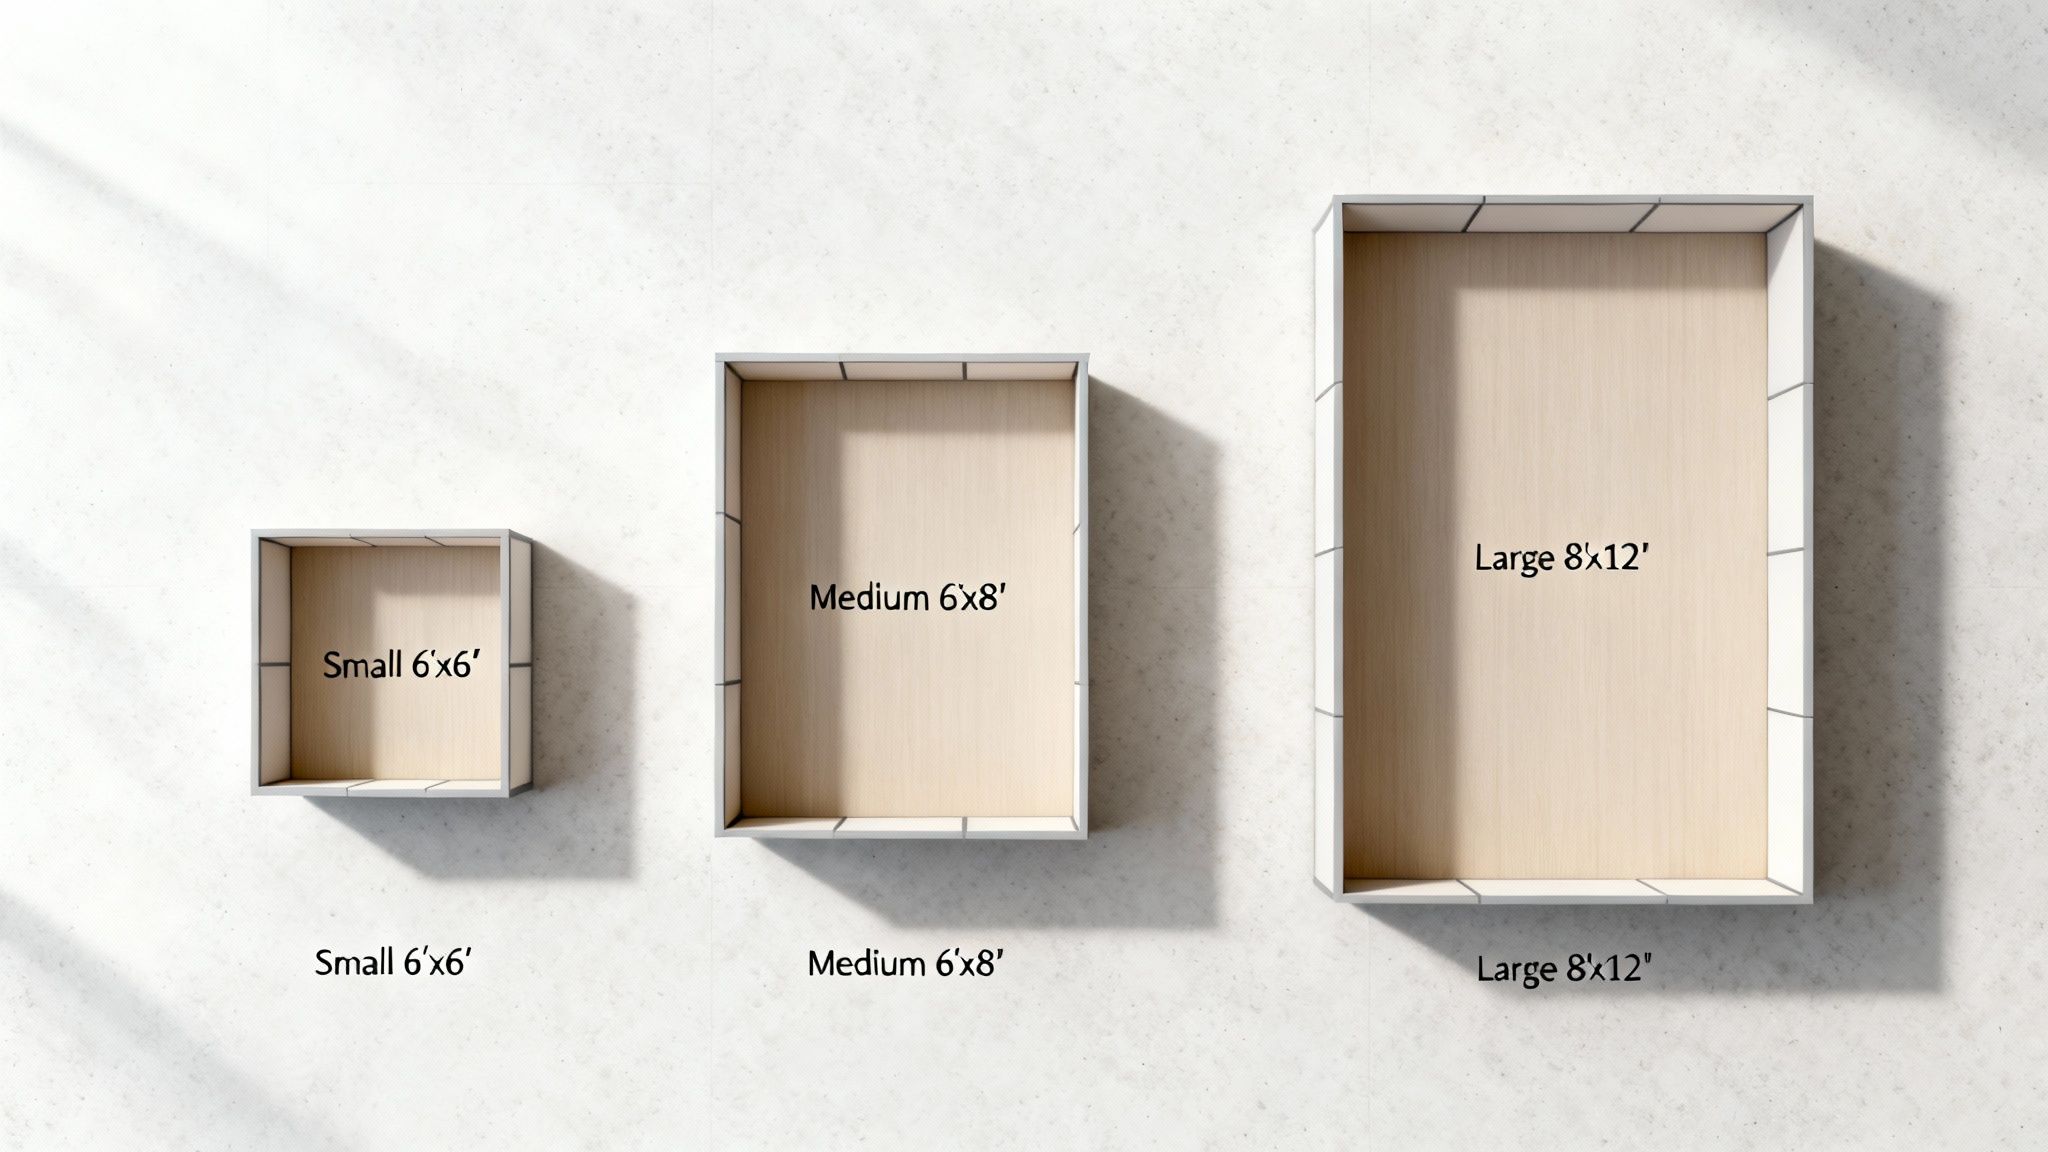
The ubiquitous 6'x6' cubicle is a product of decades of workplace evolution. At 36 square feet, it became the go-to choice because it strikes a practical balance between giving someone their own territory and fitting enough people on a floor.

The whole concept dates back to the 'Action Office II' in 1968, which was a pretty revolutionary idea for flexible, modular workspaces. But by the 1980s, corporate cost-cutting took over. That idealistic vision morphed into the dense "cube farms" many of us picture, with companies shrinking footprints down to 4.5'x4.5' just to pack 30-40% more people in, often at the expense of comfort.

The right cubicle footprint is more than just a measurement; it's a strategic decision that shapes your office culture, workflow, and employee satisfaction. It defines the boundary between personal focus and team interaction.

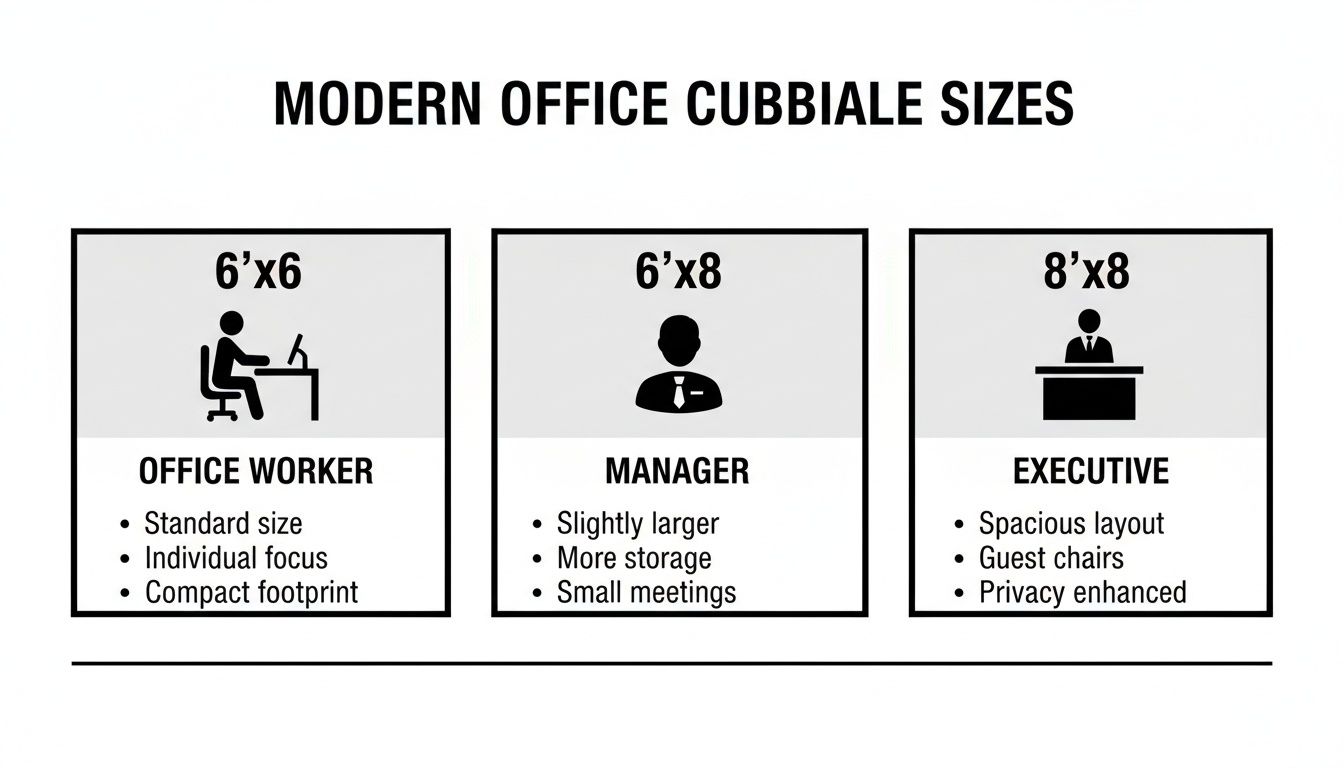
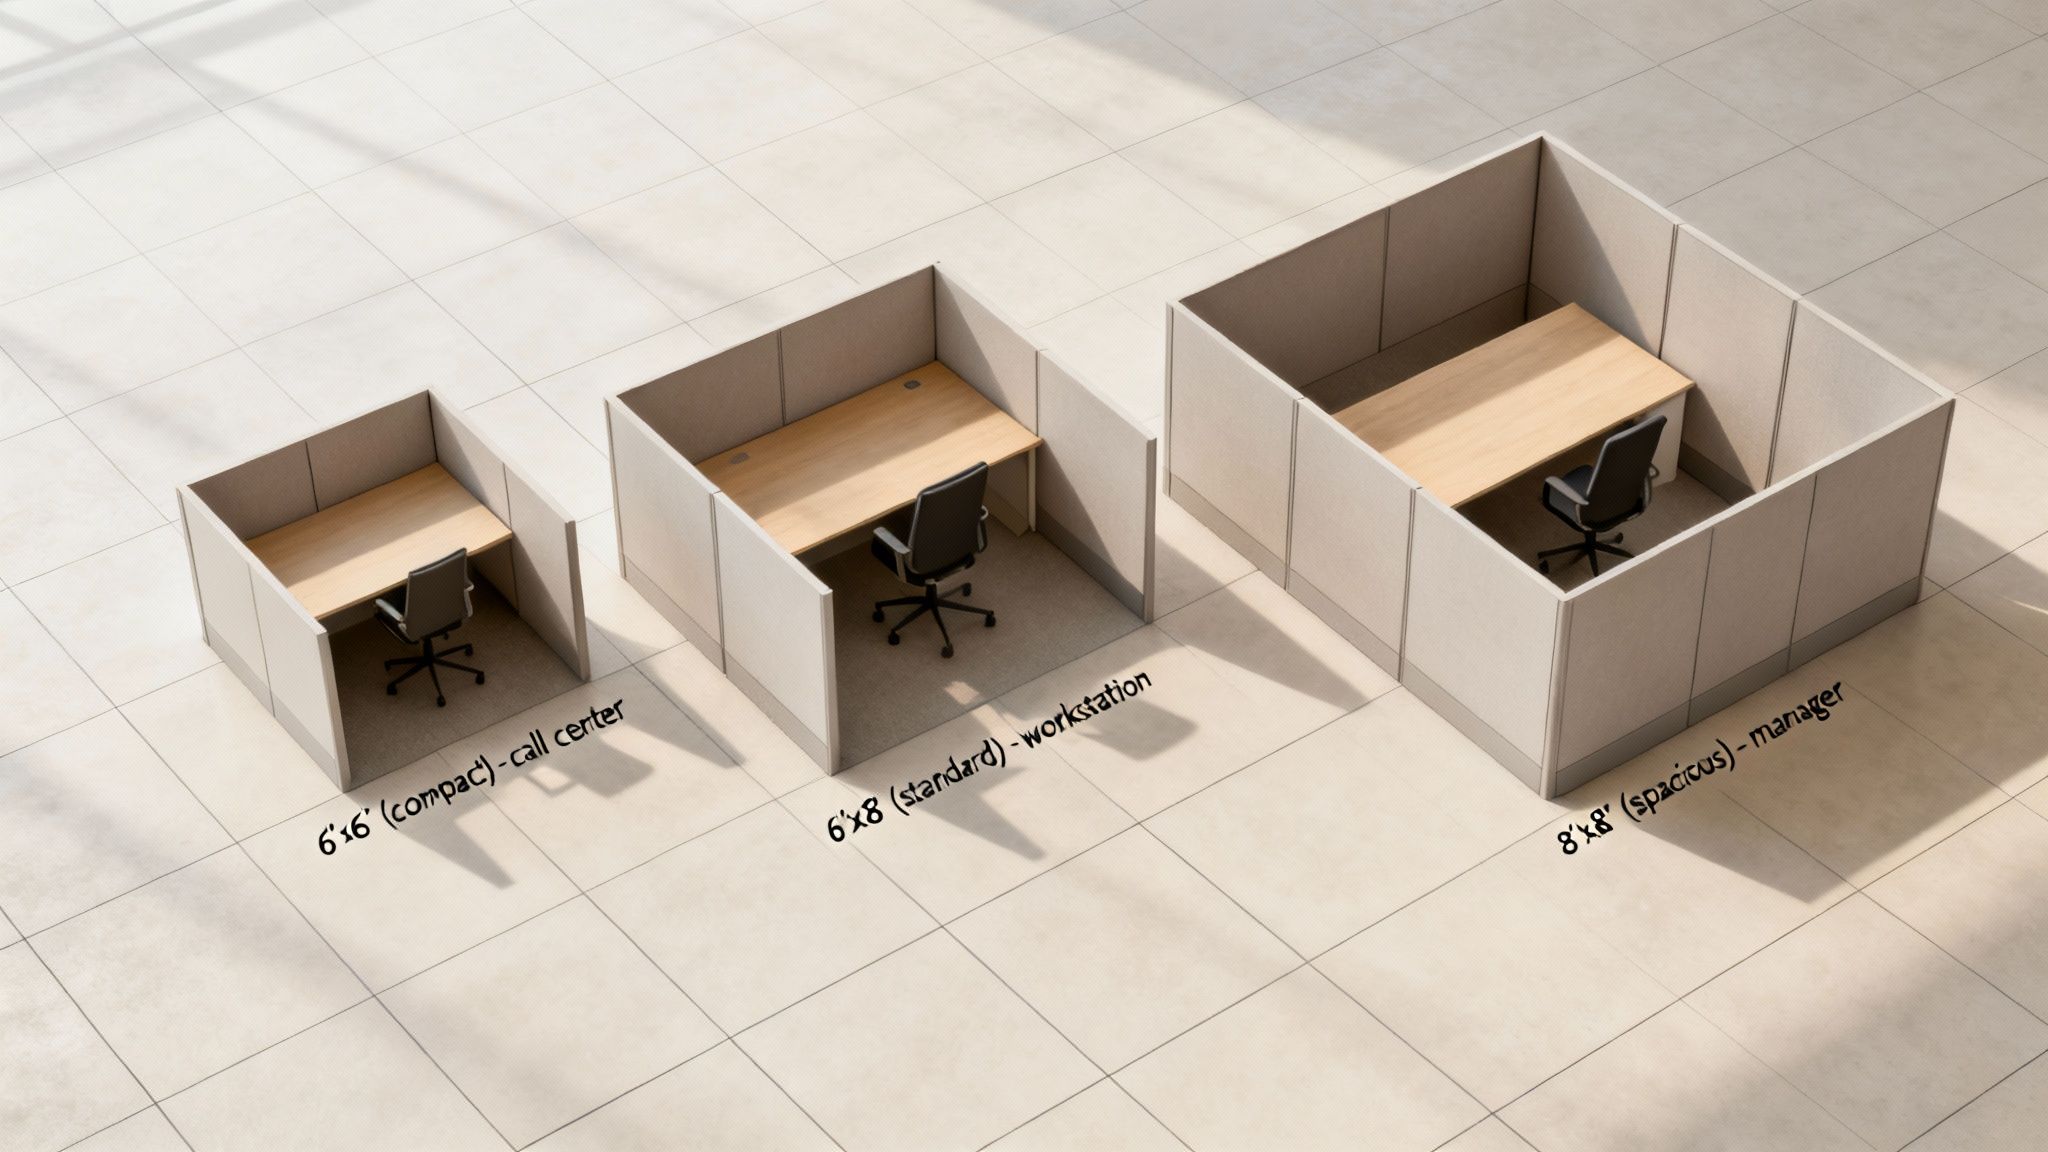
Visualizing Your Options

To make this a bit clearer, the diagram below breaks down the three core cubicle types and what they're best used for, from solo workstations to more team-focused setups.

Diagram illustrating standard office cubicle typologies, showing sizes and their intended uses for individual and team work.

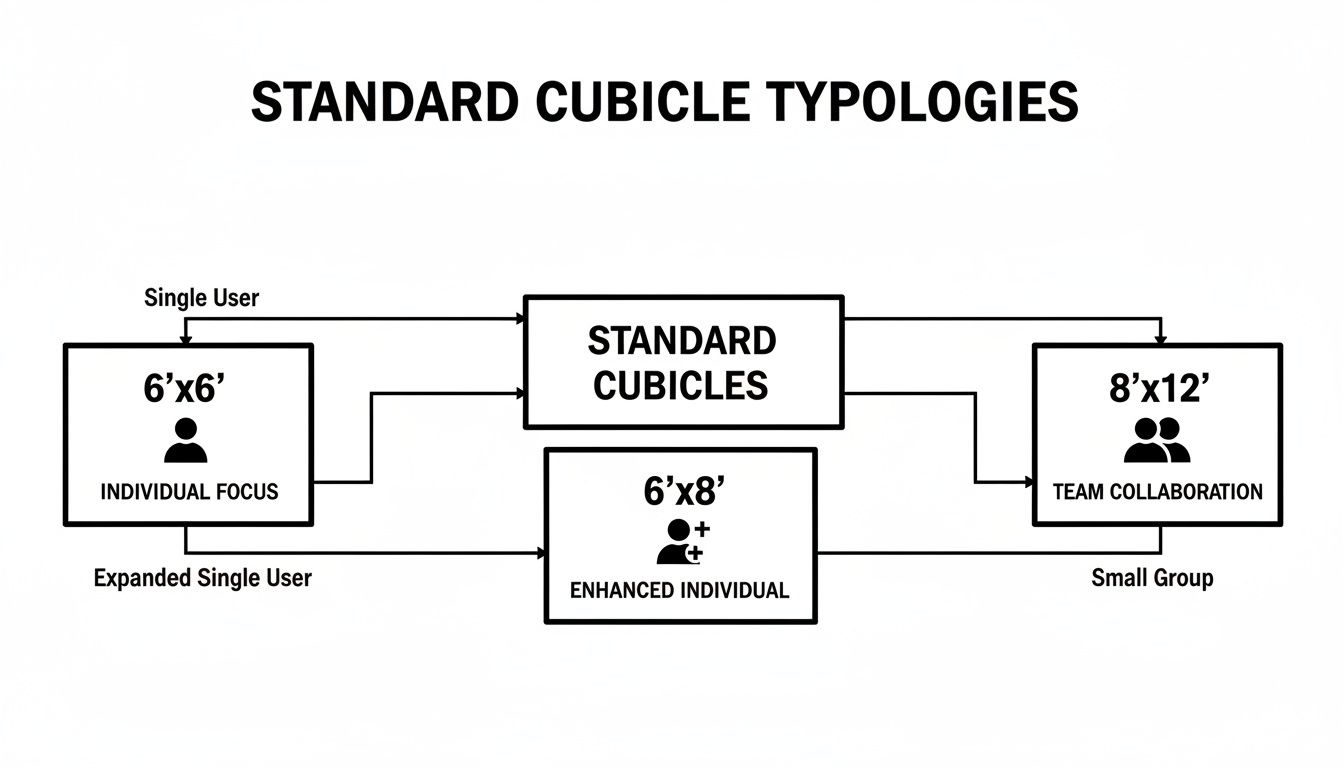
As you can see, each step up in size is meant to accommodate more complex work styles and more equipment. This simple visual guide can help you start pointing toward the best fit for your team, whether that’s a bank of individual workstation cubicles or a few larger private office cubicles for your senior staff.

How to Choose the Right Cubicle Footprint

Picking the right cubicle footprint isn't about just filling up floor space—it's about setting your team up to win. The dimensions you choose should directly support what each person does all day. Think of it like a perfectly tailored suit: a great fit makes everything feel effortless and efficient, while a bad one just causes friction. Each of the standard office cubicle dimensions has a job to do, whether it's for heads-down focused work or for leading a team.

When you match the size of the workstation to the demands of the job, you’re building an environment where people have exactly what they need to do their best work. This is more than just buying furniture; it's a strategic part of your office design. To get a better handle on this whole process, our guide on professional office space planning and design is a great place to start.

Three storage cubicles of different sizes: Small (6'x6'), Medium (6'x8'), and Large (8'x12').

The Versatile 6'x6' Footprint

The 6'x6' cubicle is the tried-and-true workhorse of the modern office. Clocking in at 36 square feet, it’s the perfect size for roles that require a high degree of focus, like call center agents or administrative staff.

This compact footprint gives you enough room for a monitor, keyboard, and your essential papers without ever feeling claustrophobic. It’s an awesome choice for creating high-density work zones where individual productivity is the name of the game.

The Spacious 6'x8' Footprint

Sometimes, a job just needs more elbow room. When you've got dual monitors, piles of documents, or specialized equipment, the 6'x8' cubicle is the perfect step up. This size really came into its own in the '70s and '80s as computers and all their peripherals started demanding more desk space.

This footprint is ideal for people like accountants, graphic designers, or engineers who need to spread out with blueprints or reference materials. That extra bit of space, totaling 48 square feet, makes a huge difference in keeping a workflow smooth and organized.

The Commanding 8'x12' Footprint

For your team leads, supervisors, and managers, the 8'x12' cubicle is more than just a desk—it’s practically a mini-office. With a generous 96 square feet of space, it can easily handle a larger desk, personal storage, and even a couple of guest chairs for those quick one-on-one chats.

This size gives managers a private space to get their own work done while still being right there on the floor with their team. It projects a sense of leadership and provides the privacy needed for sensitive conversations or strategic planning.

Choosing the right footprint is one of the most fundamental decisions in workspace design. By matching cubicle dimensions to job functions, you invest directly in your team's ability to perform at their best.

Whatever your team needs, we at Cubicle By Design can help you find the perfect solution. From standard sizes to completely custom layouts, our team is here to help you plan a workplace that actually works. You can even play around with different setups yourself using our online Cubicle Designer tool.

Finding the Right Cubicle Panel Height

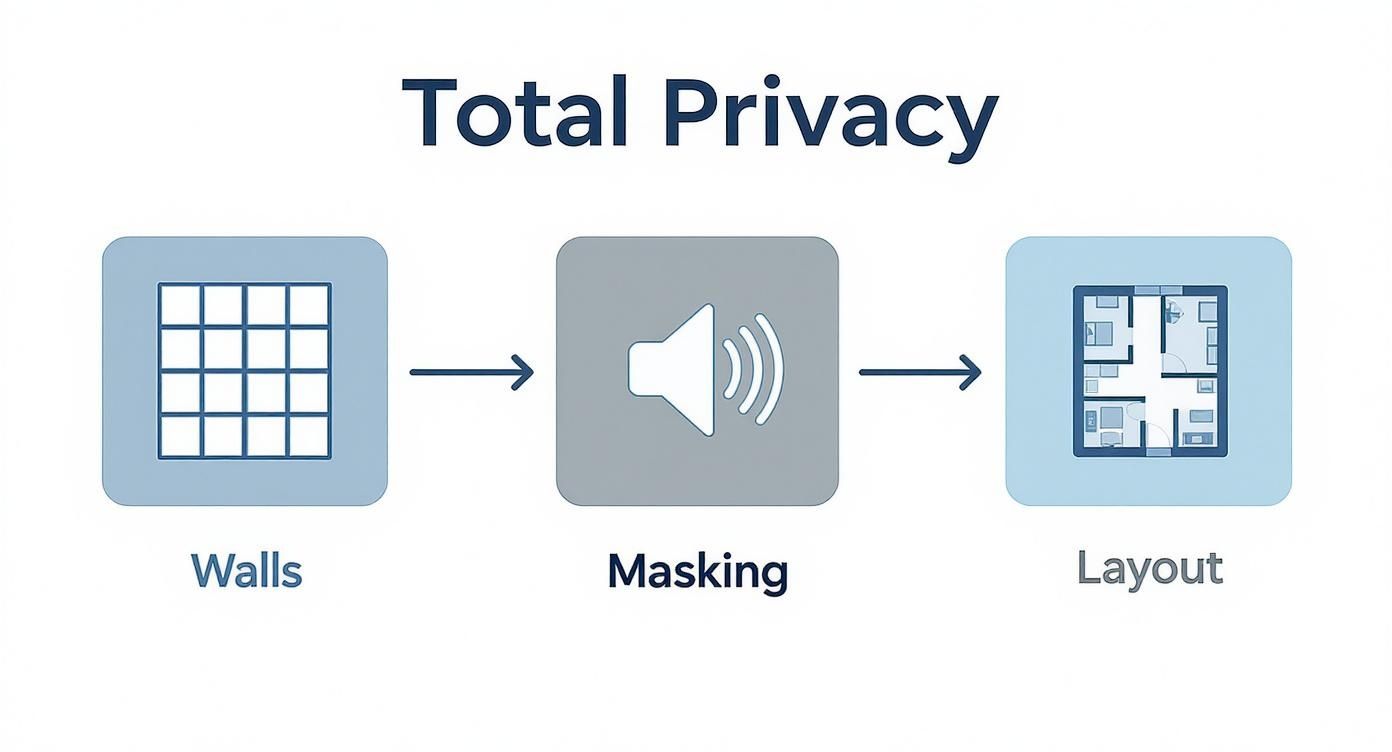
While a cubicle’s footprint sets the stage for your office layout, its wall height directs the action.

Think of the walls as the volume knob for your office culture. You can turn them up for intense, heads-down focus or dial them back to encourage teamwork and conversation. Getting the height right is a huge part of designing a workspace that actually supports how your team needs to work.

Panel height directly impacts privacy, noise levels, and the overall feeling of openness in your office. It's a delicate balance. Go too low, and distractions can easily derail productivity. Go too high, and you might accidentally create isolated silos where collaboration goes to die. The goal is to find that sweet spot for each team's specific function.

This is where the flexibility of modular systems from Cubicle By Design becomes a real game-changer. You’re not stuck with one-size-fits-all. You can mix and match heights to create distinct zones, crafting an environment that supports every work style.

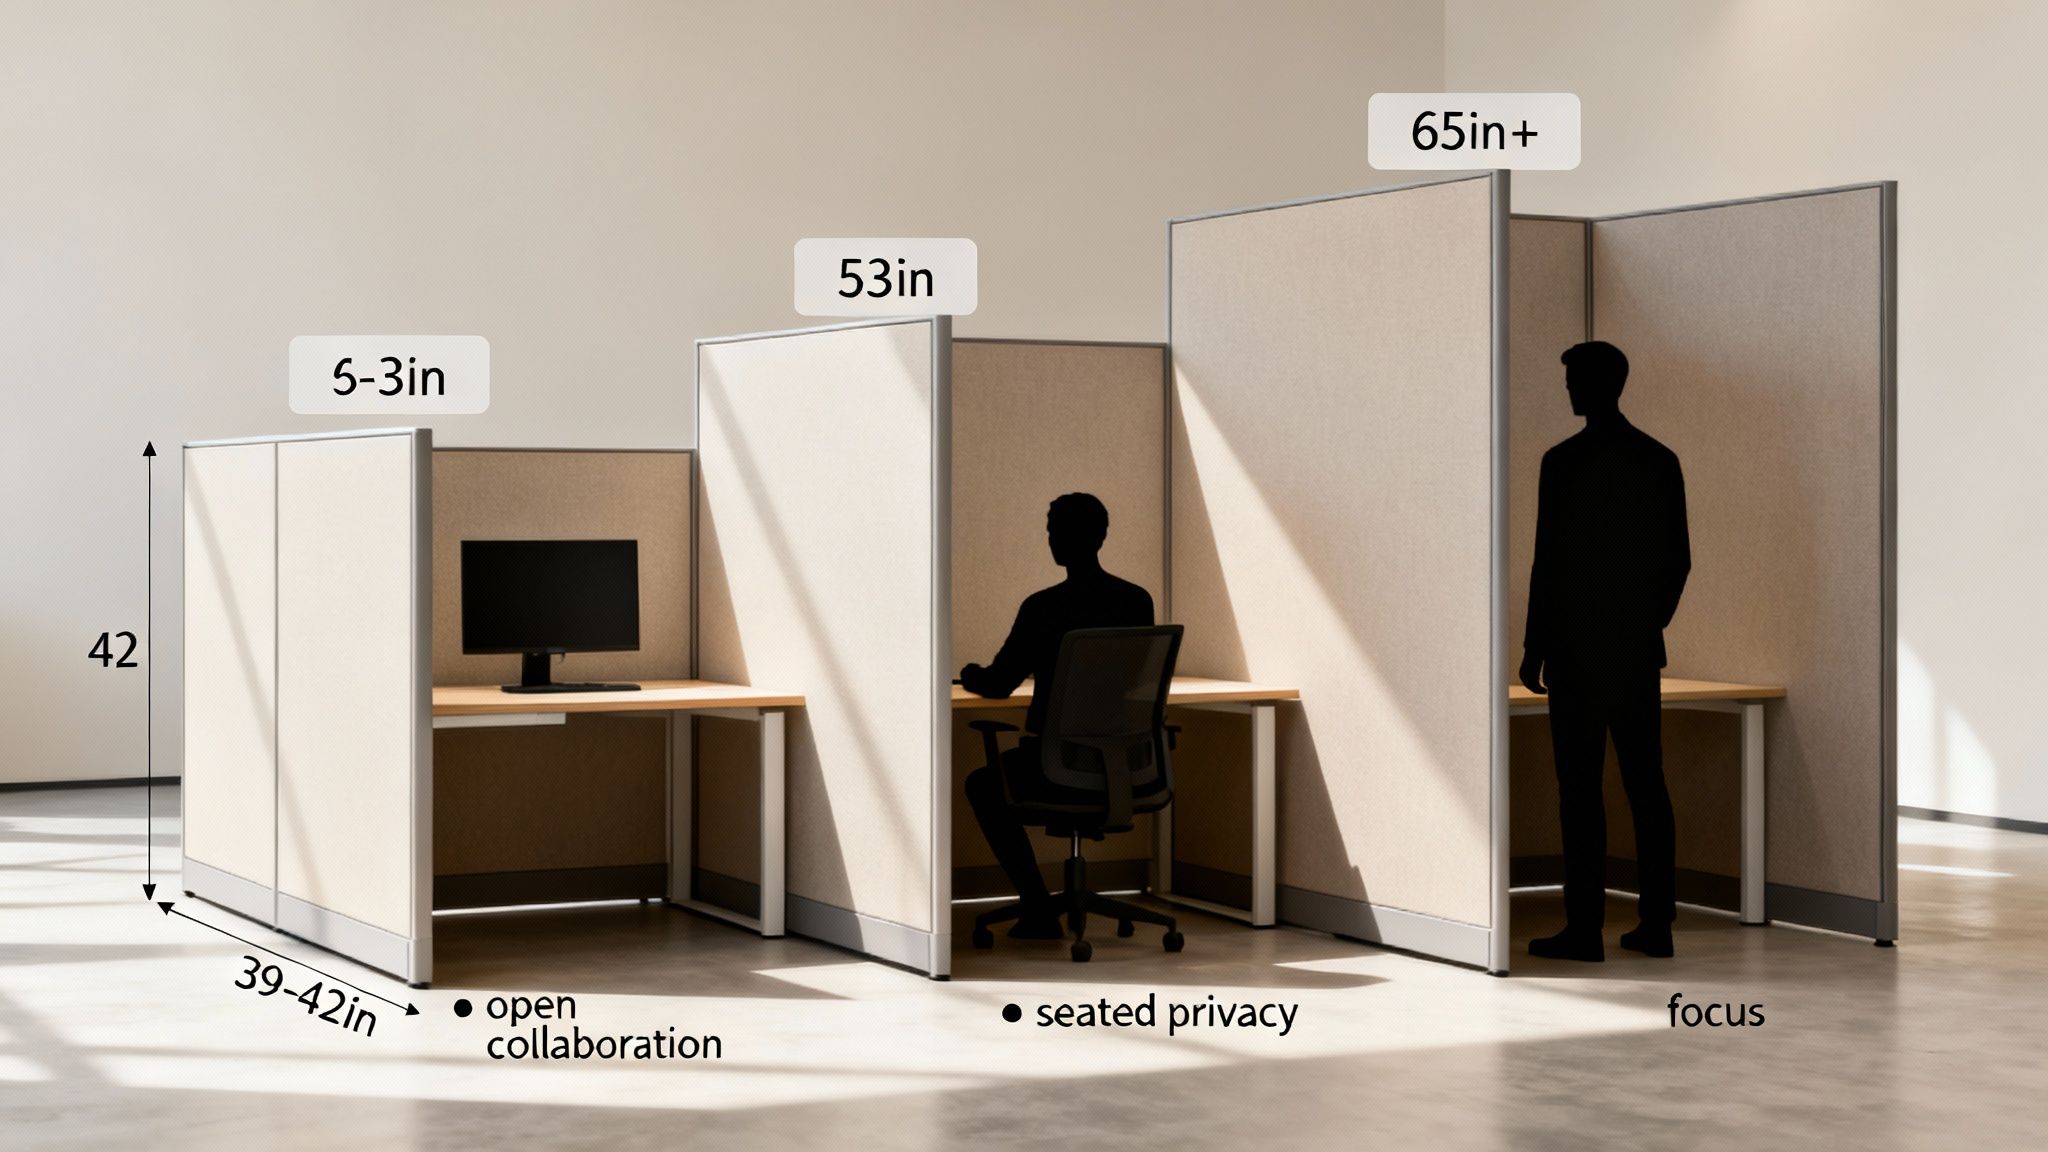
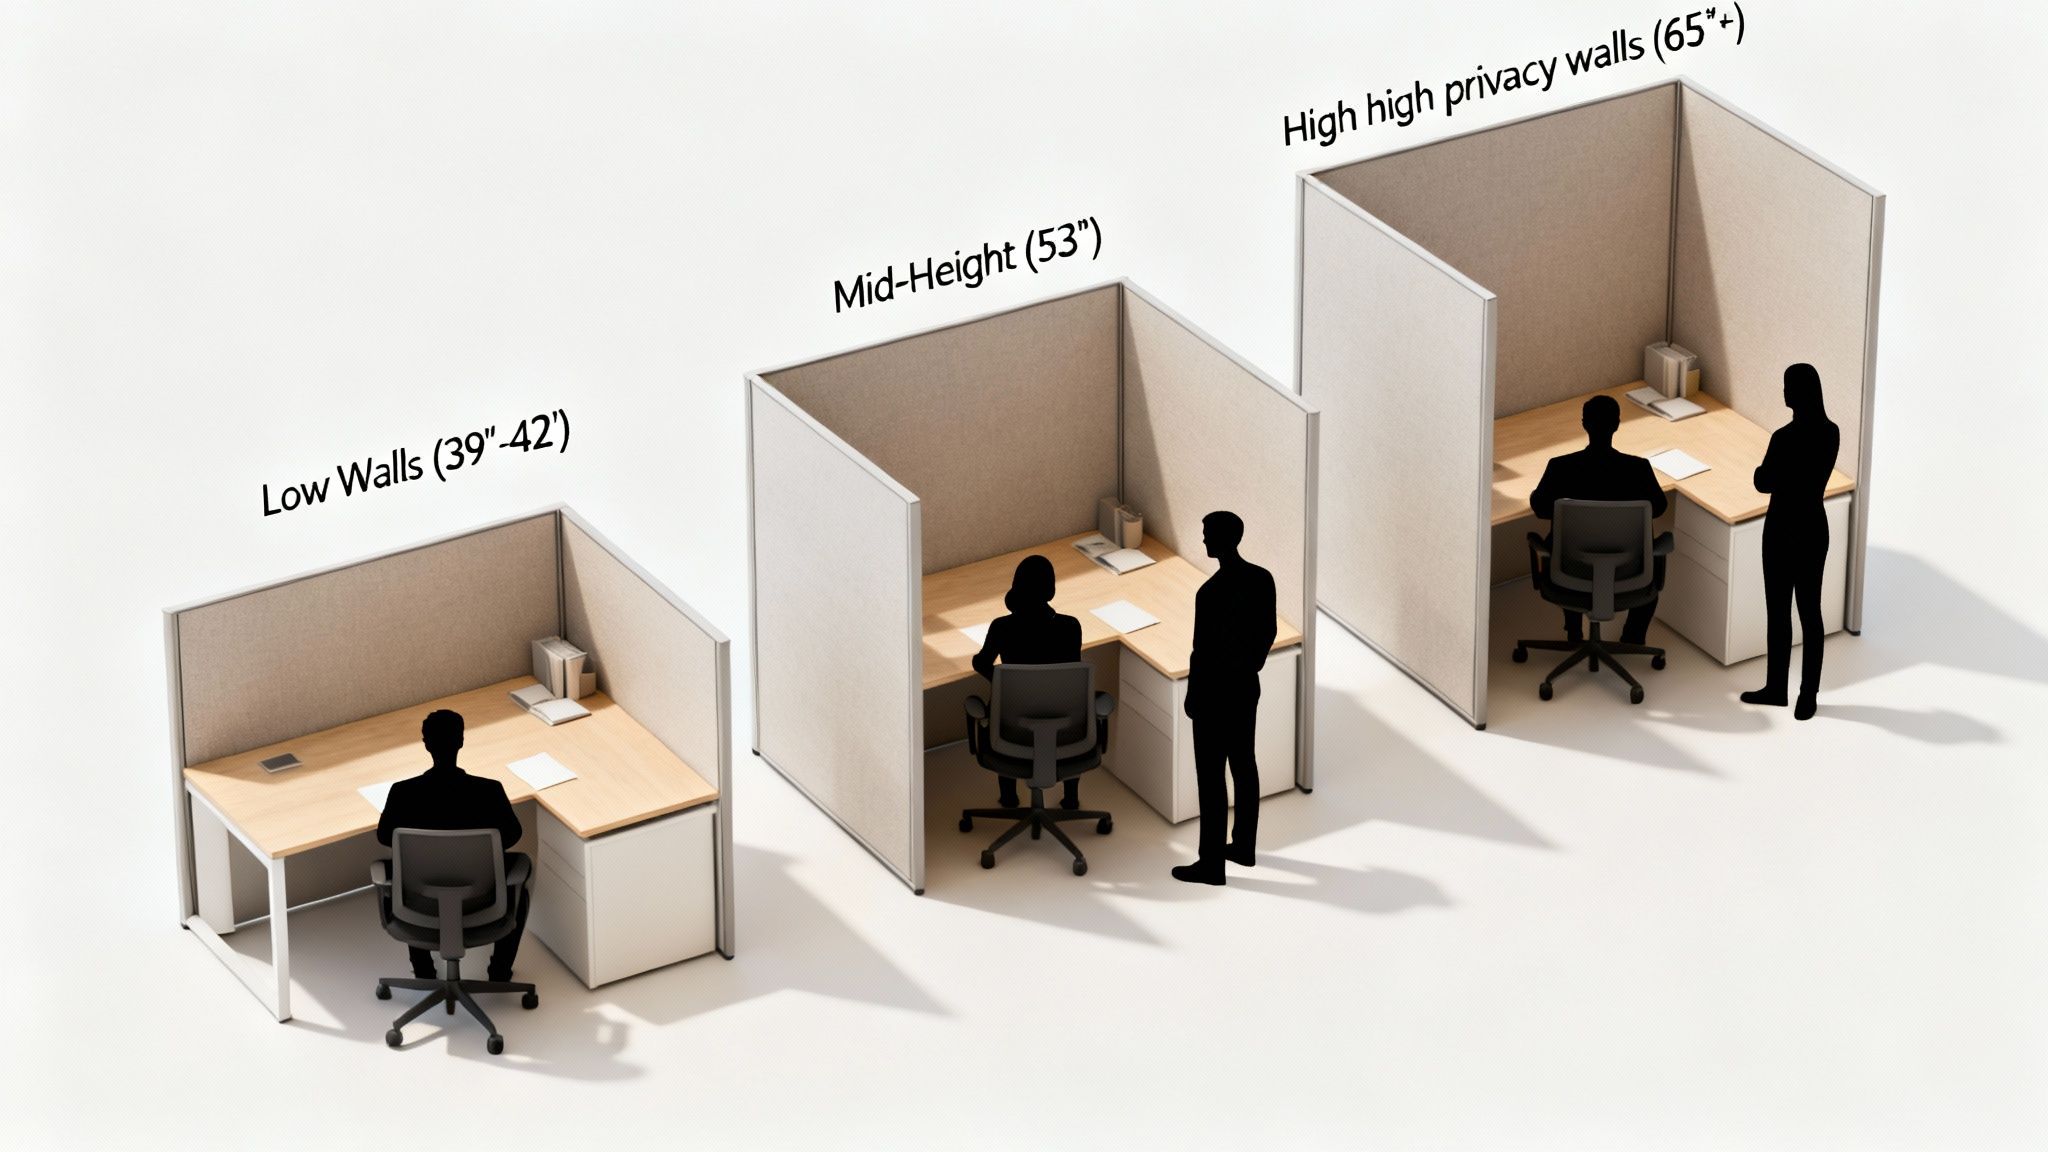
Low Walls For Collaboration

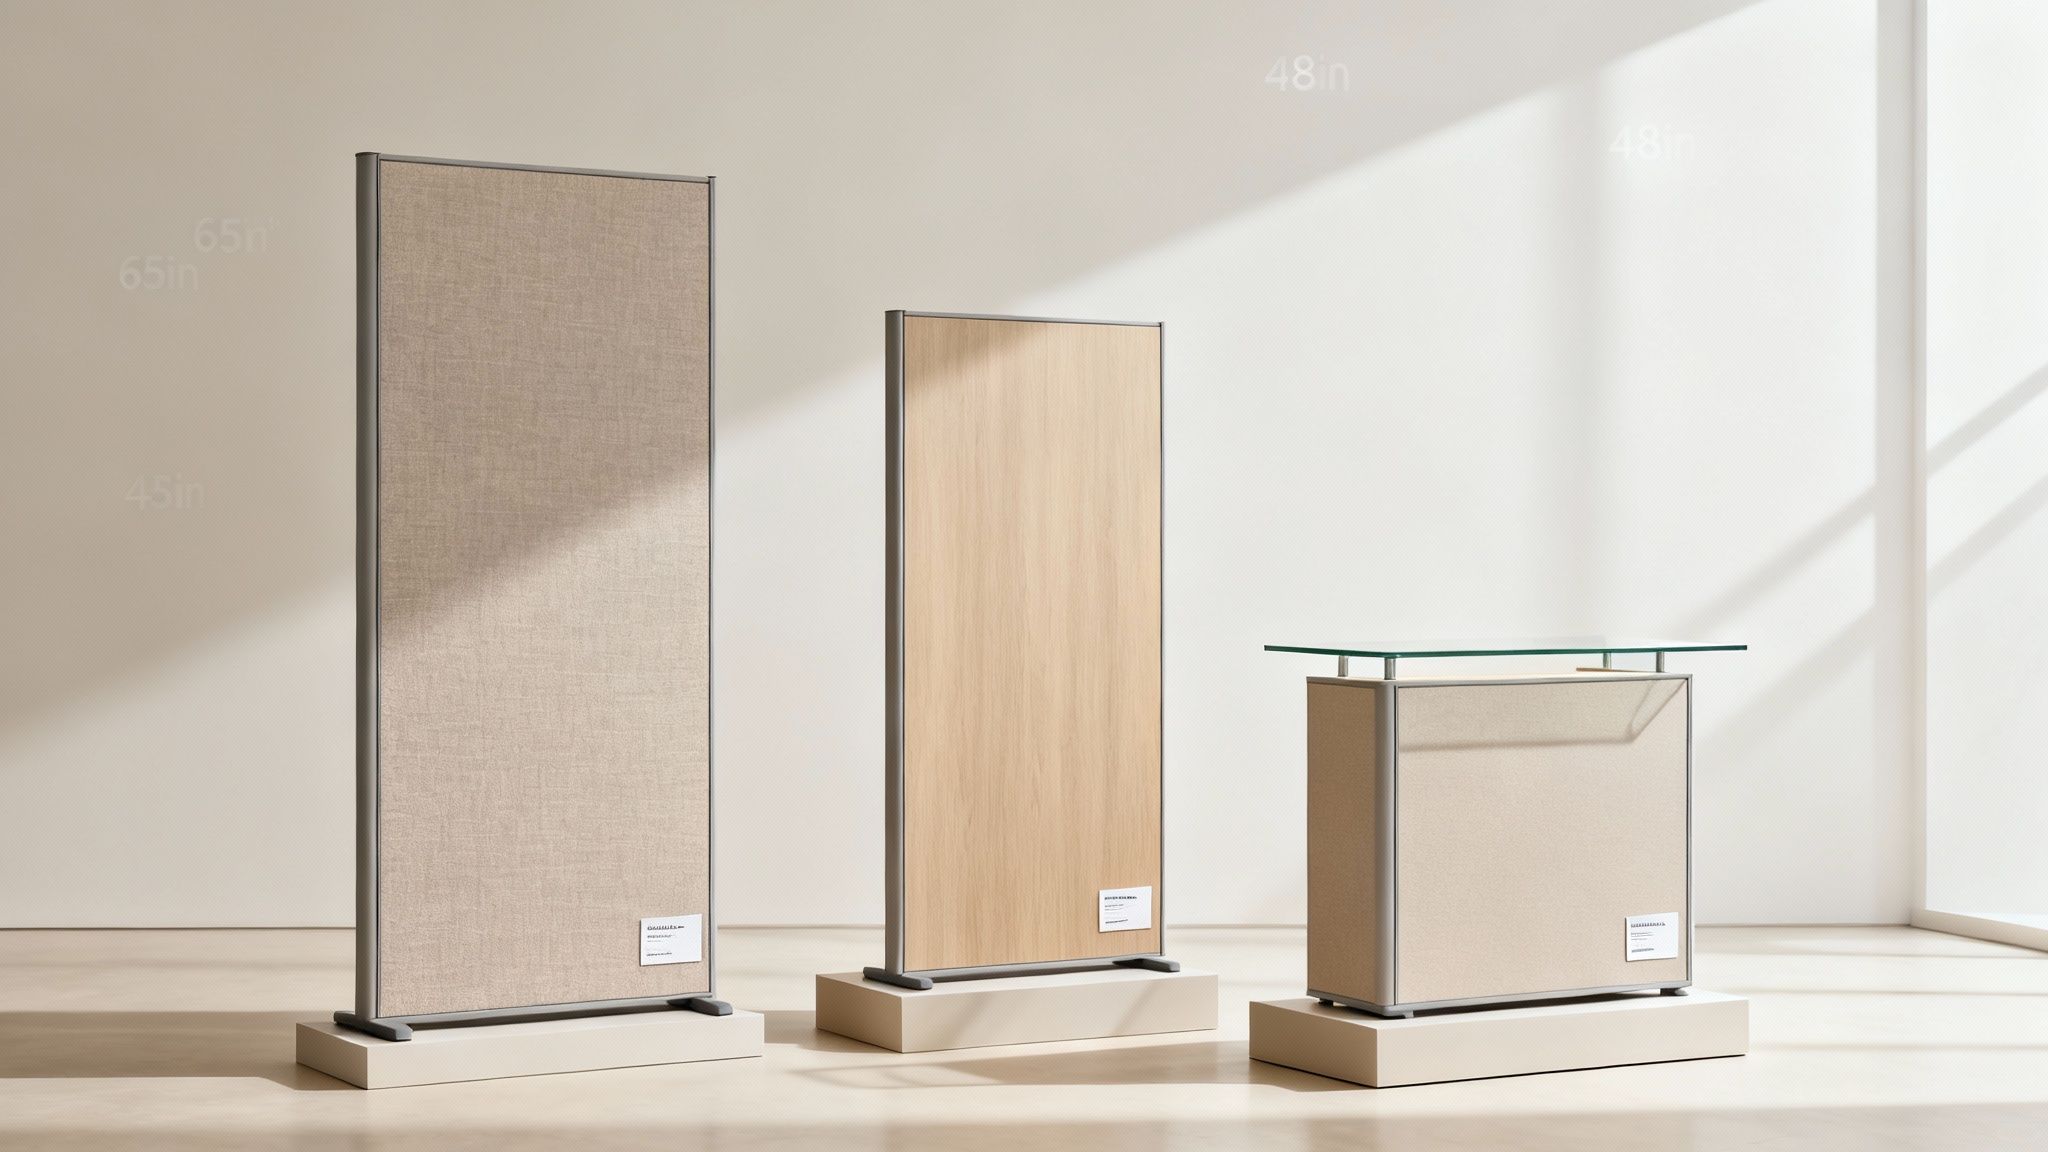
Low-height panels, typically between 39 to 42 inches, act like friendly neighborhood fences. They do a great job of defining each person's workspace without completely blocking sightlines, making them perfect for teams that thrive on constant communication and quick collaboration.

These walls are just high enough to provide a sense of personal territory while seated, but low enough for team members to easily make eye contact and chat without even leaving their chairs. This setup is a home run for creative departments, sales teams, or any group where spontaneous conversations spark the best ideas.

Mid-Height Walls For Balanced Focus

Mid-height walls, usually hovering around 53 inches, offer the best of both worlds. This is an incredibly popular choice for standard office cubicle dimensions because it provides what's known as "seated privacy." When an employee is sitting down, the walls are high enough to block most visual distractions, allowing for focused, productive work.

Yet, the moment they stand up, they can see across the office, ask a colleague a question, or join a nearby discussion. This height strikes a fantastic balance, fostering concentration without sacrificing the open, connected feel of a modern office.

Cubicle wall height is a powerful tool for shaping behavior. By strategically choosing different panel heights, you can architect an office environment that naturally guides employees toward the right balance of focus and interaction.

High Walls For Maximum Privacy

When the job demands confidentiality and minimal interruptions, high walls are the only way to go. Panels that are 65 inches or taller create a true private sanctuary, significantly cutting down on both noise and visual distractions. For a deeper dive, check out our guide on achieving office cubicle privacy.

These taller setups are essential for roles in HR, finance, or legal departments where sensitive information is handled every day. They’re also a key feature of larger managerial cubicles, like the 8’x12’ footprint, which actually evolved from early flexible office concepts. While the original 1960s designs got a bad rap during the "cube farm" era, the backlash in the 1990s led 60% of Fortune 500 firms to adopt these larger, more private spaces for supervisors. You can learn more about this fascinating journey from the history of office layouts at ROSIinc.com.


To make it even clearer, let's break down how each panel height changes the dynamic of your workspace.

Cubicle Panel Height Comparison

Panel Height Privacy Level Best For Collaboration Ideal Work Style
39" – 42" Low Excellent Open-plan, high-interaction roles (e.g., sales, creative teams).
53" Medium Good Balanced roles needing both focus and team access (e.g., marketing, project management).
65"+ High Limited Heads-down, confidential work (e.g., HR, finance, legal, programmers).

Ultimately, choosing the right height isn't about picking one number for the entire office. It's about understanding the unique needs of your teams and creating tailored zones that help everyone do their best work.

Planning Your Office Flow and Layout

Picking out the right standard office cubicle dimensions is a huge part of the puzzle, but it's the space between the cubicles that really brings an office to life. You can have the best workstations in the world, but if getting to them is a nightmare, you’ve got a problem.

Think of your office layout like a city map. The cubicles are the buildings, sure. But the walkways and main aisles are the streets and avenues that let people get where they need to go without causing a five o'clock traffic jam by the printer. A great layout feels natural and intuitive, guiding people from their desk to the breakroom or a meeting without a second thought. This is the secret to a well-functioning office.

Three office cubicles demonstrating low, mid-height, and high privacy wall options with people.

Establishing Clear and Safe Pathways

The number one rule of thumb for office layout? Give people room to move. Cramped, narrow aisles are more than just an annoyance; they create bottlenecks and can be a genuine safety hazard in an emergency.

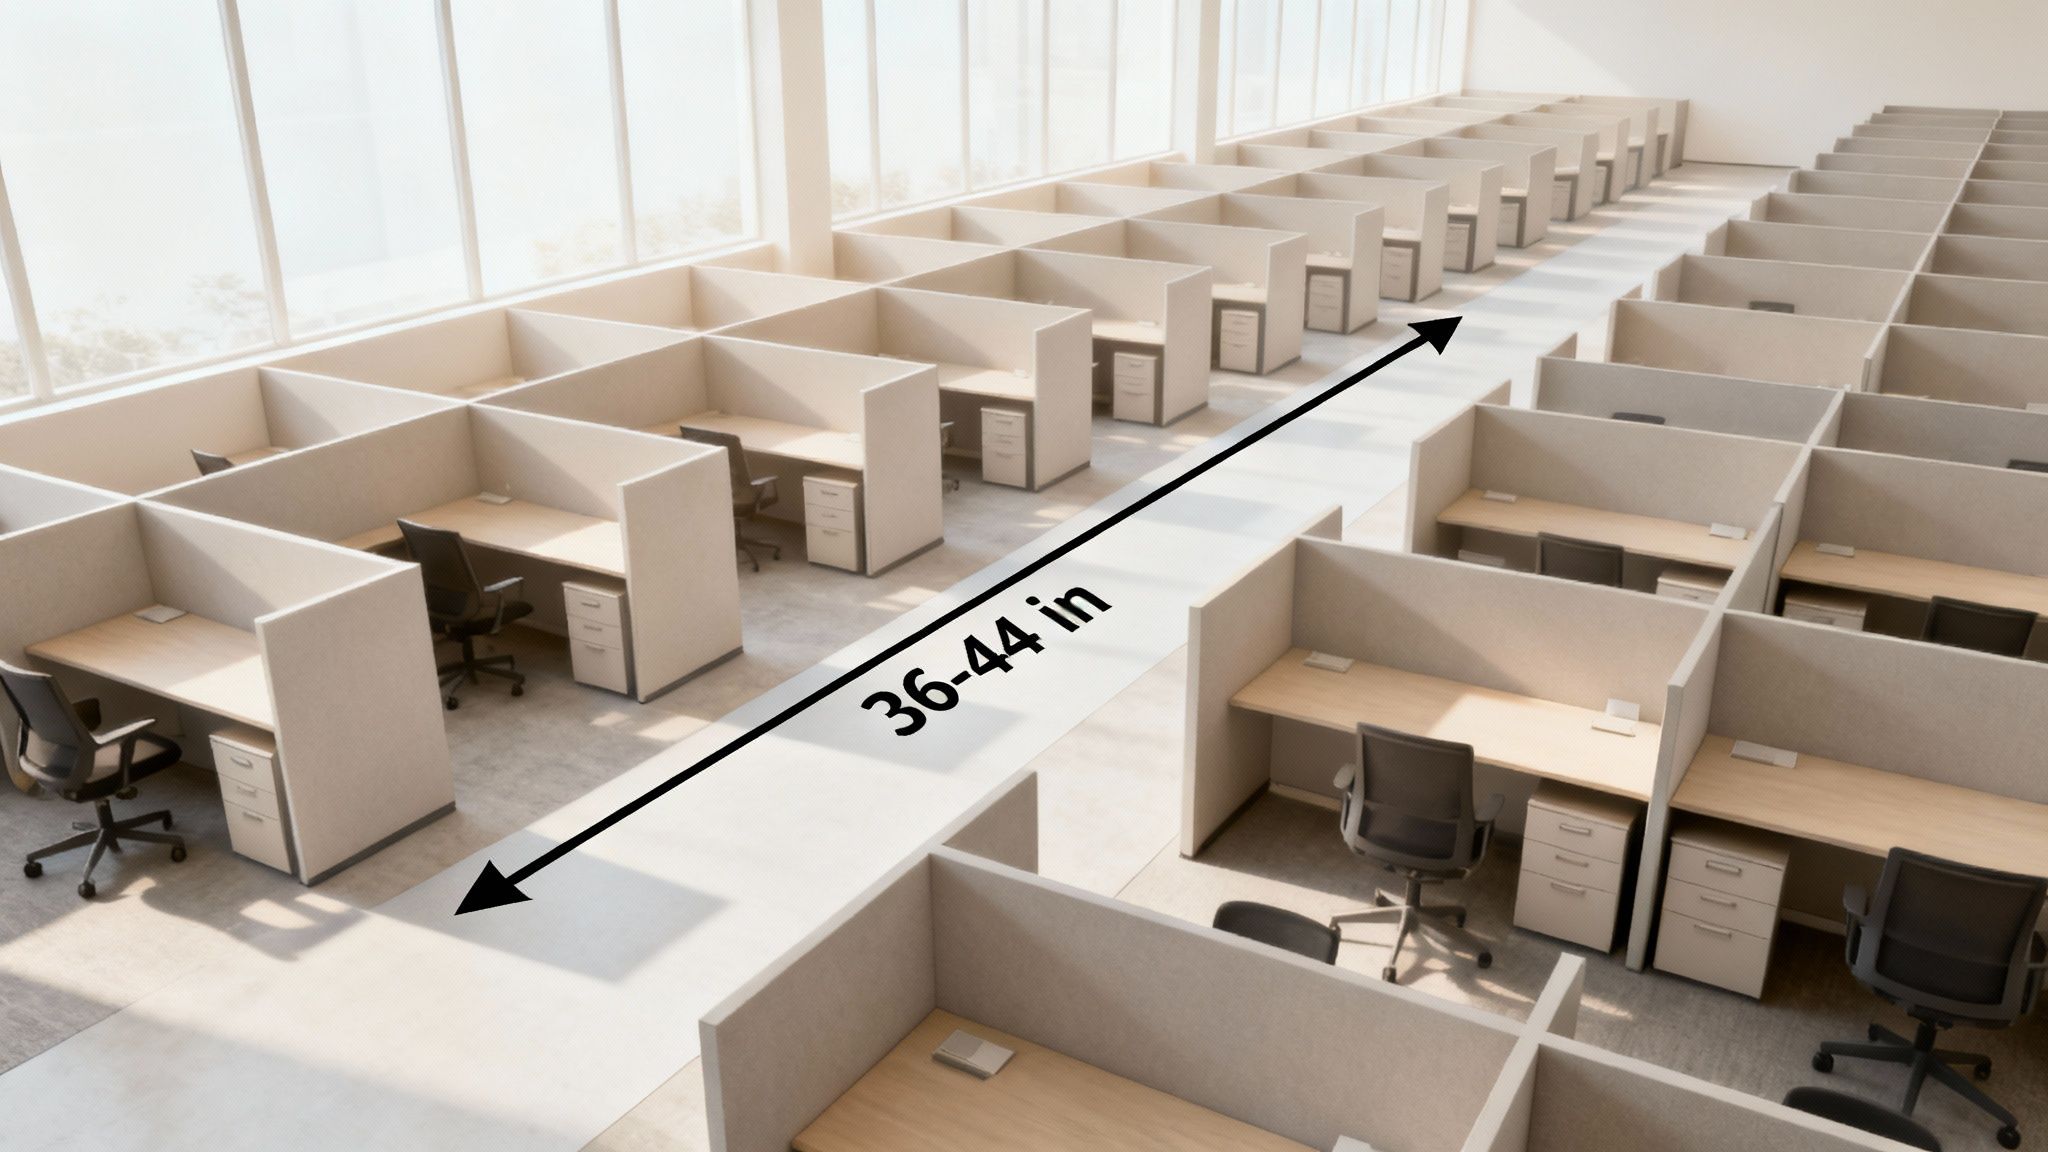
As a starting point, stick to these minimums:

  • Secondary Walkways: For the aisles between individual rows of cubicles, aim for at least 36 inches of clear space.
  • Main Thoroughfares: For the major arteries leading to exits, conference rooms, or the kitchen, you'll want 44 inches or more.

These numbers aren't pulled out of a hat. They’re the sweet spot that allows two people to pass by each other without doing an awkward shuffle, ensuring the flow of traffic stays smooth all day long.

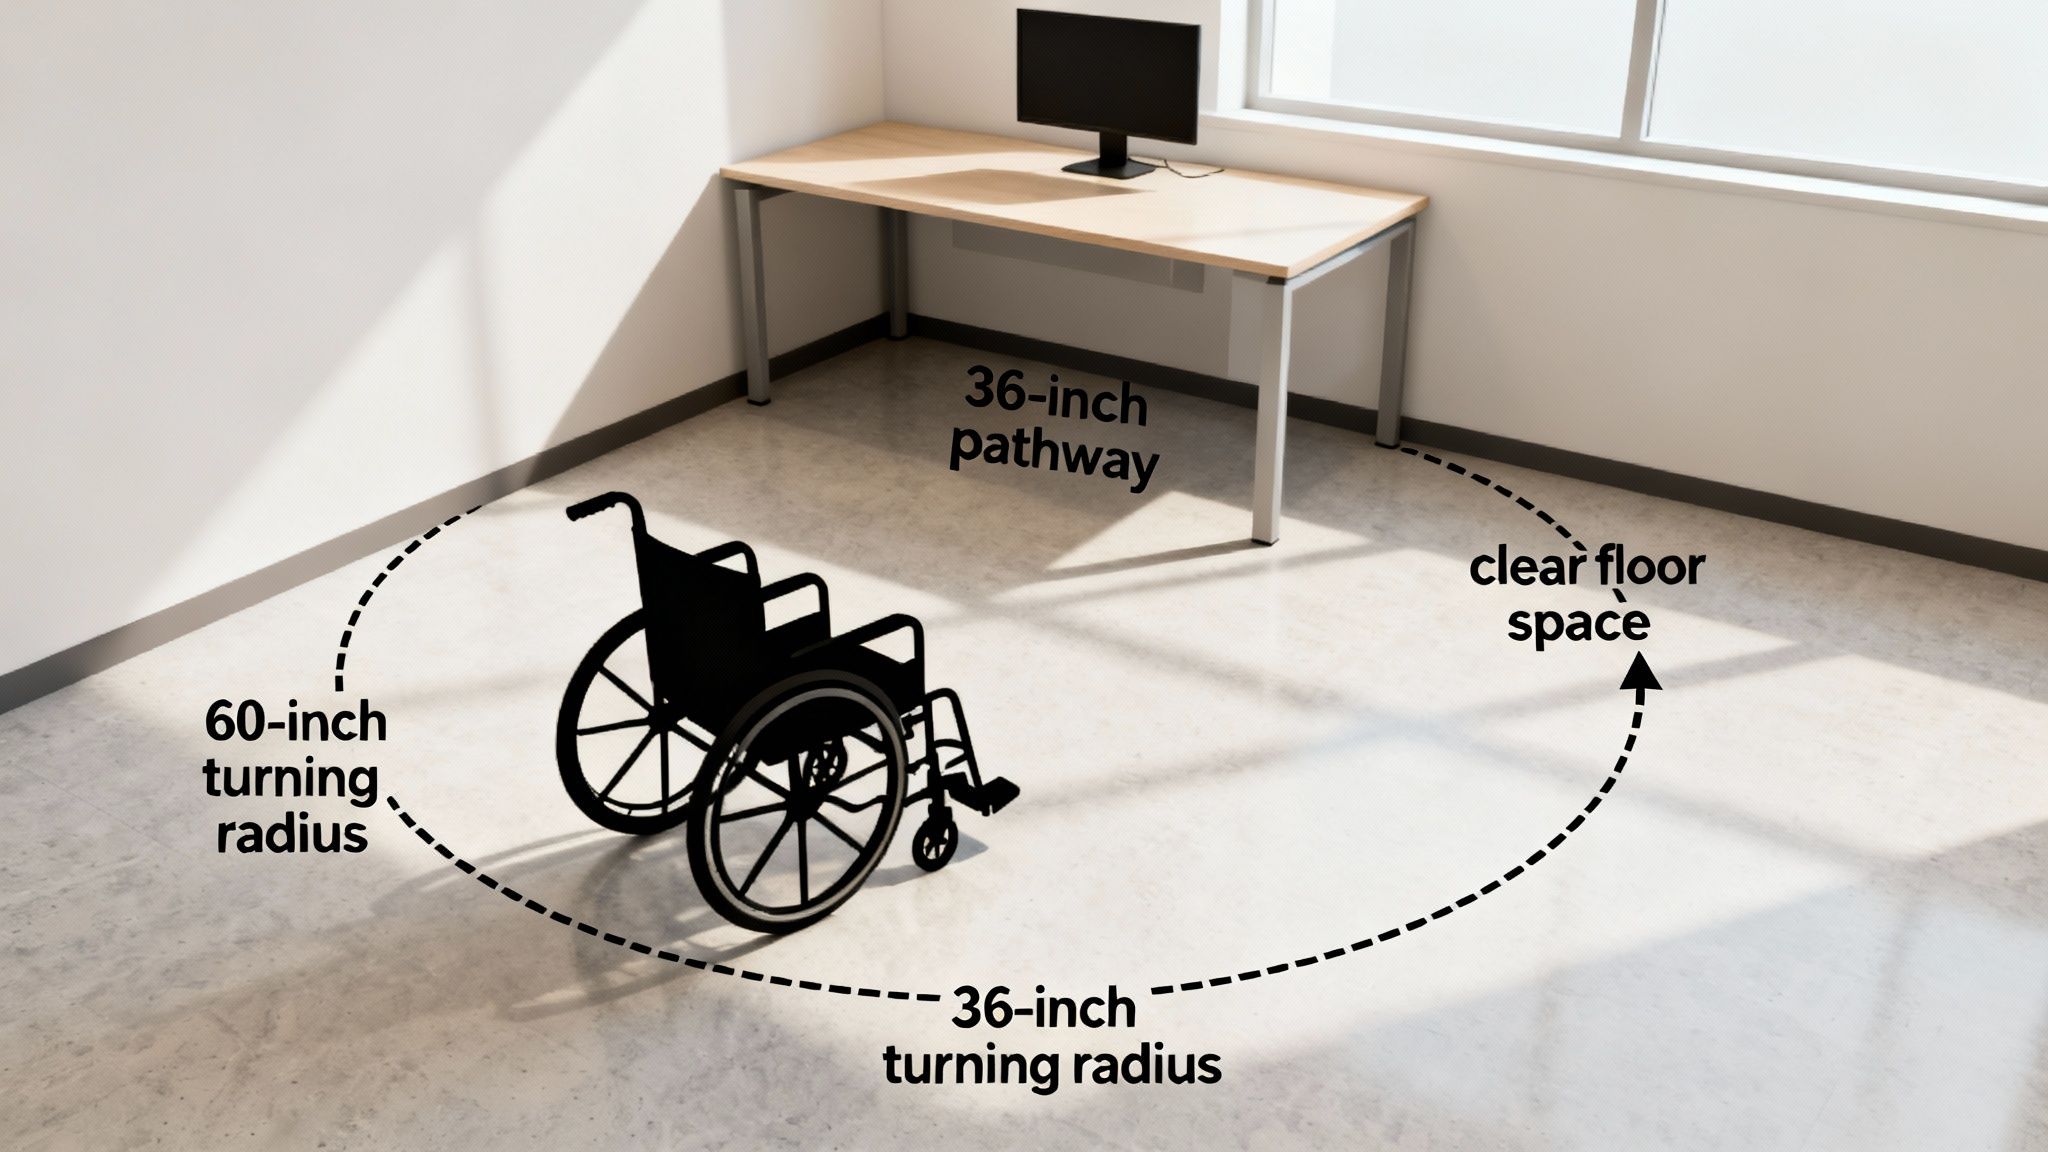
ADA Compliance and Accessibility

Beyond simple convenience, your layout absolutely must comply with the Americans with Disabilities Act (ADA). This isn't optional—it's the law. But more than that, it's about creating a workspace that’s truly accessible to everyone on your team, including those who use wheelchairs or other mobility aids.

A truly functional office is an inclusive one. Planning for ADA compliance from the start isn't just about following rules—it’s about creating a workspace where every team member can navigate safely and independently.

This means thinking about details like turning radius in aisles and ensuring every workstation is approachable. It can feel like a lot to juggle, but at Cubicle By Design, we bake these considerations into the planning process. We'll help you design a layout that is not just efficient but fully code-compliant, taking all the guesswork out of these critical requirements.

To see how this fits into the bigger picture, it helps to review essential facilities management best practices, which cover how space utilization impacts the entire operation. By putting clear pathways and accessibility at the top of your list, you’re not just arranging furniture—you’re building an office that is safe, efficient, and welcoming for your whole team.

Design Your Perfect Cubicle Layout Online

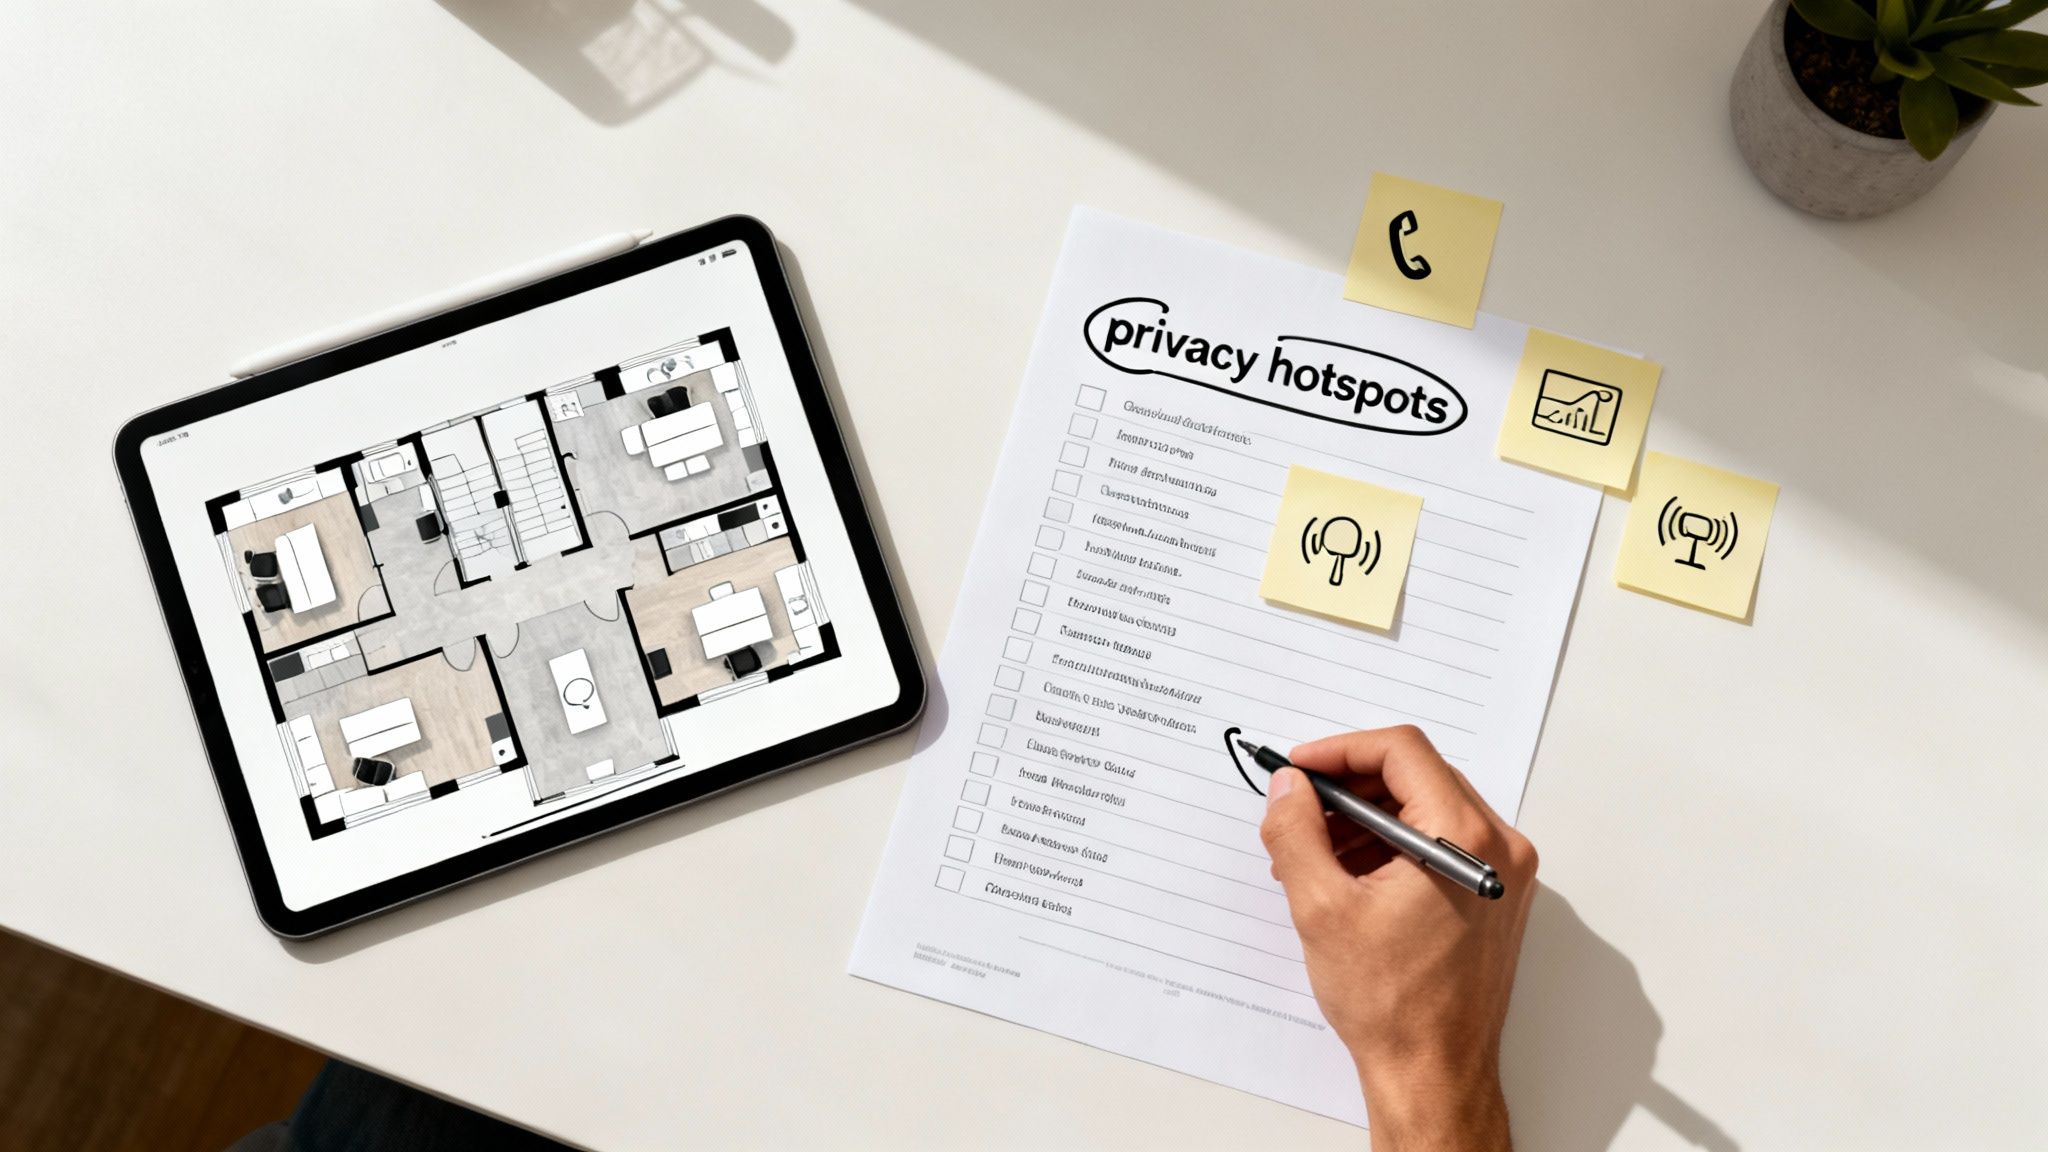
Reading about standard office cubicle dimensions is one thing, but actually bringing your vision to life is where the real fun begins. It can feel like a huge leap going from abstract concepts like footprints and panel heights to a concrete floor plan. This is the moment you translate what your team needs into a tangible, functional design you can see and tweak.

Instead of messing around with rough sketches and guesswork, you can use powerful online tools to build a virtual model of your future office. It’s the perfect way to bridge the gap between theory and reality, helping you make smart decisions before you spend a dime. You get to play with different setups and make sure every last square foot is pulling its weight.

An aerial view of a modern office with rows of cubicles and a central aisle measuring 36-44 inches.

From Blueprint to Reality

Here at Cubicle By Design, we’ve made this whole process dead simple. We created our online Cubicle Designer tool to put you in the driver’s seat, letting you build, customize, and visualize your ideal office layout from the ground up.

The tool guides you through each step of the process. You can:

  • Select a Footprint: Kick things off with standard sizes like 6'x6' or 6'x8', or plug in custom dimensions for a truly unique fit.
  • Adjust Panel Heights: Dial in the perfect balance of privacy and collaboration by choosing between low, mid-height, and high walls. You can even pop in some glass panels for a more modern, open vibe.
  • Choose Finishes: Pick from a massive range of fabrics, laminates, and trim colors to make sure everything matches your company's brand and style.
  • Add Components: Easily drag and drop essentials like overhead storage bins, locking pedestals, and electrical outlets right where you need them.

Seeing your layout before you buy is the single best way to avoid expensive mistakes and guarantee the final design nails every one of your requirements—from workflow to employee comfort.

This hands-on approach really demystifies the design process. You can experiment with clustering workstations together or creating separate zones with private office cubicles. As you build, you get a crystal-clear picture of how each choice affects the flow and feel of your space.

Take Control of Your Office Design

Using an interactive designer turns space planning from a headache into an engaging, creative project. It cuts out the uncertainty by giving you a realistic preview of your finished office, which helps you line up your vision with your budget. You can learn more about how to transform your office with our interactive cubicle designer.

Ready to get your hands dirty? Dive in and see what’s possible.

Common Questions About Cubicle Dimensions

When you start planning a new office layout, the little details can really pile up. Even after you get a handle on footprints and panel heights, the practical questions always seem to find their way to the surface. We get it.

So, we've gathered some of the most common questions we hear from office managers and facility planners just like you. Think of this as getting a head start—we’re here to give you clear, straightforward answers based on years of helping businesses sort out their perfect space.

What Is the Most Common Office Cubicle Size?

Hands down, the 6'x6' footprint is the king of the cubicle world. It's the most popular and versatile size you'll find, offering a solid 36 square feet of personal space. This is the sweet spot for most general office work.

Why is it so popular? Because it gives an employee enough room for a computer, a bit of paperwork, and their own personal items without feeling boxed in. At the same time, it’s efficient, allowing you to create a functional office without eating up all your valuable square footage. It’s that perfect balance of employee comfort and smart use of space.

How Much Space Should Be Between Cubicle Rows?

Giving people room to move is essential for a safe and functional office. You don't want people bumping into each other just to get to their desk.

As a general rule of thumb, make sure your main walkways are at least 44 inches wide. For the secondary paths between rows of cubicles, a minimum of 36 inches is a good starting point. This keeps foot traffic flowing smoothly and avoids annoying bottlenecks.

But—and this is a big one—you absolutely must check your local building codes and the Americans with Disabilities Act (ADA) guidelines. These rules have very specific requirements to ensure the entire office is accessible, especially for individuals using wheelchairs. Working with a professional space planner is the best way to make sure your layout is both efficient and fully compliant.

Can I Mix Different Cubicle Sizes in One Office?

Absolutely! In fact, we highly recommend it. A modern, dynamic office isn't about a sea of identical boxes. It’s about creating an environment that supports different kinds of work.

For example, you could have a block of 6'x6' cubicles with mid-height walls for your main team, giving them a nice balance of focus and the ability to collaborate. In another area, you might place 6'x8' workstations for employees who need more surface area for things like dual monitors or large drawings.

And for managers who need space for private conversations? A larger private office cubicle, maybe an 8'x12' with high panels, gives them the room and privacy they need. Today’s modular systems are built for this kind of flexibility.

"A well-planned office isn't about uniformity; it's about providing the right tool for the job. Mixing cubicle dimensions allows you to create specialized zones for collaboration, deep focus, and leadership, all within a cohesive and efficient layout."

How Do I Plan for Power and Data in My Layout?

This is a step you can't afford to treat as an afterthought. Power and data need to be part of the plan from day one.

Modern cubicles are designed with this in mind. They have built-in raceways—hollow channels, usually along the base of the panels—that let you run all your electrical wiring and data cables right to the workstation. It's a clean, safe solution that keeps cords hidden and eliminates tripping hazards.

When you're designing the layout, you’ll need to map out where your power sources are coming from, whether that’s outlets in the floor, on the walls, or from power poles dropped from the ceiling. Here at Cubicle By Design, our team helps you with this every step of the way. We’ll work with you to make sure your power plan fits perfectly with your cubicle layout, so your new space is ready to go from the moment you move in.


Ready to stop guessing and start designing? The team at Cubicle By Design can help you navigate every aspect of your office layout, from choosing the right standard office cubicle dimensions to ensuring a flawless installation. Explore our full range of cubicles or visit us at https://cubiclebydesign.com/.

Read More

Office Cubicles Standard Dimensions: Your Quick Guide to Space-Saving Layouts

When you’re laying out an office, there are a few standard cubicle sizes that have become the go-to for a reason. The most common footprints you’ll see are 6’x6′ (36 sq. ft.), 6’x8′ (48 sq. ft.), and 8’x8′ (64 sq. ft.). These three sizes are pretty much the industry standard, giving you a solid, scalable starting point for anything from a high-density call center to more spacious setups for managers.

Getting the size right from the beginning is one of the most important first steps you can take in planning your office space. It impacts everything that comes after. At Cubicle By Design, we help businesses find the perfect fit every day.

Why Standard Dimensions Matter for Your Office

Sticking with standard dimensions when you’re planning an office layout has some major upsides, especially when it comes to cost, flexibility, and just plain efficiency. There’s no need to reinvent the wheel. These tried-and-true footprints give you a reliable foundation for building a productive work environment. For most businesses, cubicles are going to fall somewhere in that 36 to 64 square foot range.

Choosing from these common sizes makes everything easier, from figuring out your budget to planning for future growth. It creates a modular, predictable system that can change right along with your team or workflow.

This infographic gives a quick breakdown of which roles are typically best suited for each standard cubicle size.

Infographic showing modern office cubicle sizes for office workers, managers, and executives, detailing dimensions and features.

As you can see, the workstation’s footprint grows with the needs of the job, scaling up from a compact, efficient space to one large enough for holding small, private meetings.

For a quick reference, here’s a simple table summarizing the most common footprints.

Standard Office Cubicle Footprints At A Glance

Footprint (Width x Depth) Square Footage Common Use Case Recommended Panel Height
6′ x 6′ 36 sq. ft. Call centers, data entry, high-density task work 42″ – 53″
6′ x 8′ 48 sq. ft. Administrative staff, cubicles with guest seating 53″ – 65″
8′ x 8′ 64 sq. ft. Managers, supervisors, employees needing more storage 65″ or higher

This table gives you a great starting point for matching a cubicle’s physical space to the actual work being done inside it.

The Benefits of Using Standard Sizes

Working with established dimensions brings some real advantages for anyone managing a facility or running a business.

  • Cost-Effectiveness: Manufacturers produce standard-sized panels and surfaces in massive quantities. That volume almost always means a lower cost per station compared to fully custom solutions.
  • Simplified Space Planning: When you’re working with predictable footprints, laying out a floor plan is much faster and more straightforward. You can easily figure out your office’s capacity and make sure you have proper walkways.
  • Future-Proof Flexibility: A modular system based on standard sizes means you can reconfigure, add on, or move workstations with way less hassle as your business needs change down the road.

At the end of the day, getting a handle on these core dimensions is the first real step toward creating a workspace that works for you now and can adapt for the future. For a deeper look at all the layout possibilities, check out our guide on cubicle configurations.

A Practical Look at Core Workstation Footprints

Numbers on a floor plan are one thing, but understanding how a cubicle footprint actually works in a real office is what matters. Each standard size isn’t arbitrary; it’s been refined over years to suit specific roles, balancing how much space you use with how comfortable your team is. The goal is simple: match the cubicle’s square footage to the day-to-day tasks of the person using it.

Getting this right affects everything—from an employee’s workflow and focus to office acoustics and even team dynamics. A layout that’s too tight can kill concentration, but one that’s too spread out is just a waste of expensive real estate. Let’s break down the three most common office cubicles standard dimensions to see how they play out in the real world.

Three office cubicles showcasing different standard dimensions for call center, workstation, and manager roles.

The Compact And Efficient 6×6 Cubicle

There’s a reason the 6’x6′ cubicle is the workhorse of the modern office. Clocking in at 36 square feet, it hits that sweet spot for high-density setups where getting the most out of your floor plan is the top priority.

  • Best For: Call centers, data entry teams, and touchdown stations for hybrid or remote staff who are only in the office part-time.
  • Pros: It’s the most space-efficient option, period. You can fit more people per square foot, which keeps costs down and makes planning layouts for large, open offices much simpler.
  • Cons: The compact space can feel a bit tight for anyone who juggles a lot of paperwork or needs multiple large monitors. There’s also not much room left over for personal items or a guest chair.

This footprint is really designed for focused, heads-down computer work where collaboration isn’t the main event. We see a lot of companies use the 6×6 as their go-to for general workstation cubicles because it’s such a versatile and practical starting point.

The Versatile 6×8 Workstation

By adding just 12 more square feet, the 6’x8′ cubicle delivers a serious upgrade in both comfort and utility. This size is often considered the perfect middle ground, adaptable enough for a huge range of professional roles.

That extra two feet of depth or width makes a world of difference. It easily allows for an L-shaped desk, more filing cabinets, or even squeezing in a small guest chair without making the space feel cramped. It’s a fantastic choice for employees who need a bit more elbow room to spread out their projects or keep reference materials handy.

The Spacious 8×8 Managerial Hub

At a generous 64 square feet, the 8’x8′ cubicle is a major step up. We typically see these reserved for managers, supervisors, or team members with specialized equipment needs. In practice, this size functions almost like a mini-office right on the main floor.

An 8×8 can comfortably house a U-shaped worksurface, plenty of storage, and proper seating for one-on-one meetings. The larger footprint is also what you need if you’re creating private office cubicles with taller panels, making them ideal for roles that demand confidentiality and frequent private conversations. When you start laying out these larger stations, it’s a good idea to consult an office space planning guide to make sure you’re leaving enough room for people to move around them comfortably. And while you’re thinking about footprints, don’t forget the floor itself; for anyone setting up a workspace at home, this guide to the Best Flooring for Home Office has some great pointers.

Choosing The Right Panel Height For Privacy And Collaboration

While a cubicle’s footprint defines the physical workspace, it’s the panel height that really dictates the atmosphere. This single dimension has a massive impact on privacy, ambient noise, and whether your teams collaborate naturally or stay siloed. Picking the right height is more than just a design choice—it’s a strategic move that directly shapes your company’s workflow and culture.

Generally, panel heights for office cubicles fall into three standard dimensions, each serving a different function. The most effective office layouts I’ve seen usually mix and match all three to create dedicated zones for different kinds of work. Getting a handle on these categories is the secret to balancing individual focus with team synergy.

Comparison of three office cubicle systems with dimensions for open collaboration, seated privacy, and focused work.

Low Panels For Open Collaboration

Low panels, which typically stand between 39 to 42 inches tall, are all about creating an open, connected environment. At this height, employees can easily see and talk to colleagues right from their chairs, making it a perfect fit for teams that run on constant communication.

  • Best For: Sales teams, creative departments, and any project group that needs to bounce ideas off each other constantly.
  • Key Benefit: These panels don’t just encourage teamwork; they also let natural light flow freely across the office, which makes the whole space feel brighter and more energetic.
  • Consideration: The trade-off is pretty clear: you get minimal acoustic and visual privacy. This can be a major source of distraction for anyone trying to do deep, focused work.

Mid-Height Panels For Seated Privacy

Striking a great balance, mid-height panels usually measure around 53 inches tall. We often call this the “seated privacy” height because it blocks sightlines when an employee is sitting down but still allows them to see across the office when they stand up.

This is the sweet spot for many modern offices. It gives people the ability to concentrate on their own tasks without feeling totally walled off from their team. It’s a design that supports both focused work and easy accessibility.

This versatility makes 53-inch panels our most popular choice for general workstations, administrative roles, and any department that juggles independent tasks with occasional teamwork. It’s a simple, effective way to reduce visual clutter while keeping everyone connected. For a deeper look at creating the right level of separation, check out our guide on office cubicle privacy.

High Panels For Maximum Focus

When deep concentration is non-negotiable, high panels are the only way to go. Ranging from 65 inches and up, these walls provide serious visual and acoustic separation from the rest of the office.

High panels are essential for roles dealing with sensitive information or requiring long stretches of uninterrupted focus—think finance, HR, or legal departments. They effectively create a private bubble, minimizing both noise and visual distractions. Many companies use these taller panels to build out dedicated quiet zones or even full private office cubicles without the expense and hassle of permanent construction.

Navigating ADA Compliance For Accessible Workspaces

When you’re mapping out cubicle dimensions, you have to think beyond just comfort and productivity. Office layouts are governed by some very real legal requirements, namely the Americans with Disabilities Act (ADA) and local building codes. This isn’t just about being considerate—it’s a non-negotiable part of creating a workspace that’s safe and functional for every single employee. Trying to cut corners here is a recipe for hefty fines and expensive redesigns later on.

The smartest move is to plan for accessibility right from the get-go. This means looking past the footprint of a single workstation and thinking about how people actually move through the entire office. A layout that’s designed to be compliant from the start ends up benefiting everyone, creating a more open, spacious, and easy-to-navigate environment.

An office space with a wheelchair, illustrating ADA-compliant 60-inch turning radius and 36-inch clear pathways.

Key ADA Dimensional Requirements

While your local building codes might have their own quirks, the ADA sets a clear baseline for accessible design. As you plan your cubicle layout, these are the critical numbers you need to have baked into your design to make sure your space is truly open to all.

  • Clear Pathway Width: Your main walkways and corridors need a minimum clear width of 36 inches. This is the absolute minimum to allow for wheelchair passage. For busier areas where people are likely to pass each other, we always recommend going up to 48 inches.
  • Turning Space: Every accessible workspace needs a clear spot for turning around. The standard is a 60-inch diameter circle, which gives a person using a wheelchair enough room to complete a 180-degree turn without bumping into anything.
  • Accessible Routes: The path to an accessible workstation has to be just as clear as the workstation itself. Make sure furniture, filing cabinets, or other items don’t jut out into that required clear width.

These rules have a direct impact on how small you can realistically make an accessible workstation. To accommodate the necessary clearances for turning and movement, you’re often looking at a footprint of at least 8’x8′ (64 sq. ft.) or larger. It’s simply what’s needed to create a usable, unobstructed space.

Weaving Accessibility Into Your Floor Plan

Getting these standards into your design is more than just dropping a bigger cubicle in a corner somewhere. It requires a holistic look at your entire office. You have to ensure that shared resources—like printers, break rooms, and conference areas—are all located along accessible routes.

An accessible office is simply a more effective office. When you design for everyone, you end up with a less cluttered, more functional environment that improves traffic flow and usability for the whole team, not just for those with mobility challenges.

Nailing these guidelines can be a complex job. Working with experts can take the guesswork out of the process and ensure your layout is fully compliant from day one. If you need some hands-on help, check out our professional office space planning and design services to make sure your workplace is set up for success.

Essential Space Planning Rules For Office Layouts

Getting the dimensions of a single cubicle right is one thing, but how your entire office flows is what truly makes or breaks the space. Good space planning isn’t just about cramming in as many desks as possible. It’s about creating an environment where people can move around, collaborate when they need to, and get their work done without constant interruption. This all starts with clear walkways and smart placement of common areas.

If you don’t nail down the basics of circulation, even the most thoughtfully designed cubicles will feel cramped and clumsy. Planning these paths correctly prevents bottlenecks and ensures your office is safe and accessible for every single person.

Defining Walkways And Clearances

To keep foot traffic moving smoothly, office layouts really need two different kinds of walkways, and each has its own minimum width.

  • Major Walkways: Think of these as the main arteries of your office. They’re the primary routes from the entrance to different departments or to the emergency exits. A minimum width of 48 inches is the standard here. This gives enough space for two people to pass by each other comfortably and meets most accessibility codes.
  • Minor Walkways: These are the smaller paths you find between rows of cubicles or between a desk and a wall. You absolutely need at least 36 inches of clearance to give a single person a clear path and allow employees to push their chairs back without blocking the way.

Sticking to these minimums is non-negotiable for a functional layout. Squeezing walkways to fit one more desk almost always backfires, leading to daily frustration and a cluttered feel that can hurt productivity.

As you map out your office and choose cubicle sizes, it’s critical to have a solid financial plan. For a deeper look into the costs involved, it’s worth reading up on understanding tenant improvement costs per square foot.

Strategically Placing Common Resources

Where you put shared equipment like printers, copiers, and break areas has a huge impact on your office’s workflow. It’s tempting to stick them in any open corner, but they really need to be in central, easy-to-reach spots.

The trick is to also keep them away from zones where people are trying to do deep, focused work. This simple step prevents noise and foot traffic from becoming a constant headache for employees who need to concentrate.

This table is a handy reference for the most critical clearances you’ll need to create a successful and code-compliant office design.

Minimum Clearance Checklist For Office Layouts

Area/Element Minimum Recommended Clearance Reason
Main Aisle/Corridor 48 inches (4 ft) Allows for two-way traffic and wheelchair accessibility.
Minor Aisle 36 inches (3 ft) Provides a clear path for a single person.
Behind Seated Employee 36 inches (3 ft) Ensures enough room for chair pushback without blocking a walkway.
Facing a Wall/File Cabinet 42 inches (3.5 ft) Allows an employee to work and access drawers without feeling cramped.

Customizing Your Space With The Cubicle Designer Tool

Standard dimensions are a great starting point, but let’s be honest—they’re just that, a start. Your office has its own quirks, its own workflow, and its own personality that an off-the-shelf solution can’t fully capture. This is where customization really makes a difference, letting you move beyond the basics to build an environment that truly works for you.

True optimization happens when you fine-tune your workstations to fit your team’s specific needs. By adjusting dimensions, finishes, and storage, you design a space that actively supports productivity and comfort, ensuring every square foot is pulling its weight.

Bringing Your Vision to Life

It’s one thing to read about different footprints and panel heights; it’s another to actually picture how they’ll look and feel in your own space. That’s a tough gap to bridge, which is why we offer a powerful, free online tool to put you in the driver’s seat. The interactive Cubicle Designer lets you experiment with layouts in real-time.

With this tool, you can take everything you’ve learned here and build a tangible plan. It lets you drag and drop components, play around with different configurations, and see exactly how your choices will come together.

Being able to pre-visualize your layout is a game-changer. It gets rid of the guesswork, prevents costly measurement mistakes, and makes sure the final installation is exactly what you envisioned.

Benefits of Using the Designer Tool

Hopping on a digital planning tool before you commit to an order offers some serious advantages for any office manager or business owner.

  • Experiment Freely: You can test out different layouts for collaborative workstation cubicles or build high-privacy setups without any risk. See what fits and what doesn’t.
  • Select Finishes: Browse through a wide range of fabrics, laminates, and trim colors to make sure everything lines up with your company’s brand and style.
  • Generate a Precise Plan: When you’re done, you’ll have a detailed design our team can use to give you an accurate quote and make the installation process a whole lot smoother.

This tool is the essential bridge between knowing the standard sizes and creating a personalized, highly functional office. For a deeper dive, check out our guide on how to transform your office with our interactive cubicle designer.

Common Questions About Cubicle Dimensions

When you’re trying to figure out the world of office cubicle standard dimensions, it’s easy to get bogged down in the details. Getting straight answers to your questions is the key to designing a workspace that actually works—one that’s efficient, comfortable, and up to code. We get these questions all the time from office managers and business owners, so we’ve gathered the most common ones here.

Think of this as your quick reference guide. It builds on everything we’ve covered and acts as a final check to make sure you’ve thought through all the critical angles before you commit to a layout.

What’s The Most Popular And Versatile Cubicle Size?

Hands down, the 6’x8′ cubicle is the industry go-to. It’s seen as the most versatile and popular choice for most modern offices, and for good reason. At 48 square feet, it hits that sweet spot between giving an employee enough personal workspace without eating up your entire floor plan.

A 6’x8′ footprint can easily handle a standard desk, a good ergonomic chair, and necessary storage like a filing pedestal. There’s even plenty of room for a dual-monitor setup without making things feel tight. Its adaptability makes it a solid starting point for all kinds of general office roles, from administrative staff to project managers. It’s the footprint many of our clients begin with for their general workstation cubicles.

How Much Space Should I Leave For Walkways Between Cubicles?

This one is absolutely critical for both safety and accessibility, so don’t eyeball it. For any main walkways that get a lot of foot traffic, you need to plan for a minimum width of 48 inches. This gives enough room for two people to pass by each other without issue and keeps you in line with most ADA guidelines.

For smaller, secondary walkways—like the path between a row of cubicles and a wall—the absolute minimum is 36 inches. This ensures a clear, safe path for one person. But always, always double-check your local building codes. They have the final say and may have specific requirements for your building.

Can I Combine Different Panel Heights In My Office Layout?

Yes, you absolutely can, and you should! Mixing different panel heights is a smart and effective office design strategy. People often call it “zoning,” and it lets you create different kinds of work environments for different teams, all within the same open-plan office.

For instance, you could use tall panels (65″ or higher) to build quiet, focused zones for your finance or development teams. At the same time, you can use low panels (around 42″) for more collaborative groups like sales or marketing to keep communication open and easy. Mid-height panels are perfect for creating a transition between these areas.

This kind of strategic mix helps you support different work styles, which directly impacts productivity and keeps your team happy. If you’re planning zones that require high walls for real concentration, our private office cubicles can be a great modular option.


At Cubicle By Design, we know from experience that the right dimensions are the foundation of a better workplace. You don’t have to stick with standard sizes—let’s create a layout that’s perfectly suited to your team’s unique needs. Start bringing your ideal office to life today with our free, interactive tool.

Design Your Custom Cubicle Layout Now

Read More
Office Cubicle Privacy

Office Cubicle Privacy: Tips for Better Focus

Achieving real privacy in an office isn’t just about putting up walls; it’s about creating a space where people can actually focus, handle sensitive information confidently, and simply feel comfortable. It’s a careful balance between blocking visual clutter, like constant foot traffic, and quieting the acoustic chatter from nearby calls and conversations. Getting it right means looking beyond panel height to think about layout, materials, and even your workplace culture.

Why Office Privacy Is More Than Just High Walls

Let’s be honest, the standard cubicle often fails at its main job: giving someone a space for focused work. We’ve all been there—trying to dive into a complex report while a loud phone call happens just a few feet away, or getting distracted by constant movement in our peripheral vision. This isn’t just a small annoyance; it’s a huge drain on productivity, morale, and even data security.

Modern office cubicles with glass panels designed for privacy.

Creating effective office cubicle privacy is a strategic business decision, not just an employee perk. It starts with understanding the two very different kinds of distractions that plague most offices.

The Two Faces of Office Distraction

First, you have visual privacy. This is all about controlling what an employee sees. The constant parade of people walking by, colleagues waving, or just general movement can repeatedly break concentration. This is a massive issue for roles that demand intense visual focus, like data analysis, coding, or graphic design.

Second, and often the bigger culprit, is acoustic privacy. This is about controlling what an employee hears. Overheard conversations, ringing phones, and even loud typing can make deep work feel impossible. Study after study confirms that human speech is the single most distracting office sound, causing a significant drop in performance.

A distracting environment doesn’t just slow people down; it forces them to work harder to achieve the same results, leading to increased stress and burnout. Solving for privacy is solving for employee well-being and operational efficiency.

Different Teams Have Different Needs

One of the biggest mistakes I see is a one-size-fits-all approach to privacy. It’s crucial to recognize that every team has unique requirements.

For instance:

  • A finance or HR department handling sensitive data needs the highest level of both visual and acoustic separation to maintain confidentiality.
  • A customer service or sales team absolutely needs strong acoustic barriers to prevent calls from bleeding over and to keep conversations professional.
  • An engineering or writing team might benefit most from reducing visual motion, which helps them stay in a state of deep, uninterrupted focus for longer stretches.

The fact that high-partitioned cubicles are the single most popular office setup, making up 37.7% of all surveyed configurations, shows that businesses know personal space is important. The problem is, many of these setups fail because they don’t solve the specific acoustic and visual problems for the teams using them.

By figuring out your office’s unique pain points, you can move beyond generic solutions. That’s where specialists like Cubicle By Design come in, helping you transform a distracting space into one that’s built for success. Once you understand the real-world impact of these interruptions, you can start building a workspace that truly works. A great next step is to explore the key features that make a difference by reading our guide on the benefits of a modern office cubicle. This background will set you up perfectly for the practical solutions we’ll cover next.

Diagnosing Your Office’s Privacy Pain Points

Before you even think about pricing out new panels or shifting desks around, you’ve got to take a step back and figure out what’s really going on. I’ve seen it time and time again: companies make assumptions about what their employees need, and it turns into one of the most common—and costly—mistakes in office planning. The goal isn’t just to throw up barriers; it’s to solve the right problems.

A team collaborates in a modern office space, highlighting the need for balanced privacy and teamwork.

Jumping straight to a solution without a clear diagnosis often leads to a wasted budget and the original issues festering. A smart strategy always starts with asking the right questions to map out the specific pain points hitting your team.

Moving Beyond Assumptions

Every department works differently, which means they all have different privacy needs. Your sales team, for example, is probably struggling with call confidentiality. When they’re discussing pricing and contracts, the last thing they need is for those details to be overheard. For them, strong acoustic separation is a must-have to do their jobs right.

Meanwhile, your engineering team might be completely derailed by something else: visual motion. The constant parade of people walking past their desks can completely shatter the deep focus needed for complex coding. In their case, visual privacy is the top priority. If you don’t ask, you’d never know which problem is doing more damage to productivity.

A Practical Diagnostic Checklist

To get real answers, you have to collect direct feedback. You don’t need anything complicated—a simple survey or a few quick, informal interviews can uncover everything you need to know. The key is to ask questions that get to the root of the distractions and frustrations.

Here are a few questions you can adapt for your team:

  • What are the top three distractions you face on a typical day? (This helps you figure out if the problem is noise, visuals, or both.)
  • Where in the office do you feel most productive, and why? (Their answer might point to a quiet corner or a less-trafficked spot.)
  • Are there times you feel conversations—yours or others’—are too public? (This one gets right to the heart of acoustic privacy concerns.)
  • Does movement or activity in your line of sight disrupt your focus? (This hones in specifically on visual distractions.)

The answers will quickly help you identify “privacy hotspots”—specific areas or departments where the lack of office cubicle privacy is hitting hardest. These are the places you need to tackle first.

By focusing on your team’s actual feedback, you shift from guessing what they need to knowing what will make a tangible difference. This data-driven approach ensures your investment directly addresses the biggest obstacles to their productivity and well-being.

This whole diagnostic phase is about understanding that delicate balance between collaboration and concentration. Getting this information first helps you avoid the common pitfalls many companies fall into. To learn more about what to watch out for, check out our guide on the common mistakes in office planning and how to avoid them.

Ultimately, this process gives you a clear, evidence-based roadmap. You’ll know precisely where higher panels are needed, which areas could benefit from sound-dampening materials, and how a smarter layout could support different work styles. With this diagnosis in hand, you’re ready to find real solutions for your actual problems.

Choosing the Right Cubicle Panels and Materials

Alright, you’ve done the hard work of diagnosing your office’s privacy weak spots. Now for the fun part: translating that insight into real, physical solutions. This is where we move from strategy to structure, picking the actual walls and panels that will shape your team’s workspace and, ultimately, their productivity.

Getting this right is about more than just aesthetics. It’s about matching the physical environment to the work being done. A one-size-fits-all approach is a fast track to wasted money and frustrated employees.

A modern office featuring Series 7 cubicles with fabric panels and glass toppers to enhance privacy and light.

Why Panel Height Matters More Than You Think

Panel height is your number one tool for creating privacy. It can be the single biggest factor between a team that’s locked in and one that’s constantly pulled off task.

For a sales or customer service team that lives on the phone, a 65-inch or taller panel isn’t a luxury; it’s a necessity. These high walls are fantastic at containing sound, stopping conversations from bleeding over and protecting client confidentiality. They also create total visual separation, which is crucial for any role that requires deep, uninterrupted focus.

On the other hand, a collaborative team in marketing or design might find that suffocating. For them, 48-inch to 54-inch panels often hit the sweet spot. This height provides privacy when seated—blocking distracting sightlines and dampening some noise—but still makes it easy to pop your head up and ask a quick question. It’s the perfect balance between individual focus and spontaneous teamwork.

The big push toward open-plan offices really brought this issue to light. We’ve seen studies showing that over half of employees are unhappy with their sound privacy. We’re talking 59% in offices with high partitions and 58% in those with low ones. The lesson? Just having a wall isn’t enough. It has to be the right wall for the job.

Selecting Materials for Acoustic and Visual Control

Once you’ve got your height figured out, the panel material itself is your next big decision. Each one brings something different to the table.

  • Sound-Absorbing Fabric Panels: When noise is your main enemy, these are your best friend. The fabric is porous by design, trapping sound waves and cutting down on that ambient office chatter. They’re essential for call centers, HR departments, or anywhere conversations need to stay contained.
  • Durable Laminate Panels: Laminate won’t absorb sound like fabric, but it’s incredibly durable and a breeze to clean. It’s a smart, practical choice for high-traffic zones and provides a solid visual block, making it a great base for any cubicle setup.
  • Glass Panel Toppers: Glass is my favorite trick for adding privacy without making the office feel like a cave. You can add clear, frosted, or patterned glass toppers to your panels—like the ones in our Series 7 line—to block sound while still letting all that valuable natural light flow through the space.

I’ve found that the most successful layouts almost always mix materials. Think about a fabric panel at desk level to soak up the most noise, with a sleek glass topper above it to keep things feeling bright and open. It’s a win-win.

Below is a quick cheat sheet I put together to help clients compare their options at a glance.

Comparing Cubicle Panel Options for Privacy and Purpose

This table breaks down how different panel heights and materials stack up against common office needs, helping you make a more informed choice.

Panel Option (Height & Material) Visual Privacy Rating (1-5) Acoustic Privacy Rating (1-5) Best For Example Product
48″ Fabric Panel 3 3 Collaborative teams needing seated privacy and moderate noise reduction. Series 7 Cubicles
54″ Laminate Panel 4 2 High-traffic areas needing strong visual separation and durability. Series 7 Cubicles
65″ Fabric Panel 5 5 Call centers, sales teams, HR—any role requiring high focus and sound containment. Series 7 Cubicles
65″ Fabric + Glass Topper 5 4 Executive areas or focus-heavy roles where natural light is also a priority. Series 7 Cubicles

As you can see, the “best” option really depends on the specific job function. There’s no single right answer, only the right answer for your team.

Visualizing Your Privacy Solutions

Trying to imagine all of this can be tough. That’s why tools like a Custom Cubicle Designer are so valuable. You can play around with different heights, materials, and layouts in real-time. See exactly how a row of 65-inch stations will feel, or how adding glass toppers can completely change the vibe of a department.

This step is a game-changer for getting everyone on board and making sure the final product is exactly what you envisioned. It also helps you manage your budget by comparing costs. And on that note, many people are surprised to learn that custom-fit cubicles are more affordable than you think. They deliver a much better ROI than off-the-shelf solutions that don’t quite solve your core problems.

Ultimately, choosing the right panels is all about matching form to function. When you align your choices with the real-world needs of your team, you’re not just buying furniture—you’re building an environment designed for success.

Thinking Beyond the Wall for Total Privacy

Getting office cubicle privacy right means looking past the panels themselves. While the right walls are your foundation, a truly private and productive workspace is built by layering smart, complementary strategies. It’s about shaping the whole environment—what people see, what they hear, and even how they move through the space.

Great privacy isn’t just about what you build up; it’s also about what you tune out. This is where clever acoustic and layout solutions come in, transforming a collection of cubicles into a cohesive, focused work environment.

Mastering the Office Soundscape

One of the most powerful tools for acoustic privacy isn’t a physical wall at all. Sound masking systems, sometimes called white noise machines, work by introducing a soft, unobtrusive background sound that’s similar to airflow.

This engineered sound is specifically designed to match the frequencies of human speech. It doesn’t actually eliminate conversations, but it gently blurs them, making them much harder to understand and, therefore, far less distracting. The key is subtlety. When done right, the sound should be barely noticeable, just blending into the background without an annoying hum.

Think of it like this: In a dead-silent library, a single whisper can travel all the way across the room. But in a busy coffee shop, that same whisper gets lost in the ambient noise. Sound masking creates a consistent, controlled “coffee shop effect” for your office.

This simple addition can dramatically cut down on how far conversations travel, giving employees the confidence to take calls without feeling like the whole office is listening in. It’s a potent layer of acoustic defense that makes your cubicle panels work even harder.

Designing a Smarter Office Layout

How you arrange your cubicles is just as critical as what they’re made of. A strategic layout can passively guide foot traffic, break up sightlines, and create natural zones for different kinds of work. Instead of lining up cubicles in long, straight rows that create a “bowling alley” effect, you can get a lot smarter with the configuration.

Here are a few layout tips I’ve seen work wonders:

  • Stagger the Entrances: By simply offsetting cubicle openings, you immediately eliminate those long, direct lines of sight. This small change prevents people from getting distracted by every single person who walks down the main corridor.
  • Create Dedicated Zones: Group teams with similar work styles together. For example, put a high-energy, phone-heavy sales team on the opposite side of the office from a detail-oriented accounting department that needs deep concentration. This minimizes cross-departmental disruption before it even starts.
  • Use Natural Barriers: Don’t underestimate the power of strategically placed furniture and decor. Large potted plants, bookcases, or freestanding acoustic screens can act as soft visual and sound buffers, breaking up open spaces and adding a much-needed layer of perceived privacy.

A thoughtful layout anticipates workflow and potential distractions, solving a lot of privacy issues from the get-go. For a deeper dive into how different setups compare, check out our guide on the open-plan offices vs. cubicles and their pros and cons.

Layering Small Solutions for Big Impact

Finally, giving employees some personal control over their space can complete your privacy strategy. The most effective workspaces I’ve designed combine the big-picture solutions with smaller, individual ones.

Consider adding these elements to the mix:

  • Desktop Acoustic Dividers: These smaller, portable panels can be added to existing desks. They provide an extra boost of sound absorption and visual focus right where it’s needed most.
  • Headset Policies: For teams that are constantly on calls or listening to audio, establishing a clear headset policy can drastically cut down on the ambient noise pollution for their neighbors.

Here’s how this plays out in the real world. Imagine a sales team placed next to an accounting department. The solution isn’t just taller walls. It’s a combination of 65-inch fabric panels to block the initial sound, a sound masking system to blur any remaining chatter, a layout that directs foot traffic away from the accountants, and a clear headset policy for the sales team.

By layering these architectural, acoustic, and behavioral solutions, you create a genuinely private workspace. Each element supports the others, delivering a result that’s far more effective than any single solution could ever be on its own.

Your Practical Privacy Implementation Checklist

Okay, you’ve diagnosed your privacy issues and sketched out some great ideas. Now for the hard part: turning those plans into a real, functioning workspace without derailing everyone’s day-to-day. A successful rollout is about much more than just scheduling an installation date. It’s a dance of budgeting, logistics, and most importantly, communication.

Let’s walk through a practical checklist to help you manage your office cubicle privacy project like a pro and sidestep those last-minute disasters we’ve all seen happen.

Budgeting and Calculating Your Return

Before a single panel is ordered, you need to get the budget locked down and make a clear case for the investment. Let’s be honest, a well-planned office overhaul isn’t cheap. It’s a serious corporate investment—so serious, in fact, that the global market for cubicles and partitions hit $6.3 billion in 2022 and is still climbing. That tells you businesses are taking this seriously. If you want to dive deeper into the market trends, there’s some interesting research on the resurgence of cubicle design on room.com.

To get that budget approved, you have to talk about the return on investment (ROI). It’s all about productivity.

  • Estimate Lost Productivity: Just ask your team. Find out how much time they feel they lose to noise and distractions every day. Even 30 minutes of lost focus per person adds up to a staggering amount of lost time and money across the entire company.
  • Project Error Reduction: Think about your detail-oriented teams—finance, data entry, legal. A quieter, more private space directly translates to fewer costly mistakes. Try to put a number on what those errors cost you now.
  • Factor in Employee Retention: Don’t underestimate this one. An office that respects focus and well-being is a massive perk. It’s a powerful tool for keeping your best people from looking elsewhere.

Mapping Out Technical and Logistical Needs

Here’s a step I’ve seen people skip, and they always regret it: planning for power and data. Your slick new layout is almost guaranteed to require changes to your existing infrastructure. Finding that out on installation day is a recipe for major delays and budget overruns.

Grab your facilities manager or a professional planner and physically walk the space.

  • Electrical Outlets: Does every single new workstation have easy access to power? Don’t assume.
  • Data Ports: Is there a network drop planned for every station that needs one?
  • Code Compliance: Double-check that the new layout meets all local fire and accessibility codes. This is non-negotiable.

This whole process is about layering solutions. You’re combining physical walls, maybe some acoustic masking, and a smarter layout to get the job done.

An infographic showing the process flow for achieving total office cubicle privacy, with icons for walls, sound masking, and layout.

As you can see, it takes more than just one element to create a truly private and productive environment.

A project’s success is often determined by how well you manage the small, technical details. A thorough walkthrough of your electrical and data plan before you order a single panel will save you from major headaches down the road.

Communication and Team Buy-In

Finally, you can have the perfect plan, but it will fall flat without clear communication. Any change, even a good one, can make employees anxious if they don’t understand what’s happening and why.

Put together a simple communication plan to get your team on board and even excited about the new space.

  1. Announce the ‘Why’: Don’t just say, “we’re getting new cubicles.” Explain how the new layout is designed to slash distractions and help them focus. Frame it as what it is: an investment in their comfort and productivity.
  2. Share the Timeline: Give everyone the key dates. When does installation start? When will it be done? No one likes surprises.
  3. Provide a Floor Plan: Show them what the new space will look like and where their new workstation will be. It helps people visualize the change and reduces a ton of uncertainty. If you need some inspiration, browsing a gallery of popular cubicle configurations can give you great ideas for how to organize the space.
  4. Conduct a Final Walkthrough: Once the dust settles, walk through the new layout with team leads. This is your chance to catch any small issues and make final adjustments before everyone moves in.

Follow these steps, and you’ll do more than just install some new furniture. You’ll execute a smooth, successful project that genuinely improves your office and shows your team you’ve got their back.

Answering Your Top Office Privacy Questions

Even with the best plans, a few questions always seem to pop up right before you pull the trigger. Designing a private, productive office involves a lot of moving parts, from panel heights to materials and flow. To help you sort through the final details, here are our answers to the questions we hear most often from business owners tackling this exact challenge.

What’s the Magic Number for Cubicle Height?

This is the classic question, and if I’m being honest, there’s no single “magic” height. The right choice is all about what your teams actually do all day. You’re matching the barrier to the task at hand.

For departments that need to buckle down and focus—think HR, finance, or your legal team—you’ll want to look at panels 65 inches or higher. This is the gold standard for creating a true zone of focus. It provides serious acoustic dampening and complete visual separation, effectively cutting out disruptions from conversations and foot traffic.

But for teams that feed on quick, spontaneous collaboration, like marketing or creative groups, those tall walls can feel like a cage. For them, a height between 48 and 54 inches is often the sweet spot. It’s high enough to block sightlines and muffle sound when people are seated, but low enough that they can easily pop their head up to ask a teammate a quick question. The best office designs we see almost always mix and match, tailoring the privacy level to each department.

The goal isn’t just privacy; it’s purposeful privacy. A 65-inch wall is a tool for focus, while a 48-inch wall is a tool for balanced interaction. Choosing the right tool for the job is what makes the investment pay off.

How Can I Boost Privacy Without Breaking the Bank?

Improving privacy doesn’t have to mean a massive, expensive overhaul. If you’re working with a tight budget, you can get a lot of bang for your buck by focusing on a few strategic, high-impact changes first.

If noise is the main problem, start with sound-dampening fabric panels that you can add to your existing cubicle walls. Even smaller desktop dividers can absorb a surprising amount of chatter right at the source. Sometimes, a simple white noise machine can work wonders in masking background conversations and giving people their speech privacy back.

For visual privacy, some of the most effective solutions are completely free. Try rearranging your layout to stagger cubicle entrances or face desks away from busy hallways. It can dramatically cut down on distractions. Adding a few tall plants or freestanding screens also creates effective and affordable visual barriers. The key is to focus your limited budget on the teams with the most critical privacy needs first—that’s where you’ll see the biggest return.

Are Glass Panels a Good Idea for Privacy?

Glass panels are a fantastic option, especially when you want to achieve acoustic separation without sacrificing that open, airy feel. Solid materials block sound waves, and glass is no exception. It lets you create quiet zones while keeping the natural light and brightness that modern offices are known for.

Of course, clear glass on its own doesn’t do much for visual privacy. That’s where frosted or patterned glass comes into play. These options obscure distracting movement and details while still letting all that valuable light pass through.

A design we recommend all the time is using glass panels as “toppers” on fabric or laminate panels. For example, a 54-inch solid panel with a 12-inch glass topper gives you a total height of 66 inches. This design blocks sound where it matters most—at voice level—but keeps the upper part of the office feeling visually connected. It’s a modern approach that really delivers the best of both worlds.

Will Taller Walls Make My Office Feel Claustrophobic?

This is probably the number one concern we hear, and it’s a totally valid one. Nobody wants their team to feel like they’re working in a maze of dark corridors. The good news is, this is easily avoided with a few smart design choices.

The trick is to use panels that are tall enough for privacy but still stop well below the ceiling. That simple gap at the top allows for proper air circulation and lets your overhead lighting reach every single workspace. It makes all the difference in preventing that closed-in feeling.

And as I mentioned, incorporating panels with glass toppers is another great strategy. This gives you the acoustic blocking you need at seated and standing height, but keeps the upper space feeling light and open. Don’t underestimate the power of color, either. Lighter fabrics and finishes can make the entire office feel bigger and more expansive. You’re not trying to build a fortress; you’re just creating distinct “zones of privacy” that feel both secure and inviting.


Ready to stop guessing and start designing a more private, productive workspace? The experts at Cubicle By Design can help you navigate every decision, from layout planning to material selection. Explore our solutions and start building a better workplace today.

https://cubiclebydesign.com

Read More