Creative DIY Office Furniture Ideas for a Modern Workspace | Cubicle By Design

Building your own workspace furniture is one of the most effective DIY office furniture ideas out there. It puts you in complete control of the style, the function, and, most importantly, the budget. Whether you're talking about simple shelving or a completely custom-built conference table, going the DIY route lets you create pieces that fit your space and your company culture perfectly.

Why DIY Office Furniture Is a Smart Move for Modern Workplaces

The old-school office—a sea of identical desks under fluorescent lights—is a thing of the past. Today's workspaces need to be flexible, adaptable, and built for the people who actually use them. This shift is a huge reason why so many businesses are looking at DIY office furniture ideas. It's about so much more than just saving a few dollars; it's a way to build a more effective and inspiring place to work.

Two modern mobile height-adjustable desks with a portable privacy screen in a bright, flexible office space. The desks feature a light wood finish and are positioned on a grey carpet, showcasing DIY office furniture ideas for a flexible office.

When you build it yourself, you move beyond the one-size-fits-all furniture that clutters most catalogs. You get the chance to craft an environment from the ground up that actually helps your team do their best work.

The Real Drivers Behind the DIY Trend

So, what's really fueling this trend? It’s not just one thing. A few key factors are making custom-built furniture a surprisingly practical choice for everyone from scrappy startups to established corporations. For more inspiration on reimagining your office space, check out these creative ideas.

Here's what's pushing businesses toward DIY:

  • The Need for Flexibility: Hybrid work is here to stay, and that means your office has to be able to change gears quickly. DIY projects like mobile partitions or modular tables let you reconfigure a space in minutes, not days.
  • A Unique Company Culture: Off-the-shelf furniture is, by definition, generic. Building your own pieces, even small ones, injects your company's personality into the physical space. It’s a tangible way to show what you're all about.
  • Budgetary Control: Let's be honest, cost is always a factor. While it's not the only reason, DIY can give you a high-end, custom-fit look without the high-end price tag, freeing up cash for other important things.
  • Solving Specific Problems: Ever had an awkward corner that nothing fits into? Or needed a collaboration table that’s a very specific, non-standard size? DIY is the perfect answer for creating pieces that solve your unique spatial puzzles.

A well-designed office isn’t just about looking good; it's a tool that can directly impact how people work, think, and feel. Taking on DIY projects is a hands-on way to make sure that tool is perfectly suited for your company's mission.

This thinking lines up with how modern office trends boost employee productivity, focusing on design that supports performance.

Ultimately, mixing in smart DIY projects helps you create a more thoughtful, purpose-built workspace. But you also have to know when a project is too big to handle on your own. That’s where blending your custom creations with professional solutions from a provider like Cubicle By Design makes all the sense in the world.

Inspiring DIY Projects You Can Actually Build

Alright, enough with the theory. The best DIY office furniture projects are the ones you can actually finish and that genuinely improve how your workspace feels and functions. This is where your bright ideas meet a hammer and nails.

Let's walk through a few concrete projects that deliver a high-end look without the matching price tag, ranging from beginner-friendly to a bit more involved.

A rustic wooden workbench covered in sawdust, showcasing a DIY office furniture woodworking project. On the bench are a blueprint, sander, measuring tape, and clamps, ready for construction.

It’s no surprise that the appeal of DIY is exploding. The global DIY furniture market is on track to jump from USD 201.48 billion in 2026 to a staggering USD 353.36 billion by 2031. That’s fueled by a powerful 11.89% annual growth rate, with younger folks in North America and Europe really pushing the trend.

For office and facility managers, this translates directly into real savings—often a cost advantage of over 2% on certain pieces compared to buying them off the shelf.

Here are a few projects you can get started on.

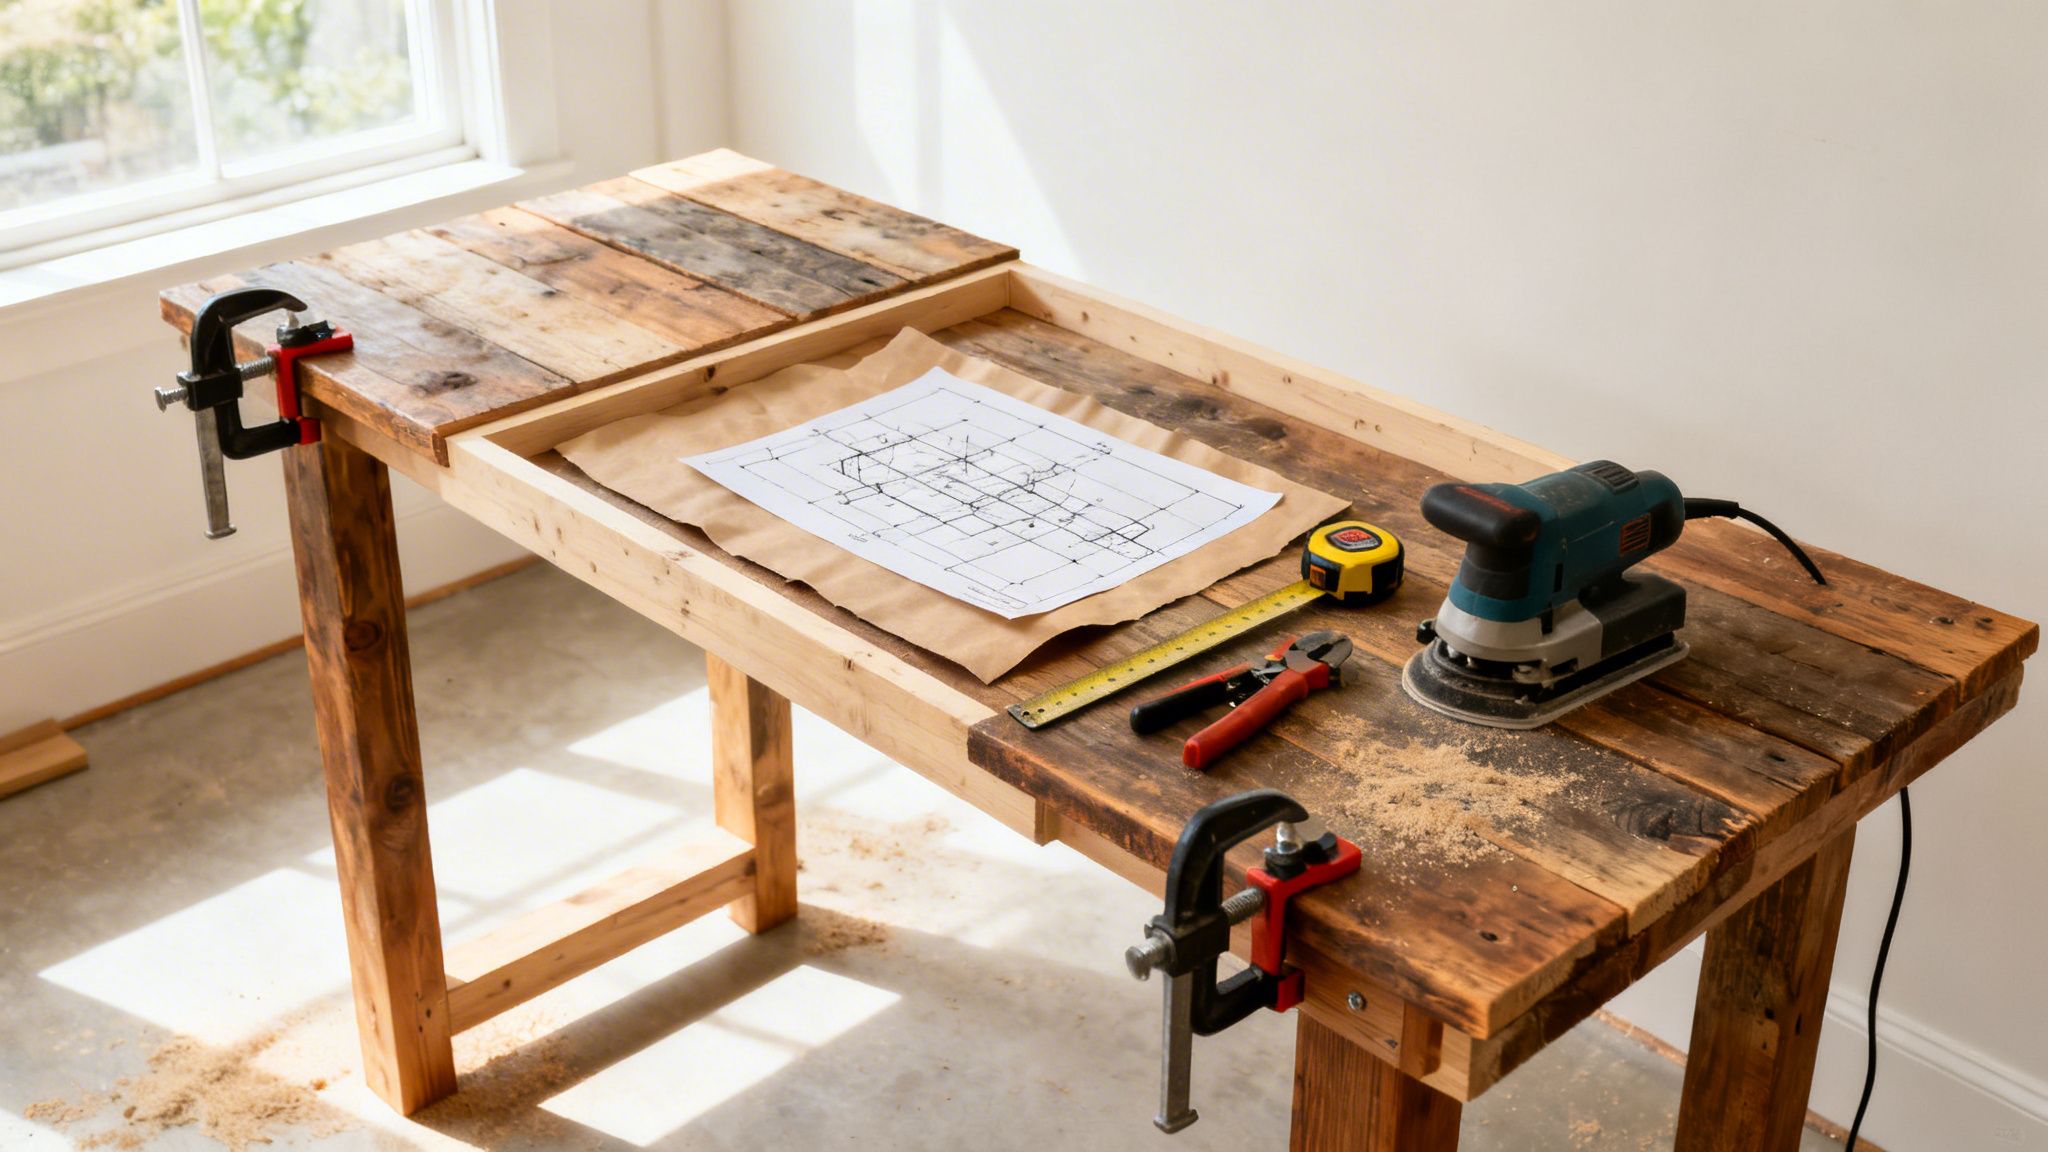
The Reclaimed Wood Standing Desk

A standing desk is a game-changer in a modern office, boosting both health and focus. When you build one yourself from reclaimed wood, you get a piece with character and a great story.

  • Materials: Reclaimed wood planks (old barn wood or scaffolding boards work great), sandpaper, wood sealant or oil, and a standing desk frame kit (you can get electric or manual versions).
  • Cost Estimate: $200 – $500. The frame kit is your biggest line item here; the wood itself can often be found for cheap or even free.
  • Build Summary: Start by cleaning up the wood and sanding it until it’s smooth, but try to keep some of that unique, weathered texture. If you need a wider surface, join a few planks together. Seal it for protection, then attach your new desktop to the standing desk frame by following the manufacturer’s guide.

The result is a one-of-a-kind desk that feels both rustic and perfectly modern.

Industrial Pipe Shelving

If you need a storage solution that's both tough and stylish, industrial pipe shelving is a fantastic choice. It fits right into creative, modern, or industrial-themed offices.

These shelves are incredibly easy to customize, making them one of the most flexible DIY office furniture ideas out there, especially for odd-shaped corners or a blank wall that needs a statement piece.

The beauty of pipe shelving lies in its modularity. You can start with a small unit and easily expand it as your storage needs grow, all while maintaining a cohesive look. This makes it a smart, long-term investment for an evolving office.

  • Materials: Black iron or galvanized pipes and all the fittings (flanges, elbows, tees), solid wood planks (pine is a good, affordable option), wood stain, and sturdy wall anchors.
  • Cost Estimate: $150 – $400, which really depends on how big and complex your design is.
  • Build Summary: First, map out your shelf layout and cut the wood planks to the right length. Stain and seal them. Next, assemble the pipe structure—it’s a lot like building with adult-sized LEGOs. Secure the flanges to the wall with heavy-duty anchors, then simply place your finished shelves onto the pipe supports.

The Upcycled Collaborative Table

Have an old, forgotten table taking up space in a storage closet? Don't get rid of it. Upcycling is a brilliant, low-cost way to create a large, functional table for team huddles and brainstorming.

If you're interested in breathing new life into old pieces, you can find some easy and creative furniture upcycling tips to get you started. This approach isn't just about saving money; it’s about being resourceful, keeping a perfectly good item out of a landfill, and adding a unique piece with a history to your office.

Choosing the Right Materials for a Lasting Build

A great design idea is one thing, but the materials you choose are what will make or break your DIY office furniture. The right choice affects everything—the look, the feel, and most importantly, how well your new desk or shelf stands up to the daily grind. It's a classic balancing act between your budget, the durability you need, and the style you're going for.

Various construction materials for DIY office furniture ideas laid out on a floor. The materials include wood planks, plywood sheets, MDF boards, black metal pipe fittings, and reclaimed wood boards.

Let’s get practical and look at the most common materials people use. We'll go beyond the basics to talk about what it’s actually like to work with them and how they hold up over time. This way, you can be sure that custom piece you're so proud of on day one is still looking good years from now.

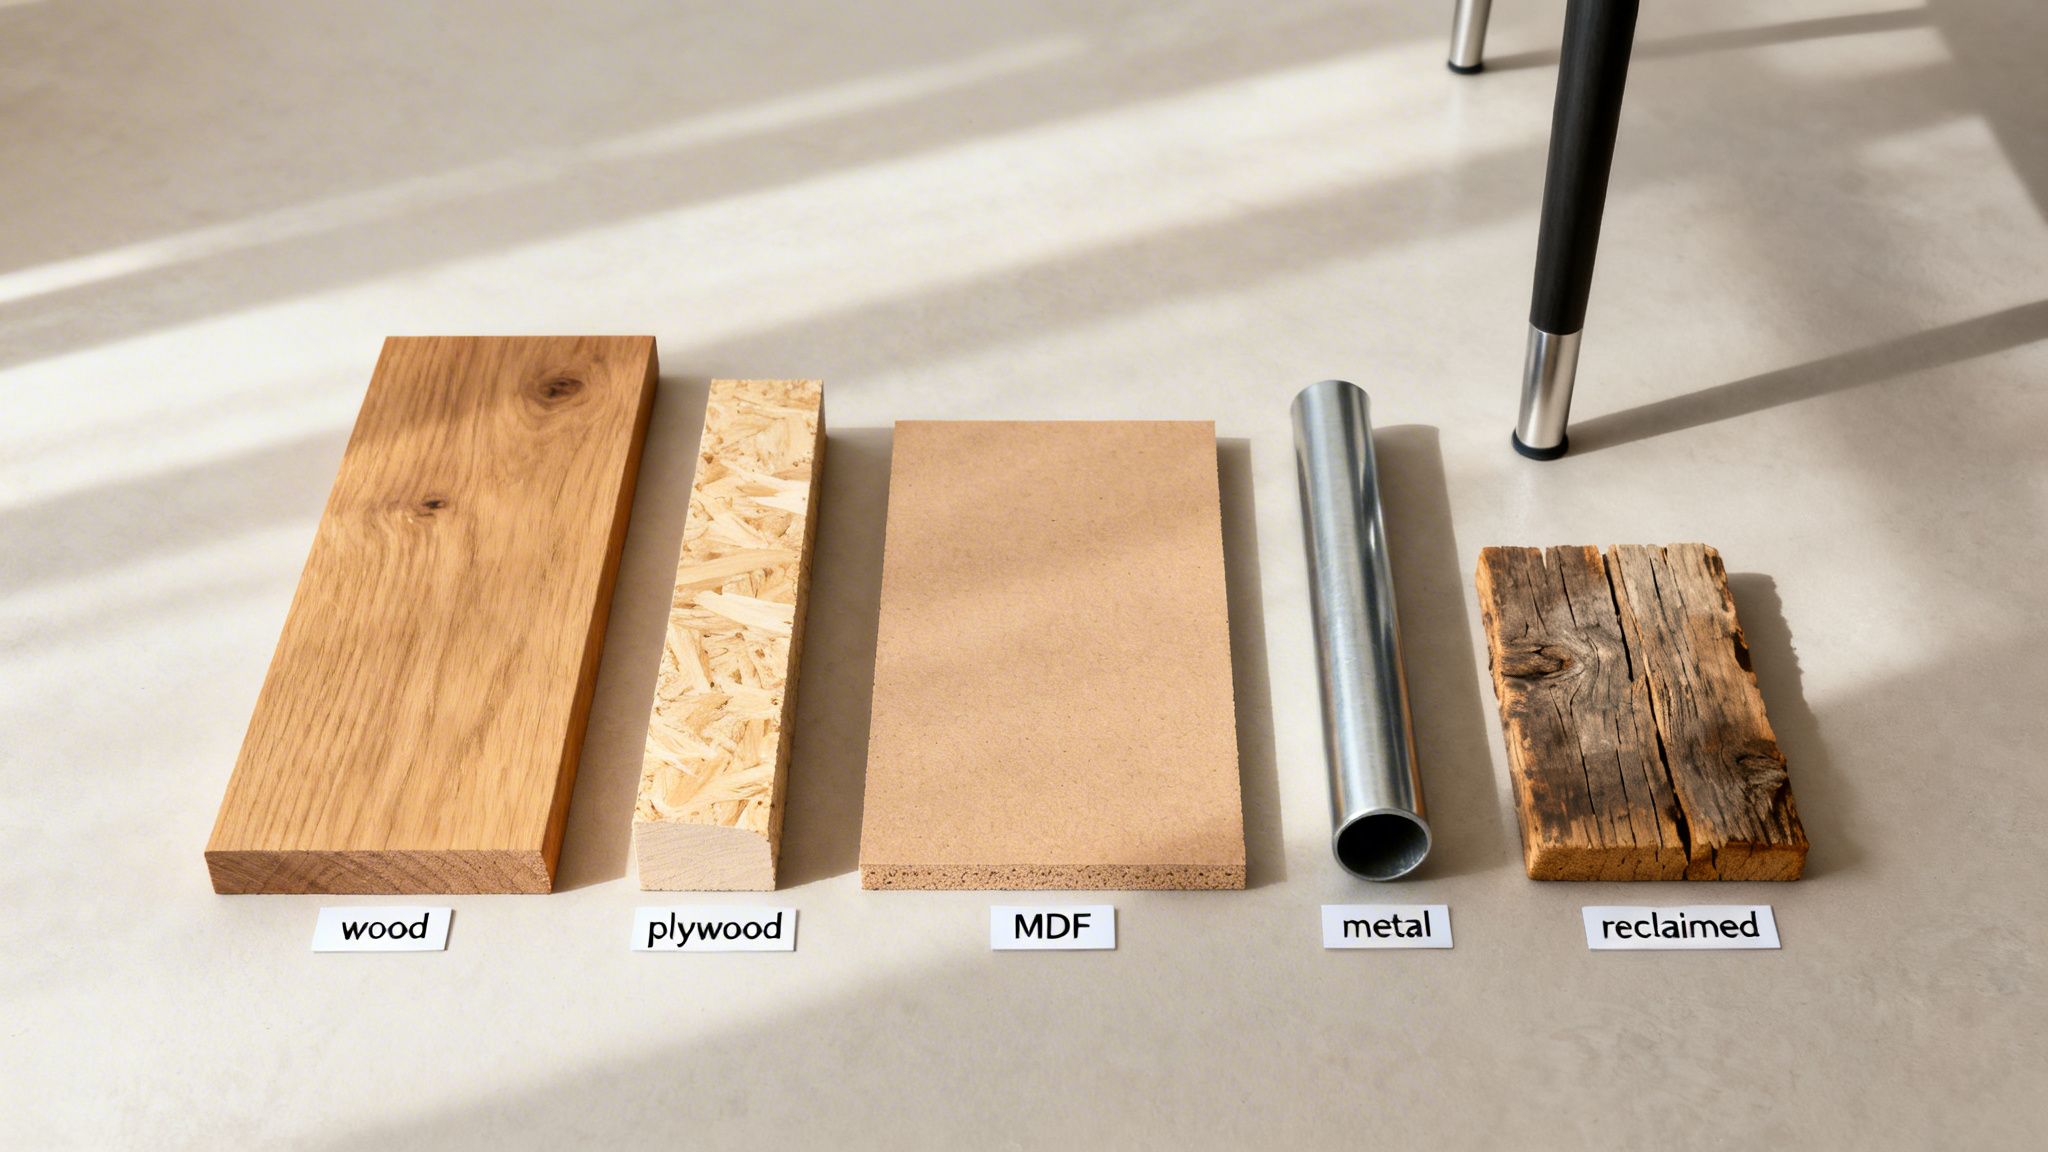
Solid Wood and Reclaimed Lumber

For pure, timeless appeal, you just can't beat solid wood. Softer woods like pine are a great starting point—they're affordable and pretty forgiving to work with. If you need something tougher, hardwoods like oak and walnut bring serious durability and a high-end finish.

Then there's reclaimed wood. It has a story built right in, giving your project an incredible texture and character that’s impossible to replicate. But be prepared for some prep work. You’ll often need to pull old nails, do a lot of sanding, and apply a good sealer. It's an investment of both time and money, but you end up with a true one-of-a-kind piece.

Plywood and MDF

Plywood and Medium-Density Fiberboard (MDF) are the real workhorses for most DIY builders. You're not just getting "cheap wood" here; high-quality Baltic birch plywood, for example, is incredibly strong and far less likely to warp than solid wood. It's perfect for big desktops and has a clean, modern look with those cool-looking layered edges.

MDF is your best friend when you’re on a tight budget and plan to paint the final piece. It gives you a perfectly smooth surface that takes paint beautifully. The trade-offs? It's heavy, will swell up if it gets wet before it's sealed, and doesn't hold screws quite as tenaciously as real wood.

A lot of DIYers use these engineered woods to build pieces that look just as sleek as professional systems. If you're curious about that world, it's worth understanding what modular furniture is to get ideas for your own custom builds.

Metal and Industrial Components

Want to add an industrial vibe and some serious strength? Bring in some metal. Black steel pipes are the classic go-to for building desk legs and shelving units. They're surprisingly easy to work with and can be configured in almost any shape or size you can imagine.

Working with metal might sound intimidating, but many projects just involve screwing together pre-threaded pipes and fittings—it’s like an adult-sized erector set. It’s a fantastic way to guarantee your furniture is rock-solid while adding a modern, utilitarian feel.

Choosing the right material is a critical first step. The table below breaks down the pros and cons of each to help you match the material to your skill level, budget, and project goals.

DIY Office Furniture Material Comparison

Material Type Average Cost (per sq. ft.) Durability Rating (1-5) Best For Beginner Friendliness (1-5)
Solid Wood (Pine) $5 – $15 3 Desks, shelves, tabletops 4
Solid Wood (Oak) $10 – $25 5 High-traffic desktops, long-lasting builds 3
Reclaimed Wood $10 – $30+ 4 Accent pieces, rustic desks 2
Plywood (Birch) $4 – $8 4 Large desktops, cabinets, modern designs 4
MDF $2 – $5 2 Painted furniture, cabinet doors, budget builds 5
Metal Pipe & Fittings Varies by project 5 Legs, frames, industrial shelving 5

After reviewing the options, you can see there's no single "best" choice—it all depends on your specific needs. For a beginner-friendly painted bookshelf, MDF is a clear winner. For a statement desk that will last a lifetime, investing in oak or walnut makes perfect sense.

Finally, don't forget about the finish. A quality stain, paint, or sealant does more than just define the look; it's your first line of defense against spills, scratches, and daily wear. Always try to pick low-VOC (Volatile Organic Compound) finishes. They’ll keep the air in your office healthier for you and your team.

How to Keep Your DIY Office Project Safe and Compliant

Building your own office furniture is incredibly satisfying. But when you move from a personal project to a professional workspace, your beautiful creation has to be more than just good-looking—it has to be completely safe. A desk that can't handle the weight of a computer or shelves that aren't anchored properly quickly become serious liabilities.

Getting this right means thinking beyond the aesthetics and focusing on the non-negotiables that make any piece of furniture truly office-ready. Every choice you make, from the screws you use to the paint you apply, has an impact.

Prioritizing Structural Integrity

The absolute foundation of any safe DIY furniture is its structural integrity. A wobbly desk or a sagging bookshelf isn’t just an annoyance; it’s an accident waiting to happen. For any piece that will hold significant weight, like big desks or storage units, this is your number one job.

  • Reinforce Your Joints: You need strong joinery methods. Think pocket holes, mortise and tenon joints, or at least sturdy metal brackets. Simple butt joints held with just glue and a few screws often aren't cut out for heavy-duty office life.
  • Use the Right Materials: As we’ve talked about, a material like MDF is fine for a painted finish, but it will never hold the weight that solid oak or high-grade plywood can. You have to match your material to the job it needs to do.
  • Secure It to the Wall: This is a big one. Any tall or heavy shelving unit must be anchored directly to wall studs. This is a non-negotiable step to prevent tipping, a major safety hazard in any environment.

Think of it like a building's foundation—without a solid base, everything built on top is at risk. Your DIY furniture's structural integrity is that foundation. A few extra screws or stronger brackets are a small price to pay for peace of mind.

Managing Electrical and Ergonomic Safety

Many modern DIY office furniture ideas incorporate power outlets and charging stations. While it's a great feature, adding electrical components demands extreme care. An improperly wired desk isn't just a tech problem; it's a serious fire risk.

  • Use Certified Components: Only buy UL-listed power strips, grommets, and wiring. These components have been tested and approved for safety. Don't cut corners here.
  • Plan for Ventilation: Power bricks and chargers get hot. If you're enclosing them, make sure there's enough ventilation to let heat escape and prevent overheating.
  • Consult an Expert: If your plan is more complex than just plugging in a pre-made power strip, stop and consult a licensed electrician. It's not worth the risk.

Beyond the electrical side, poor ergonomics can cause real, long-term problems for your team, from chronic pain to a nosedive in productivity. A desk built to the wrong height is a classic mistake. Make sure your custom builds stick to standard ergonomic dimensions for desk height (typically 28-30 inches) and leave plenty of legroom.

Choosing Healthy Finishes and Respecting Codes

The final touches on your project are just as important for safety as the construction. Many common paints, stains, and sealants release Volatile Organic Compounds (VOCs), which can seriously degrade your office's indoor air quality.

Always look for products labeled "low-VOC" or "zero-VOC." This is especially critical in an enclosed office where people spend most of their day breathing the air.

Finally, you have to know your local building and fire codes. These regulations can dictate everything from where you can place furniture to the types of materials you can use. They also specify how much clearance is needed in walkways and near exits. A quick call to your local municipality or property manager can save you from making a costly—and dangerous—mistake. If a project feels too complex, bringing in professional help for office furniture installation is the smartest move to ensure everything is safe and up to code.

Knowing When to Call in the Professionals

There’s a special kind of satisfaction that comes from building something with your own two hands. For a few key pieces, a DIY approach can be a great way to put a personal stamp on your office. But there’s a tipping point—a moment where the sheer scale and complexity of outfitting a workspace calls for a different game plan.

Knowing when you’ve hit that point is crucial. It’s the key to side-stepping expensive delays, serious safety risks, and an end result that just doesn’t live up to professional standards.

A single custom desk? That’s a fun, manageable weekend project. But outfitting an entire office for a team of ten, twenty, or more is a whole different beast. It's a logistical puzzle where a DIY approach can quickly fall apart, especially when you’re facing tight deadlines, the need for perfect uniformity, and a web of compliance rules.

The Real-World Limits of a DIY Approach

DIY truly shines when you're creating standalone statement pieces. Once you need to scale up, though, the limitations become glaringly obvious. Handcrafting ten identical desks that are perfectly level, ergonomic, and built to last is a monumental undertaking, even for a seasoned woodworker. This is where professionally manufactured systems just make more sense.

Think about these factors that signal it’s time to bring in the pros:

  • Project Scale: Furnishing more than a few workstations yourself is rarely practical. Achieving real consistency by hand is next to impossible, which can leave your office looking disjointed and unprofessional.
  • Tight Deadlines: Let's be honest—DIY projects almost always take longer than you think. If you have a hard move-in date, betting on custom builds puts your entire timeline in jeopardy.
  • Compliance and Safety: Commercial spaces have to follow strict building, fire, and accessibility codes. Professional furniture is engineered from the ground up to meet these standards, taking the guesswork and liability off your plate.
  • Need for Uniform Quality: As your business grows, you need a workspace that’s consistent and reliable. Professionally made furniture is built for heavy daily use and comes with warranties, ensuring a level of long-term performance that one-off DIY pieces simply can't promise.

Bridging the Gap Between DIY and Professional Solutions

Going with a professional furniture provider doesn't mean you have to abandon your custom vision. In fact, it's often the best way to bring your unique DIY office furniture ideas to life on a larger scale. Modern modular systems offer a fantastic blend of personalization and professional-grade engineering.

For instance, high-quality workstation cubicles can be configured to fit the specific workflow of your teams, whether you need to foster collaboration or deep focus. You get the tailored feel of a custom build but with the assurance of structural integrity and safe, integrated power solutions.

The goal isn’t to abandon your creative ideas, but to execute them with the right tools. A professional partnership allows you to focus on the big-picture design while experts handle the complexities of fabrication, code compliance, and installation.

The market size alone tells the story. While the home office furniture market is a respectable USD 25.3 billion in 2024, the commercial sector is projected to hit a massive USD 61.35 billion in 2025. This gap really highlights the different demands of professional settings, where modular systems are essential for turning creative concepts into productive, code-compliant realities. You can review the full report on the global office furniture market to dig deeper into the numbers.

Making the Smart Strategic Choice

Ultimately, the build-or-buy decision comes down to a clear-eyed look at your resources, timeline, and long-term goals. For any company on a growth trajectory, the efficiency, safety, and scalability of professional systems are simply invaluable.

This decision tree can help you walk through the key safety checks for any DIY project you’re considering.

A flowchart illustrating a DIY project safety decision tree. It guides users through structural, electrical, and finish checks for DIY office furniture ideas to ensure project safety.

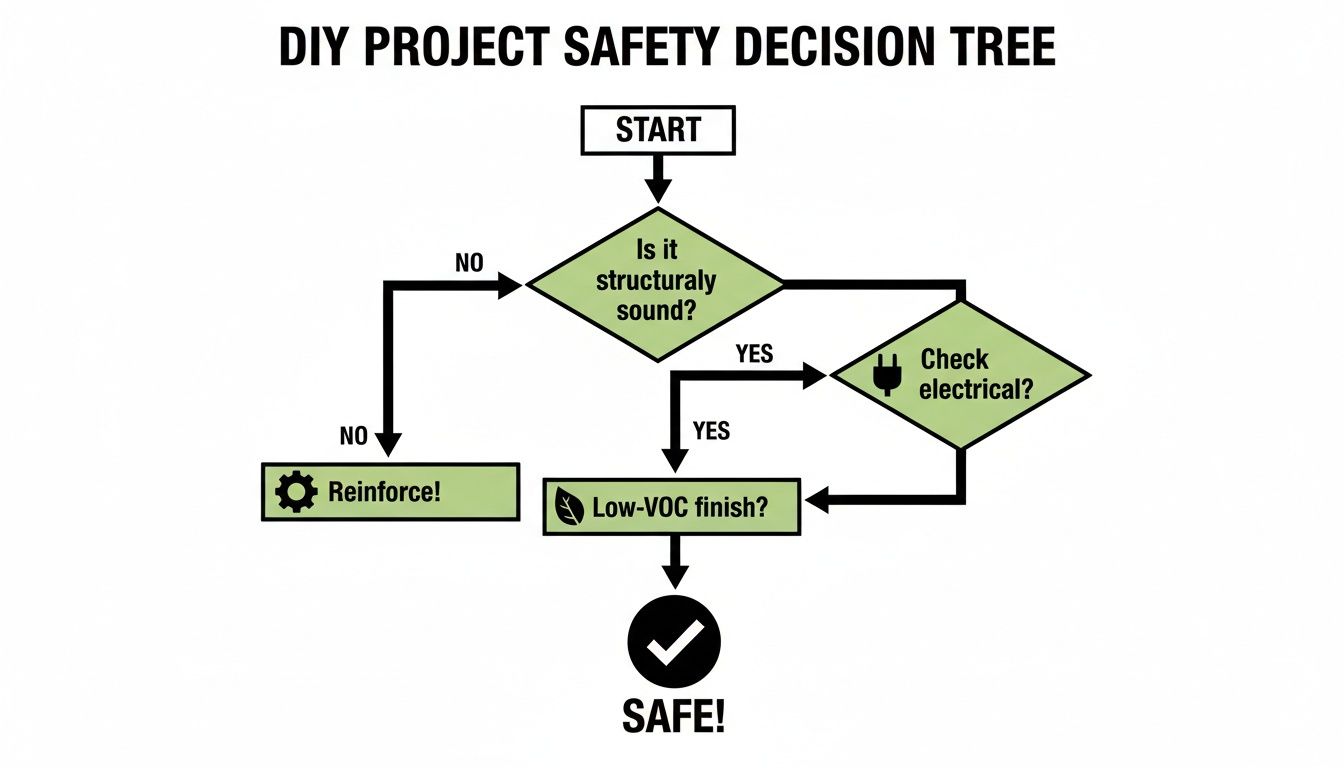
As the flowchart shows, structural soundness, electrical safety, and non-toxic finishes are non-negotiable. Each of these steps requires specific expertise that can be a real challenge for an amateur builder.

When you need the privacy and prestige of individual offices without the mess and expense of traditional construction, solutions like private office cubicles offer a sophisticated look with the flexibility to adapt as your company grows. You can even play around with layouts and finishes using an interactive tool like our Custom Cubicle Designer to see exactly how your vision translates to the real world.

For complex projects, having professionals handle the office furniture installation and disposal ensures a smooth, safe transition. It’s all about making the smartest investment for your business’s future.

Got Questions About DIY Office Furniture? We’ve Got Answers.

Jumping into a DIY office furniture project is an exciting prospect. But before you break out the saws and drills, it's completely normal to have a few questions swirling around.

A little bit of planning upfront can be the difference between a project you love and a frustrating pile of lumber. Let's walk through some of the most common questions we hear to get you pointed in the right direction.

What Are the Most Budget-Friendly DIY Office Furniture Ideas?

You don't need a massive budget to get creative. Some of the smartest, most cost-effective ideas rely on simple, accessible materials. Think desks made from a solid-core door laid across two filing cabinets, or open shelving built with stained pine boards and basic metal brackets. Even a simple workbench made from 2x4s can look surprisingly sharp.

And don't forget upcycling. A fresh coat of paint or some new hardware can completely transform a piece of furniture you already own, giving your office a major facelift for very little cash.

How Can I Make Sure My DIY Desk Is Ergonomic?

This is a big one, and getting it right is crucial for comfort. For a standard seated desk, you'll want the surface height to be somewhere between 28-30 inches. Of course, if you're building a standing desk, you can make it adjustable or customize it perfectly to your own height.

Make sure you leave plenty of legroom underneath and that the desktop is deep enough so your monitor can sit at least 20 inches from your eyes. Adding an aftermarket keyboard tray is also a fantastic way to keep your wrists in a healthy, neutral position.

Can I Build Power and Data Into My DIY Furniture?

Absolutely, but safety has to be your top priority here. You can buy and install grommets to keep cables tidy or even install recessed power strips directly into your desktop for a clean look.

If you go this route, it's critical to only use UL-certified electrical components. When in doubt, especially with any complex wiring, always bring in a licensed electrician.

For a much simpler and fully integrated approach, professional systems are designed from the ground up with safe, built-in power and data. Systems like our cubicles are already engineered to manage all these connections safely and out of sight.

How Much Time Should I Really Budget for a DIY Office Project?

The honest answer? It varies wildly. You might knock out a simple bookshelf in a weekend. A more complex, custom multi-person workstation, on the other hand, could easily take several weeks of your time.

Always factor in time for planning, gathering materials, the actual build, and finishing touches like sanding and painting. A good rule of thumb is to add a 20-30% time buffer to whatever you first estimate. Unexpected hiccups almost always pop up. If you're on a tight deadline, professionally manufactured workstation cubicles offer a much faster and more predictable path to a finished office.


At Cubicle By Design, we specialize in bridging that gap between your unique vision and a professional, polished reality. If you need a solution that’s scalable, code-compliant, and still feels like your brand, let’s talk about how we can design the perfect workspace for you. Find out more at https://cubiclebydesign.com/.

Read More
Expert Guide to Office Furniture Installation

Expert Guide to Office Furniture Installation

Expert Guide to Office Furniture Installation

Any seasoned installer will tell you the same thing: a successful office furniture installation is won long before the first box is ever opened. This initial planning phase is all about foresight and meticulous preparation. Get this part right, and you’ll avoid the costly delays and last-minute scrambles that can derail even a simple project.

Your Pre-Installation Planning Checklist

Two professional installers in high-visibility vests discussing blueprints in an empty office space ready for furniture installation.

The entire project really hinges on the quality of your pre-installation plan. Think of it like the foundation of a house—if it’s not solid, everything you build on top of it is at risk. This stage goes way beyond just taking a few measurements; it gets into the nitty-gritty operational details that separate a chaotic installation from a seamless one.

A solid plan anticipates the unique challenges of your building and layout. The goal is to solve problems on paper before they become expensive headaches on-site.

The Critical Site Assessment

First things first: you have to understand the canvas you’re working with. A thorough site assessment is non-negotiable and should be your absolute starting point. This is much more than just checking the square footage.

Your assessment should document:

  • Precise Measurements: Get the dimensions of every room, but don’t forget ceiling heights, window placements, and the exact location of columns or other permanent fixtures.
  • Architectural Quirks: Look for the hidden problems. Uneven flooring, oddly angled walls, or low-hanging ductwork can all interfere with furniture placement and assembly.
  • Access Routes: Map out the entire journey, from the loading dock to the final installation spot. You need to measure every doorway, hallway, and elevator interior to make sure all the components will actually fit through.

A classic mistake we see all the time is forgetting to check the service elevator’s weight capacity or its reservation policy. Finding out on delivery day that your biggest items won’t fit—or that another tenant has it booked—can bring your entire project to a screeching halt.

Crafting a Realistic Project Plan

Once you have a detailed site assessment in your hands, you can build a realistic project plan. This document is your roadmap, outlining every single phase. It’s also a huge part of our approach to effective office space planning and design.

This plan needs to clearly define roles and responsibilities for everyone involved, from your internal team to the installation crew. It’s also where you’ll coordinate with building management to lock down permissions, reserve those elevators, and understand any building-specific rules for contractors.

The demand for this kind of detailed planning is growing. The contract furniture market, which directly fuels these projects, was valued at USD 154.10 billion and is projected to hit USD 209.48 billion by 2030. This boom is driven by commercial development in major markets, underscoring the global need for expert installation. You can discover more insights about contract furniture market growth at Grand View Research.

Setting up clear communication channels from day one is what keeps a project on track. A well-documented plan gives everyone the information they need to work together toward the same goal.

With your floor plan finalized, the action moves from paper to the physical world. This is where logistics and site prep take center stage, and getting it right is the secret to a headache-free office furniture installation. It’s all about wrangling the controlled chaos of delivery day and making sure your space is 100% ready for the assembly crew.

Think of it like this: if you don’t prep the kitchen, the chef can’t cook. A little groundwork here is what lets your installation team fly through the assembly process without hitting expensive snags or frustrating delays.

Coordinating Furniture Delivery

The first big hurdle is simply getting the furniture into your building. We’re not talking about a simple package from Amazon; you’re dealing with massive freight trucks, hundreds of boxes, and tight delivery windows. You have to be proactive.

Get in touch with your freight carrier early to lock down arrival times. You’ll also need to iron out the critical access details for your building:

  • Loading Dock Access: Can a full-size tractor-trailer actually get to your dock? Double-check for any weird height restrictions or tight corners.
  • Elevator Capacity: Know the weight limits and, just as importantly, the inside dimensions of your service elevator. The last thing you want is to discover a 10-foot tabletop doesn’t fit in a 9-foot elevator.
  • Building Rules: Does your property manager require you to book the loading dock or service elevator? Get those reservations on the calendar the moment you have a delivery date.

Here’s a pro tip that saves a lot of grief: don’t assume the driver will help unload. Standard freight service is almost always “curbside delivery,” which means their job is done once they open the truck doors. You must confirm you have “inside delivery” if you need the items brought into your actual suite.

Smart Staging for Maximum Efficiency

Once all those boxes are inside, where you put them is a game-changer. Just piling everything in the middle of the floor creates a maze that will drive your installers crazy. A smart staging strategy is the single best way to keep the project on track.

The whole point is to sort and place every component so the assembly is intuitive. Instead of a mountain of mystery parts, the crew finds exactly what they need, right where they’ll be building. That floor plan you spent so much time on? It’s your map for this phase.

This is how the pros handle staging:

  1. Group by Zone: All the pieces for the “Marketing Pod” go in one area. Everything for “Conference Room A” goes in another. Keep it organized.
  2. Label Everything: Use your floor plan’s workstation numbers or room names to clearly mark every pallet or stack of boxes.
  3. Unbox as You Go: The crew should only unbox the parts for the station they are actively building. This keeps pathways clear and avoids a sea of cardboard.

This kind of methodical approach means installers aren’t wasting an hour hunting down a specific drawer pedestal or a lost bag of screws. It turns what could be a chaotic mess into a smooth, repeatable workflow.

Preparing the Site for Installation

The final piece of the logistics puzzle is prepping the physical space itself. Your installation area has to be clean, safe, and ready to go. Skipping this step can lead to damaged floors, scratched walls, or painful delays while your crew waits for an electrician to finish up.

Before the install team even shows up, do a final walkthrough. The space needs to be completely empty of old furniture and any leftover construction debris. This is absolutely non-negotiable, especially if you’re in the middle of a larger renovation or move. For anyone juggling a full-scale move, our guide on seamless office relocations dives much deeper into how to coordinate all these moving parts.

While you’re at it, confirm that all the power and data ports are live and in the right spots according to your plan. It’s a whole lot easier for an electrician to move an outlet before a 500-pound cubicle is built right in front of it. Lastly, protect your investment—lay down floor coverings and put up corner guards on walls in high-traffic areas to prevent dings and scuffs.

The Professional Assembly and Installation Sequence

With all the planning and logistics out of the way, it’s finally time to see the space come together. This is where a methodical, proven sequence separates a professional crew from a chaotic one. Following a specific order of operations is what makes an office furniture installation efficient, preventing bottlenecks and ensuring each piece goes in correctly without getting in the way of the next step.

The process is all about transforming an empty room into a defined, functional space. We build the skeleton of the office first, then layer in all the elements that bring it to life. It’s a structured approach that saves a ton of time and seriously cuts down on the risk of damaging brand-new furniture.

Before the first screw is even turned, a few foundational steps have to happen on-site.

Infographic detailing the three steps for a successful build day: delivery, staging, and site preparation.

As you can see, a successful build day starts with organized logistics, not just raw assembly.

Building the Architectural Foundation First

The installation sequence almost always kicks off with the biggest, most structural elements. This means any modular or architectural walls go up first. These are the components—like glass partitions or solid panel walls—that create private offices, conference rooms, and defined team zones.

Putting them in at the start serves two key purposes:

  • It establishes the fixed boundaries of the floor plan, which then guides the placement of every other piece of furniture.
  • It avoids the logistical nightmare of trying to maneuver huge, heavy wall panels around desks and chairs that have already been put together.

Think of it like building the rooms before you furnish them. This approach makes sure everything that comes next fits cleanly and precisely.

Assembling Systems Furniture and Cubicles

Once the main walls are in place, the focus shifts to the heart of the layout: the systems furniture. This is your interconnected workstations and cubicles that will form the main work areas for your team. A pro installation team will tackle this phase systematically, usually working in zones or rows based on the floor plan.

A critical pro tip here is constant measurement and leveling. Even a tiny error in the first workstation of a row can get bigger and bigger down the line, resulting in some serious misalignments by the end. Installers are always checking for levelness and squareness to guarantee a perfect fit.

Putting these systems together is a specialized skill. For a closer look at what goes into it, our guide on office furniture and cubicle assembly offers more detail on the techniques and tools the pros use.

Placing Freestanding Furniture and Casegoods

With the cubicles and workstations built, the space is really starting to feel like an office. The next logical step is to bring in all the freestanding pieces. This includes executive desks, conference tables, reception stations, and storage units like filing cabinets and credenzas.

These items get placed according to the final floor plan. Because the main systems furniture is already in, positioning these pieces is pretty straightforward. The crew can easily get them into their designated spots without having to work around piles of parts waiting to be assembled.

Final Placement of Seating

The very last step in the physical installation is placing the chairs. This covers everything from ergonomic task chairs at each workstation to guest chairs in private offices and the soft seating in lounge or collaboration areas. We save this for last on purpose to keep chairs from getting in the way or being scuffed up during the assembly of heavier items.

This final touch completes the workspace and gets it ready for the team. The growing popularity of these projects reflects bigger trends in office design. According to Fortune Business Insights, the main drivers of market expansion include a bigger emphasis on ergonomic seating, the shift toward flexible work environments, and corporate investments in modernization.

Integrating Power and Data for a Functional Workspace

A clean office workspace after professional installation with integrated power and data ports visible on the desks, showcasing effective cable management.

Beautifully assembled furniture doesn’t mean much if your team can’t plug in. A modern workspace absolutely runs on connectivity, making power and data integration a critical stage of any office furniture installation. This isn’t just an afterthought; it’s a foundational step that needs to be planned long before the first desk is even built.

Skipping this phase will almost certainly lead to a messy, hazardous, and unproductive environment. But when it’s managed correctly, you get a seamless, functional space where technology and furniture work together perfectly.

The Power of Early Coordination

The single biggest mistake we see businesses make is waiting too long to coordinate with their IT pros and electricians. Your furniture layout has to align perfectly with your building’s existing power and data infrastructure, which means getting the right people to the table during the space planning phase.

Bring in your IT team to map out data port requirements for every single workstation and common area. At the same time, loop in your electricians to make sure the power plan won’t overload circuits and that outlets are placed exactly where they’re needed. This proactive approach saves you from costly and disruptive changes later, like having to drill into new furniture or run ugly extension cords across walkways.

We’ve seen it happen time and again: a project where furniture is placed before power and data are verified. It forces teams to work backward, sometimes drilling into brand-new surfaces or compromising the entire aesthetic. Getting your technical teams and furniture installers to review the plan together is the best way to avoid this headache.

Choosing Your Cable Management Solutions

A clean, organized workspace is a productive one, and that means taming the inevitable “cable spaghetti.” Luckily, modern office furniture offers all sorts of built-in and add-on solutions to keep wires hidden, organized, and safe from damage.

Effective cable management is about more than just looks—it’s a critical safety measure. The U.S. Bureau of Labor Statistics has highlighted that falls, slips, and trips are a leading cause of nonfatal workplace injuries, with loose cords being a common and completely avoidable culprit.

Here are a few popular options to consider:

  • Raceways and Power Poles: These are channels, often built right into cubicle panels or run vertically from the ceiling to the workstation, that neatly hide bundles of cables.
  • Under-Desk Trays and Baskets: A simple but incredibly effective solution. These mount to the underside of a desk to hold power strips and excess cable slack, keeping everything up off the floor.
  • Grommets and Cutouts: These are clean openings in the desktop that allow cables to pass through neatly, preventing them from being draped messily over the edges.

For a deeper dive into the technical side of wiring, check out our detailed guide on the fundamentals of a proper cubicle electrical setup.

Navigating Compliance and Safety Codes

Beyond simple organization, integrating power and data correctly is a matter of legal compliance and workplace safety. This is a non-negotiable part of a professional office furniture installation that protects both your people and your business. Several key standards have to be met.

First off, the Americans with Disabilities Act (ADA) requires clear, unobstructed pathways. This means no cables can cross walkways where they could create a tripping hazard for anyone, especially individuals with mobility or vision impairments.

On top of that, all electrical work must follow local building and fire safety codes. Using non-compliant parts or overloading circuits can create serious fire risks and will absolutely cause you to fail a building inspection. Always, always use a licensed electrician to ensure all power integration meets these strict standards, creating a workspace that is safe, accessible, and fully compliant for every member of your team.

Nailing the Final Punch List and Project Handover

The installation crew has packed up their tools, and your new office is really starting to take shape. It looks just like the floor plan you signed off on months ago. But hold on—the office furniture installation isn’t quite over yet.

This final phase, the punch list and official handover, is what separates a good project from a great one. It’s your last, best chance to make sure every single detail is perfect before you give the final sign-off.

This isn’t a casual stroll through the space; it’s a methodical inspection. You’ll want to do this with the installation project manager right by your side. They can answer questions on the spot and, more importantly, document any issues as you find them. The goal here is simple: catch any and all deficiencies, big or small, while the crew is still on hand to fix them quickly.

Conducting a Meticulous Final Walkthrough

Come prepared. You’ll need the final floor plan, your phone’s camera, and a critical eye. Plan to inspect every single piece of furniture, one by one. Don’t just glance at the big picture; get up close. Open drawers, test locks, and sit in chairs. You’re confirming that what you paid for is exactly what was delivered and installed correctly.

Your inspection should zero in on a few key areas:

  • Aesthetic Flaws: Look for any cosmetic damage that might have happened in transit or during assembly. We’re talking scratches on desktops, dings in filing cabinets, or small tears in chair fabric.
  • Functional Issues: This is huge. Open every single drawer and cabinet. Test the height-adjustment on every sit-stand desk. Sit in each chair to make sure the casters roll smoothly and all the ergonomic controls are working as they should.
  • Stability and Alignment: Give every desk and table a firm (but gentle) push. Does it wobble? Look down the rows of cubicles—are they perfectly aligned? Are all the panels level and connected securely?

Think of yourself as a detective looking for clues. A slightly crooked cubicle panel or a drawer that sticks might seem minor now, but those little things become daily annoyances for your team. It’s so much easier to get these fixed now than to chase them down weeks or months later.

Creating an Actionable Punch List

As you spot issues, you need to document them on a formal punch list. A vague list like “desk in corner broken” is useless. To get things fixed without a ton of back-and-forth, you have to be incredibly specific.

A truly effective punch list entry includes:

  1. A unique item number for easy reference.
  2. The exact location (e.g., “Workstation 12-B, left pedestal cabinet”).
  3. A clear, concise description of the problem (“Top drawer doesn’t close flush with the frame”).
  4. A photograph of the issue. A picture is worth a thousand words here.

This level of detail cuts through any potential confusion and gives the installation team a clear, actionable checklist. It turns what could be a frustrating process into collaborative problem-solving.

The Official Project Handover

Once every last item on your punch list has been resolved to your satisfaction, it’s time for the official handover. This is the moment the project formally concludes, and the responsibility for all the new furniture transfers to you.

During the handover meeting, the project manager will give you a package of essential documents. This should include all the manufacturer warranty information, care and maintenance guides for various finishes, and any spare parts, extra hardware, or keys for locking storage. This is a vital part of the comprehensive project management that ensures a successful outcome from start to finish.

With the handover complete, the installation is officially closed out. You’re left with a beautiful, functional, and move-in-ready workspace.

What About Home Office Furniture Installation?

The shift to remote and hybrid work isn’t just a trend; it’s a permanent part of how we do business. And with it, the demand for truly professional home office setups has gone through the roof. This isn’t just about putting a desk in a spare room anymore. We’re now dealing with office furniture installation that starts on a residential doorstep, not a commercial loading dock.

This brings a whole different set of challenges. We’re seeing more complex, highly ergonomic pieces in home offices. Think high-end sit-stand desks or task chairs with a dozen different adjustments. Assembling these correctly requires real precision. If it’s done wrong, you don’t just miss out on the health benefits—you can end up with a wobbly desk, a chair that causes back pain, or even damage to the intricate internal mechanisms.

Adapting to Residential Spaces

The logistics are a world apart from a typical office build-out. Forget freight elevators and wide-open corridors. At home, installers have to skillfully navigate tight hallways, tricky staircases, and standard-sized doorways, all without scratching a wall or dinging the furniture. It takes a different kind of planning and a lot more finesse.

Then there’s the challenge of fitting everything into a smaller residential space. Trying to integrate modular storage or a compact workstation requires a smart, strategic approach. A professional installer’s job is to make sure every piece fits perfectly and is anchored safely, creating a functional workspace that doesn’t completely overwhelm the room.

An investment in professional assembly for your home office goes way beyond convenience. It’s really an investment in your own safety, proper ergonomics, and the longevity of the furniture itself. It’s how you guarantee your workspace will support you for years to come.

The growth here is no joke. The home office furniture market is already a massive industry, and some projections show it could balloon to USD 72.19 billion by 2034. That’s a clear signal that people are serious about creating better, more permanent workspaces at home. You can read the full research on the home office furniture market from GM Insights for a deeper dive.

So, whether you’re an individual finally building out that dream home office or a company looking to equip your remote team, professional installation is the key. It’s what ensures every component—every desk, chair, and cabinet—performs exactly the way it was designed to. It’s how you make sure the money you spent on quality furniture pays off in both comfort and durability.

Your Office Furniture Installation Questions, Answered

Even the most buttoned-up installation plan can leave a few questions lingering. It’s completely normal. Here are some straightforward answers to the questions we hear most often, designed to give you clarity and confidence as you head into your project.

How Long Will This Actually Take?

This is the big one, and the honest answer is: it depends. There’s just no single timeline that fits every project.

Think of it this way: a small setup for a team of 5-10 people with straightforward desks? We could have that wrapped up in a day or two. But if we’re talking about a full corporate floor—over 100 cubicles, private glass-walled offices, conference rooms, and lounge areas—you’re likely looking at a week or more of dedicated work.

A few things really move the needle on timing:

  • The Complexity of the Furniture: Freestanding desks go together quickly. An interconnected systems furniture layout with integrated power is a different beast entirely and takes much more time.
  • Site Readiness: Is the floor clear, clean, and ready for us? Or are we navigating around other trades or leftover debris? A prepped site makes a world of difference.
  • Coordinating with Other Trades: We have to sync up our work with your electricians and IT technicians, which can influence the overall schedule.

Your best bet is to ask your installation partner for a detailed project schedule. That’s the only way to get a realistic completion date you can actually plan around.

What’s the Ballpark Cost for Professional Installation?

Installation costs are usually handled one of two ways: a flat rate based on the project scope or an hourly rate per installer. As a general rule of thumb, you can budget somewhere between 5% to 15% of your total furniture purchase price for the installation.

Now, several factors can push that number to the lower or higher end of the range. Your location, whether the job requires union or non-union labor, and tricky site conditions—like multiple flights of stairs with no freight elevator—all play a part. Needing the work done after hours or on a weekend will also affect the final price.

Always, always get a detailed, itemized quote before work begins. It’s the best way to avoid any surprises when the final invoice arrives.

Here’s a pro tip: Ask if the quote includes a “final clean.” This means the crew will break down and haul away all the cardboard and packaging, and wipe down every surface. You don’t want your own team stuck with that job.

Can You Get Rid of Our Old Furniture?

Absolutely. Most full-service installation companies, including us, offer decommissioning services. It’s a huge weight off your shoulders. The process involves systematically dismantling all your old furniture, carefully removing it from the building, and making sure it’s handled responsibly.

We always try to be as sustainable as possible. That often means:

  • Recycling all the metal, wood, and plastic components.
  • Donating items that are still in good shape to local non-profits.
  • Finding a new home for pieces on the secondary market.

Just be sure to bring this up during the planning phase. That way, it can be properly quoted and built right into the project timeline.

How Do I Get My Office Ready for the Install Crew?

Getting your space prepped is single-handedly the best thing you can do to guarantee a smooth, fast installation. The goal is to give the crew a completely blank slate to work with.

Before they show up, make sure the area is totally clear of old furniture, stray boxes, and any other clutter.

If you’ve just had new paint or flooring put in, check that it’s had enough time to fully cure—we don’t want to scuff fresh work. It’s also a good idea to double-check that your electrical outlets and data ports are live and exactly where they need to be according to the furniture plan. A little bit of prep goes a long way.


At Cubicle By Design, we thrive on the details. Our seasoned project managers and professional installation crews are here to make sure your new office is built to spec, on schedule, and ready to empower your team from day one. Design your ideal workspace today.

Read More