


Training Room Setup Guide by Cubicle by Design
A training day usually goes wrong before the instructor says the first word. Chairs are packed too tightly, a cable run cuts across the walkway, someone can't connect to the display, and late arrivals have to squeeze past the front row. The room might look finished on paper, but it isn't ready to teach.
Most facilities teams have seen this pattern. The problem isn't effort. It's that training room setup often gets treated as a furniture placement task instead of an operating system for learning, movement, visibility, sound control, and fast reset between sessions.
The rooms that work best are rarely the fanciest. They're the ones planned with discipline. Capacity matches the layout. Furniture supports the session type. Power and AV are tested early. Acoustic zones are deliberate, especially when one room has to serve lectures, workshops, and hybrid breakouts in the same week. That's where long-term value shows up, not just on opening day, but every time the room gets reconfigured without chaos.
Introduction to Training Room Setup
A facilities manager preparing for back-to-back workshops usually has the same list of headaches. One group wants classroom rows. The next wants breakout tables. HR needs remote participants on screen. IT needs clean cable paths. Trainers need enough room to move without turning sideways between chairs.
When the room hasn't been planned systematically, little failures stack up fast. Participants in the back struggle to see slides. Team tables create noise spill into adjacent groups. Extension cords end up where people walk. A room that seemed flexible becomes stubborn the moment the format changes.
Good training room setup fixes those issues before the first booking hits the calendar. It starts with what the room must support, not what fits inside it. From there, layout, furniture, AV, lighting, and maintenance all become connected decisions rather than separate purchases.
Practical rule: If a room can't shift cleanly from presentation mode to active learning mode, it isn't truly finished.
The strongest setups also account for upkeep. A room that works beautifully for one launch event but becomes hard to reset, clean, or troubleshoot will create friction every week after. That maintenance mindset is what separates a polished training space from a room that only photographs well.
Assess Training Room Requirements
The most expensive training room mistakes happen before anyone draws a floor plan. Teams jump straight to tables, screens, or partitions without locking down how the room will be used. That shortcut creates rooms that look organized but fail under live conditions.
Start with a working inventory. Ask who uses the room, what session formats dominate, and how often the room needs to change. A lecture room, a software lab, and a leadership workshop room may share the same footprint, but they don't share the same operating requirements.
Define the room by session behavior
A useful requirement list includes more than headcount. It should capture:
- Training format: Presentation-led sessions need strong sight lines, while workshop formats need movement space, writable surfaces, and fast regrouping.
- Participant profile: New hires, managers, technicians, and external guests often bring different accessibility, device, and seating needs.
- Hybrid demand: Existing guidance often focuses on density but misses dynamic acoustic zoning for hybrid learning, even though 68% of organizations run blended sessions yet lack non-permanent sound control solutions according to this training hall design analysis.
- Reset speed: If the room changes modes often, modularity matters more than a static "best layout."
That last point gets overlooked. A room can meet every code requirement and still fail operationally if the setup takes too long to convert between uses.
Gather constraints before you gather products
Before selecting furniture, document the fixed conditions that will limit your options. Ceiling height, existing power locations, HVAC control access, window glare, door swing, and wall obstructions all affect the final plan. So do storage needs. If stackable chairs, mobile whiteboards, or portable panels have nowhere to go, the room will clutter quickly.
A practical review should also include:
- Accessibility paths so people with limited mobility can move, turn, and participate without awkward workarounds.
- Technology needs including presenter devices, attendee charging, microphones, Wi-Fi stability, and display inputs.
- Noise conditions inside the room and from nearby spaces.
- Safety checks for aisles, cable routing, and emergency access.
For teams still validating footprint and circulation needs, a review of office space planning and design principles helps frame the room inside the wider workplace, not as an isolated box.
Rooms fail when planners treat sound, movement, and reset time as secondary issues. In practice, those are the issues users notice first.
A good requirement brief should fit on a few pages. If it's clear, procurement gets easier, installation gets faster, and fewer compromises show up at the end.
Design Room Layout and Capacity
Capacity planning isn't about squeezing in the most seats. It's about protecting learning quality while keeping movement, visibility, and accessibility intact. In practice, the room should feel busy, not crowded.
A reliable baseline comes from the established planning standard of 15 to 17 square feet per participant for classroom-style training, which helps prevent overcrowding and preserves enough activity space for instruction and role-play, as outlined in Falcon's training space guide. The same guidance notes that a 1,200-square-foot room holds roughly 70 to 80 people in classroom style or about 30 to 40 at team tables.
Build around movement first
When I sketch layouts, I don't start with chair count. I start with circulation. Trainers need room to move, participants need to enter and exit without disruption, and equipment needs a path that doesn't cut through occupied areas. If the room uses tables, maintain enough clearance so people can pull out chairs, pass behind others, and relocate equipment without bottlenecks.
The room shape matters too. A long narrow room often looks workable on a CAD drawing but performs badly in person. People at the back feel detached, side views worsen, and movement turns into corridor traffic.
Use two repeatable layout templates
A training room usually benefits from having standard templates that staff can reset without guessing. The most useful pair is one template for instruction-heavy sessions and one for collaborative sessions.
Template one is classroom rows. Use this when the trainer leads from the front and participants need a direct view of the screen or board. This format supports higher density and easier note-taking, but discussion tends to stay front-facing.
Template two is team tables. Use this when participants need to work in pairs or small groups. This lowers capacity, but it improves collaboration and gives the trainer more options for activities.
Here is a simple planning reference:
| Layout Type | Sq Ft per Person | Capacity |
|---|---|---|
| Classroom style | 15 to 17 | 70 to 80 in a 1,200-sq-ft room |
| Team tables | Reduced by table spacing needs | 30 to 40 in a 1,200-sq-ft room |
For table-based rooms, industry guidance commonly allocates about 80 square feet per standard training table with a three-foot clearance between tables in order to support movement and equipment handling, as noted in the same Falcon planning document. I wouldn't repeat those dimensions in every room by default, but they're a solid starting point for testing fit.
Check the room with real objects, not just outlines
A mistake I see often is planning with neat rectangles and assuming the room will behave the same way once bags, carts, cords, and people arrive. It won't. Mark the layout physically if possible. Tape paths on the floor. Pull out chairs. Walk the route from the door to each seat.
If you're sizing tables before committing to a plan, this reference on conference table dimensions helps compare common footprints against circulation needs.
Field check: If a trainer can't reach the back corner without asking people to stand up, the layout is too dense.
The best layout isn't the one that fits the most furniture. It's the one staff can reset quickly, trainers can work in confidently, and participants can use without friction.
Select Furniture and Seating Options
Furniture choices shape how the room feels after the first hour, not just how it looks in the first photo. Training rooms need pieces that support fast reconfiguration, decent comfort, and enough visual order that people can focus. The wrong selection creates fatigue, clutter, and slow changeovers.
Compare furniture by operational trade-offs
Not every flexible product is equally useful in a training room. Some help with zoning but consume too much space. Others keep the room visually open but don't control sound well enough for simultaneous breakout work.
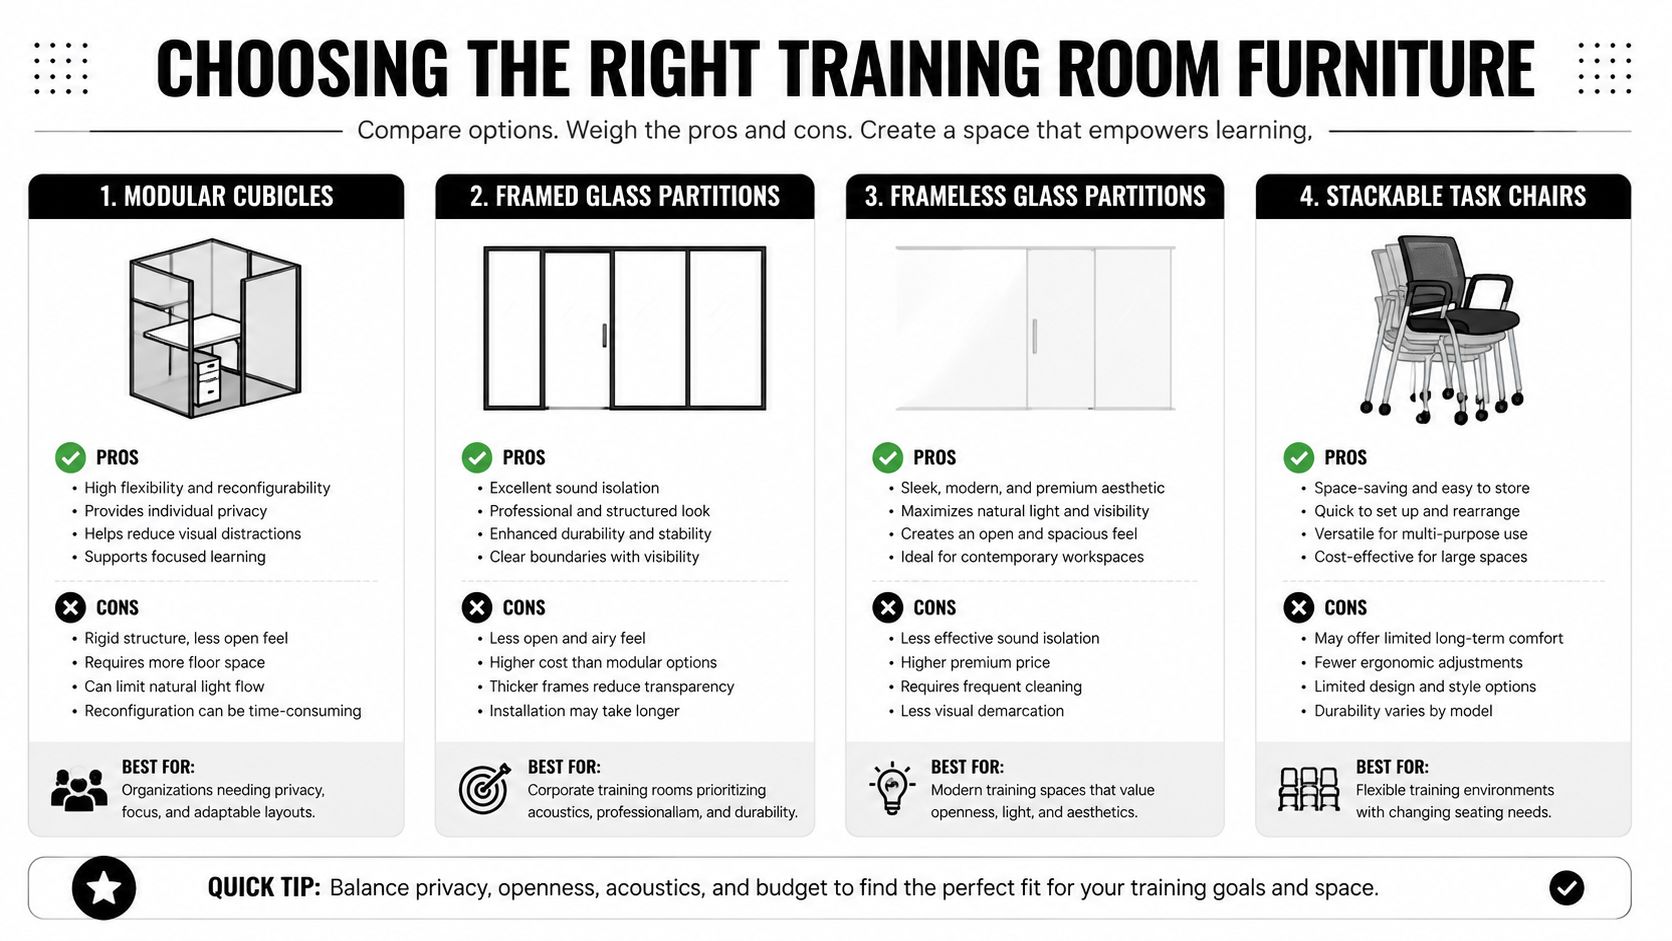
Modular cubicles work well when the room has to support temporary privacy, instructor prep areas, or repeatable pods for breakout tasks. Their strengths are flexibility and separation. Their weakness is footprint. If panels are too tall or too deep, the room starts to feel segmented rather than adaptable. For teams reviewing chair pairings alongside panel systems, this guide to an office conference chair is a useful companion.
Framed glass partitions are a stronger fit when you need a more permanent professional look with better acoustic separation than open furniture can provide. They preserve sight lines better than opaque panels while still defining space. The trade-off is that they feel less casual and usually require more upfront coordination.
Frameless glass partitions suit rooms where openness and clean aesthetics matter most. They keep the visual field broad, which helps a training room feel less boxed in. The compromise is that they generally don't control sound as well as more enclosed or framed systems.
Stackable task chairs remain one of the most practical options for multipurpose training rooms. They're easy to reset, store, and redeploy. But not all stackable seating is suitable for sessions that run long. Comfort drops fast when the seat pan, back support, or arm strategy isn't thought through.
Address fatigue before users complain
Static seating wears people down even in a good room. Seventy-two percent of learners report reduced engagement after 60 minutes in static seating, according to this ATD-related resource on training room arrangement. That matches what most trainers already know from the floor. People stop participating before they say they're uncomfortable.
A better approach is to pair furniture with movement habits and presets:
- Chair presets: Keep a standard chair position for lecture mode and another for workshop mode so staff can reset quickly.
- Micro-movement breaks: Encourage brief stand-and-turn or regroup moments between segments instead of asking people to remain fixed.
- Mixed posture options: If possible, include a small number of alternative-height surfaces or edge-perch spots for participants who focus better with posture changes.
Seating doesn't have to feel luxurious. It does have to feel sustainable for the length of the session.
Match furniture to room behavior
A startup training room that doubles as project space often benefits from lighter, movable furniture and fewer fixed elements. A call center training area may prioritize density, repeatability, and straightforward reset procedures. Leadership workshops usually need lower density, better comfort, and stronger eye contact lines.
The best furniture plan is rarely all one thing. In working rooms, a blended kit usually wins: mobile tables, stackable chairs, selective partitions, and a clear storage strategy for whatever isn't in use that day.
Plan AV Power Cabling Acoustics and Lighting
AV planning is where many training rooms become either reliable or fragile. A room can have solid furniture and still fail if the display is mounted poorly, lighting fights the screen, or participants hunt for power all session. These details aren't add-ons. They decide whether the room operates effectively.
Early in the setup process, I like using a visual checklist to pressure-test the room before equipment is fixed in place.
Get screen geometry right
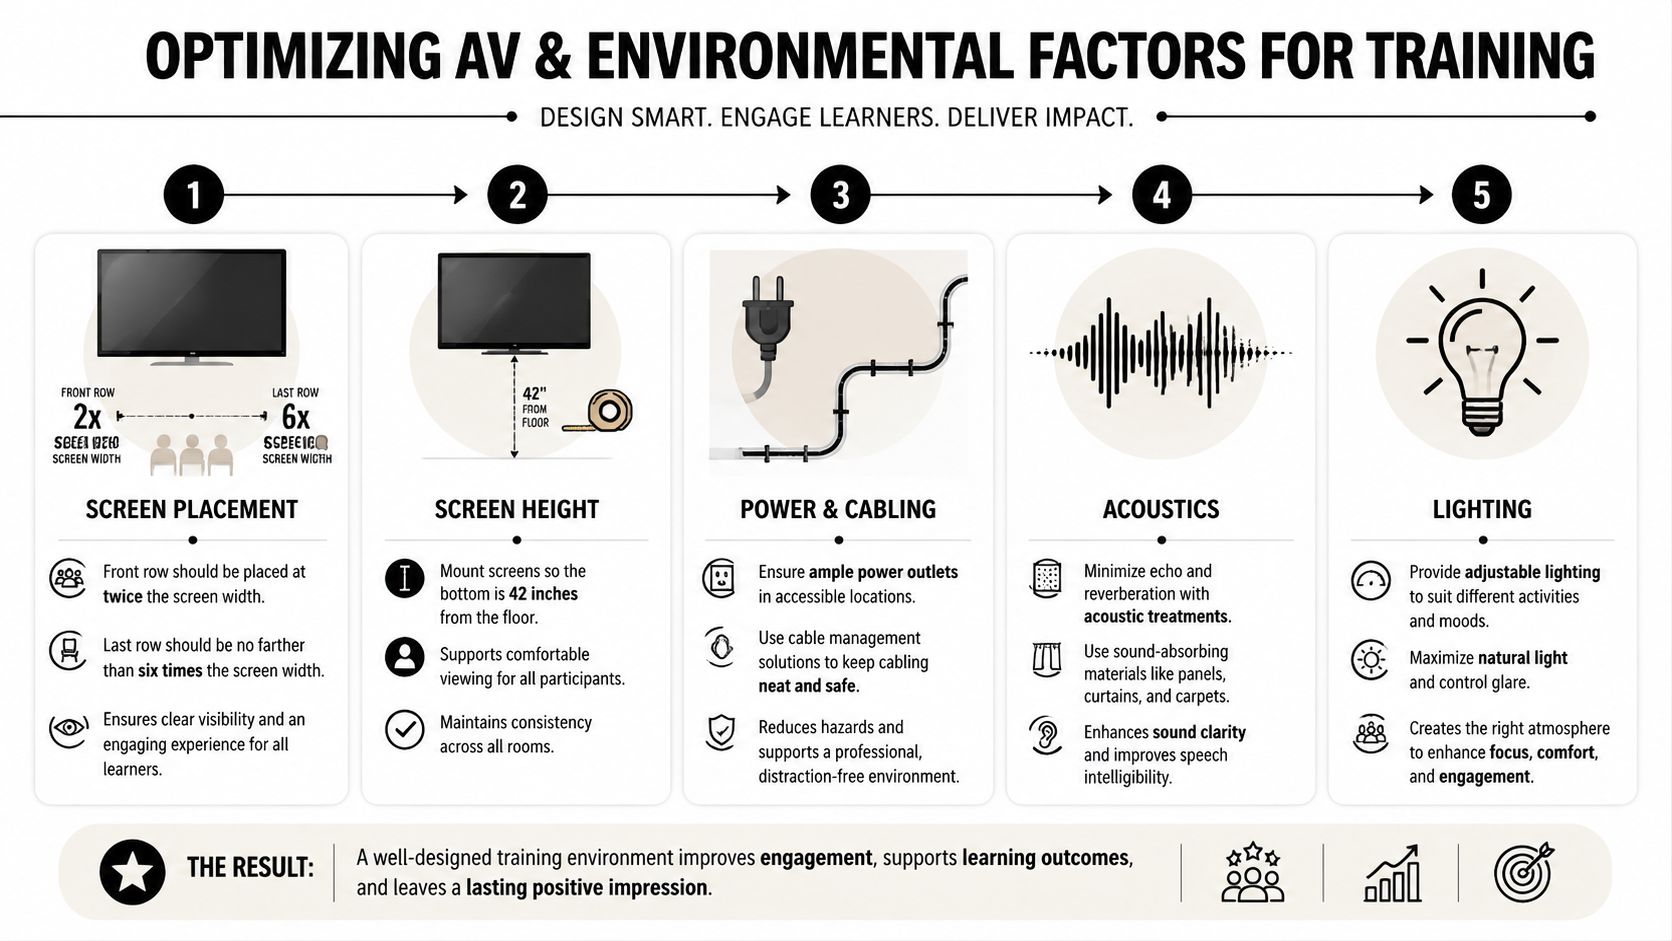
Sight line errors are hard to fix later, so mount and seat around the display with precision. The screen's bottom edge should sit 42 inches from the floor, and the seating distances should follow a simple ratio: the first row at twice the screen width and the last row at six times the screen width, according to these training infrastructure specifications. The same source recommends ambient lighting between 50 and 70 footcandles for visibility in task-oriented spaces.
Those ratios sound technical, but the payoff is simple. People can read content comfortably without craning forward or dealing with visual distortion.
A few supporting rules matter just as much:
- Rear entry placement: A back-of-room entrance reduces disruption when participants arrive late or step out.
- Window control: High windows or adjustable shades help limit external distraction and screen glare.
- Even illumination: Ambient lighting works better than direct downlight over work surfaces because it reduces harsh shadows.
Build power and cabling into the room, not around it
Training rooms break down fast when power strategy is improvised. Extension cords appear. Adapters go missing. The instructor's laptop works, but participant devices don't. This isn't a tech problem. It's a room planning problem.
Good power planning includes enough outlets where people sit and enough input flexibility at the presenter position. Cable routing should stay out of walking paths and remain accessible for service. For teams planning structured pathways overhead, overhead cable management is worth reviewing before the ceiling plan is finalized.
When IT or facilities teams need a broader reference point for structured connectivity and cleaner pathways, this overview of modern network cabling infrastructures offers practical context for planning distribution without turning the room into a cable maze.
Here are the failure points I check most often:
- Presenter connections: Does the room support multiple device types without a scramble for dongles?
- Participant charging: Are outlets close enough to use safely during training?
- Cable path discipline: Can people move through the room without stepping over temporary runs?
- Service access: Can staff reach and replace cables without dismantling furniture?
Use acoustic zoning as a modular tool
This is the issue most guides skip. Many rooms now need to host presentation audio, remote participants, and live breakout conversations in the same footprint. Permanent construction isn't always possible, but that doesn't mean the room has to stay acoustically crude.
Portable acoustic panels, movable screens, soft finishes, and selective furniture placement can create workable sound zones without renovation. The goal isn't silence. It's control. Keep instructor-led audio clear in the primary zone while absorbing spill from side conversations and collaborative work.
Later in the planning process, a short walkthrough video can help teams confirm how these pieces interact in a finished room.
Tune the environment for focus and safety
Environmental control affects attention more than people admit. Guidance for professional training rooms also recommends adjustable color temperatures in the 3000 to 4000K range, with 3500 to 4000K supporting alert lecture periods and 3000 to 3500K better suited to reflective work, as summarized in KP Centre's training room setup advice. The same source emphasizes pre-session testing of projector focus, microphone levels, Wi-Fi, and device compatibility.
It also highlights aisle widths of 1.2 to 1.5 m for mobility and safety in active rooms, along with the need for seating that remains ergonomic over 60 to 120 minute sessions. Those details matter because the room isn't static during a live event. People stand, pivot, regroup, and carry devices.
A training room should never ask users to choose between clear sound, safe movement, and visible content. If one suffers, the session suffers.
Budget Procurement Installation and Maintenance
Training rooms cost more when teams treat them as one-time purchases. The smarter view is lifecycle value. Buy for reset speed, serviceability, and repurposing, and the room stays useful much longer. Buy for a single launch condition, and you'll spend time and money correcting small failures over and over.
That lifecycle mindset matters most during procurement. Furniture, AV, partitions, and power accessories should be evaluated as a working system, not as isolated line items from different vendors.
Buy for repeat use, not one perfect layout
A room that changes frequently needs products that can handle handling. Casters, ganging hardware, modular panels, durable finishes, and replaceable accessories all make a difference over time. So does labeling. If staff can't identify where each table, chair bank, partition, or mobile board belongs, resets become slower and sloppier.
My preference is to define the room in operational bundles:
- Core bundle: The items that stay in the room every day, such as display, instructor station, and primary seating.
- Flex bundle: The pieces used for breakout, temporary division, or workshop activity.
- Support bundle: Storage, spare adapters, cable covers, cleaning tools, and replacement components.
That approach keeps procurement grounded. Teams stop buying "nice extras" and start buying things they'll use and maintain.
Control installation with a punch-list mentality
Installation quality decides whether the room opens smoothly or enters service with unresolved problems. Before signoff, every room should be tested under realistic conditions, not just visually inspected.
The handoff checklist should include:
- Access and code review: Verify door clearances, entry flow, and accessible use conditions.
- Furniture placement check: Confirm the installed layout matches the intended training mode and circulation paths.
- AV live test: Experts recommend testing all AV equipment, verifying projector focus and microphone levels, and ensuring ample outlets before attendees arrive according to KP Centre's professional development setup guide.
- Cable and power review: Check that adapters, input plates, and charging access are where users expect them.
- Trainer walkthrough: Have an actual trainer stand in the room and test movement, visibility, and transitions.
If the project includes outside installers, this overview of office furniture installation is a useful planning reference for sequence, coordination, and site-readiness questions.
Maintenance mindset: If a component is difficult to clean, store, patch, or replace, it will become the weak point of the room.
Protect the room with a simple maintenance cycle
Most training rooms don't fail suddenly. They drift. A loose cable, a scratched partition, a missing adapter, a chair with inconsistent height adjustment, a shade that no longer blocks glare. None of those issues seem urgent alone, but together they make the room feel unreliable.
A maintenance routine should cover:
- Weekly checks: Reconnect loose items, inspect cable paths, verify remotes and adapters, and clear storage overflow.
- Monthly checks: Test microphones, display inputs, rolling hardware, partition stability, and seating adjustment mechanisms.
- Quarterly reviews: Reassess layout templates, replacement needs, and whether the room still matches current training formats.
For modular rooms, repurposing discipline is part of maintenance too. Keep floor markings discreet but clear to staff. Label storage by layout type. Store extra components near the room, not across the building. A room can shift between classroom and workshop modes quickly when the reset logic is visible and repeatable.
The result isn't just lower disruption. It's a room people trust to work every time they book it.
Conclusion and Next Steps
A strong training room setup doesn't come from one smart purchase. It comes from a chain of practical decisions that support learning under real conditions. Good requirements prevent bad layouts. Good layouts reduce strain on furniture, AV, and circulation. Good maintenance keeps the room useful long after installation crews leave.
The biggest gap in many rooms isn't style. It's operational readiness. Teams plan for capacity but miss sound control. They buy flexible furniture but skip storage logic. They mount a screen but don't test the room from the last seat. Those are fixable problems when the room is approached as a system.
If you're planning a new space or correcting an underperforming one, start with the room's real behavior. Document formats, constraints, and reset needs. Pressure-test your layout. Audit power and sound before occupancy. Then choose products and installation methods that can hold up under daily use, not just opening day.
A training room should help trainers teach, participants focus, and facilities teams reset the space without friction. When it does all three, the room earns its footprint.
For teams ready to turn planning into a buildable solution, Cubicle By Design offers practical tools and product support for flexible workplaces. You can explore the Custom Cubicle Designer, review custom office cubicles, compare glass office partitions, plan dense training environments with call center cubicles, or browse workstation cubicles for modular layouts that are easier to reconfigure and maintain.