Standard Cubicle Size: A Practical Guide | Cubicle By Design

If you ask what the standard cubicle size is, most people in the industry will tell you it’s 6’x6’. And they’re not wrong. That dimension has become the go-to baseline for office planning, offering a solid sweet spot between personal space and efficient use of the floor plan.

Defining the Modern Workspace Footprint

But thinking of 6'x6' as a rigid rule is a mistake. It’s really just a starting point—a flexible foundation you build on based on what your team actually does all day. The right size for your office is a direct reflection of your company’s culture, your employees’ roles, and the kind of work they need to get done.

This whole idea of a "standard" is always shifting, too. Decades ago, the average office worker might have had close to 100 square feet. Over time, thanks to smaller tech and a focus on cost-efficiency, that number has shrunk. The 36-square-foot 6'x6' footprint is what we’ve landed on today, but it’s part of a much longer story in office design.

Common Cubicle Dimensions

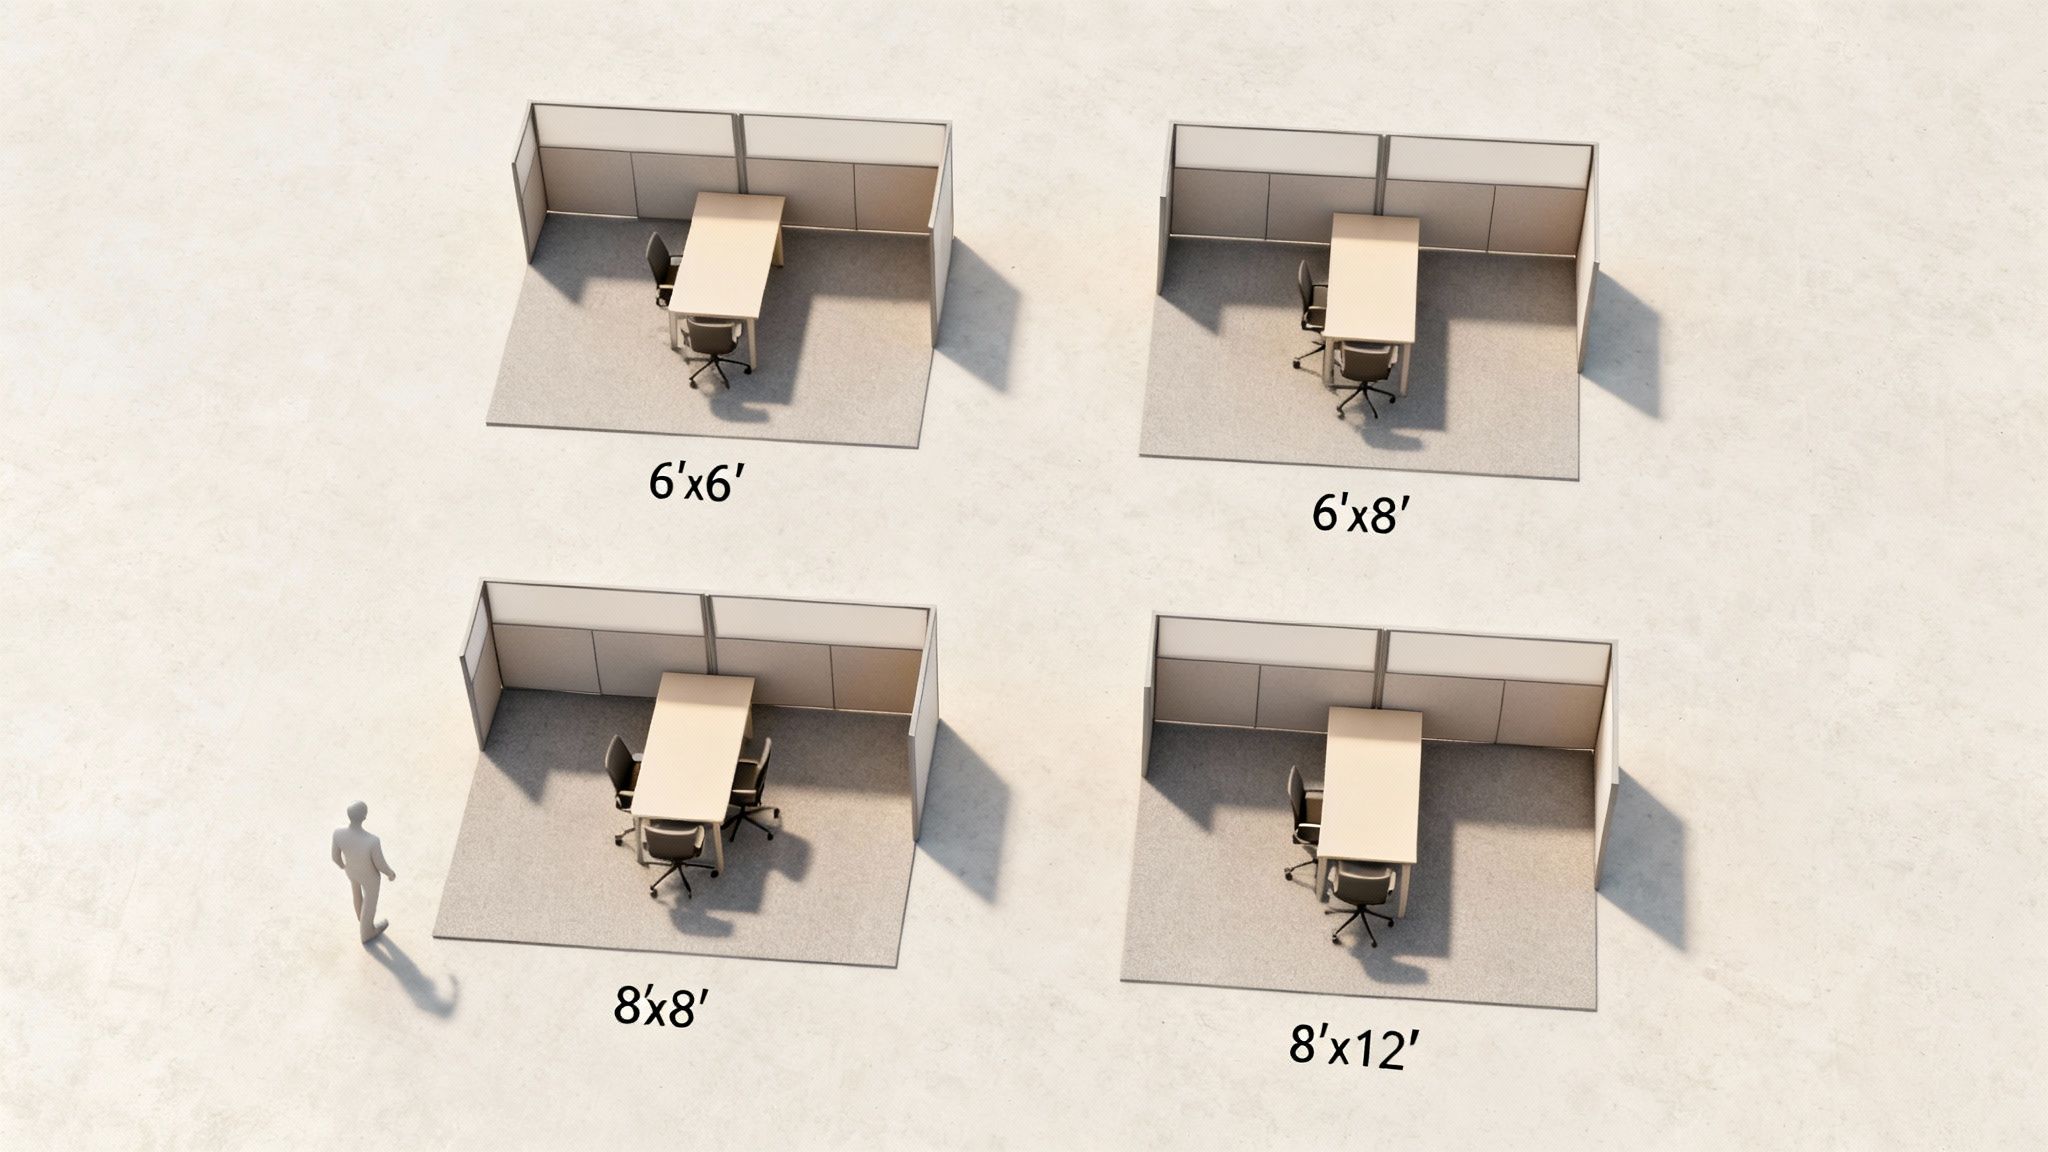
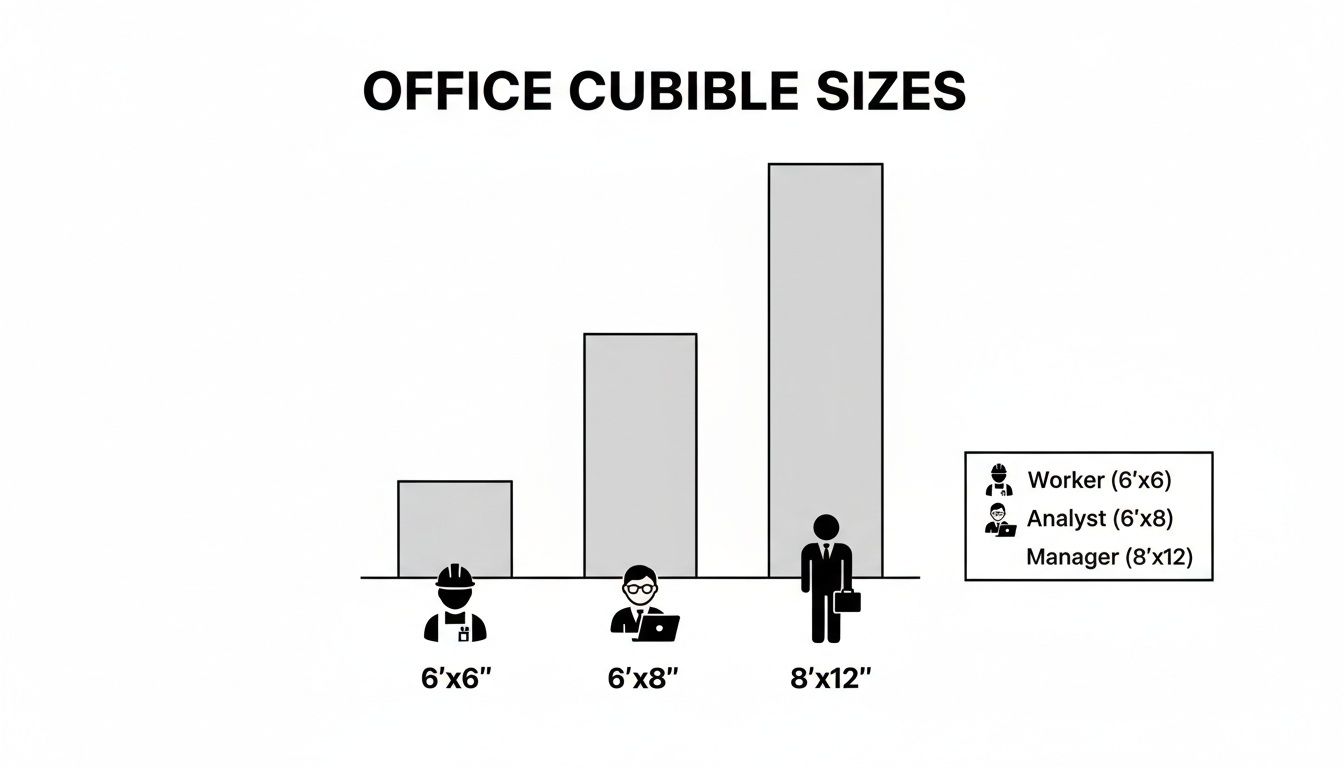
To get a better feel for your options, let’s look at the most common sizes you’ll encounter. It’s pretty clear that what a general staff member needs is completely different from a manager who needs extra room for small meetings or has more files to wrangle.

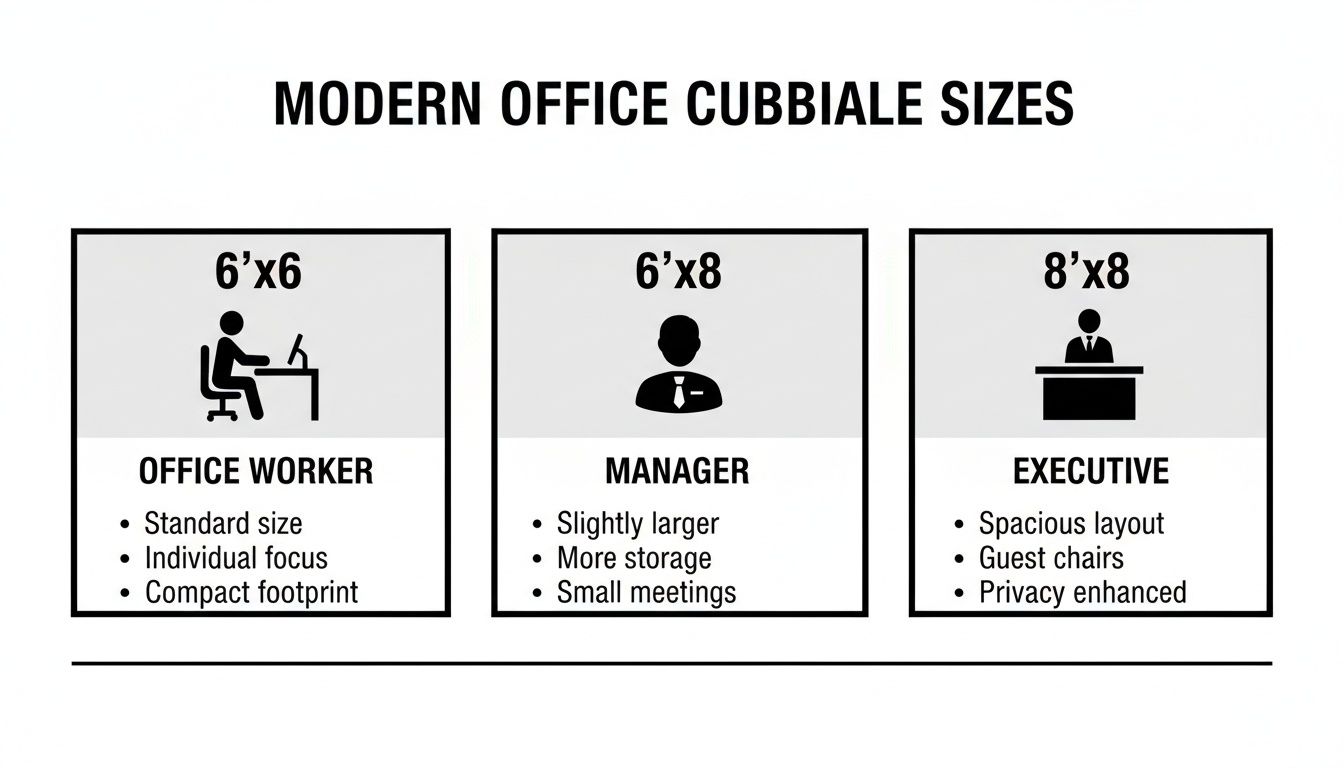
  • 6'x6' (36 sq ft): This is the workhorse of the modern office. It’s ideal for most task-focused employees, giving them plenty of room for a computer, some paperwork, and a few personal items without hogging real estate.
  • 6'x8' (48 sq ft): A nice step up, this size is perfect for team leads or anyone who just needs a bit more elbow room. That extra two feet of space is often used for an L-shaped desk or a small filing cabinet, making it a favorite for supervisors.
  • 8'x8' (64 sq ft): Now we're getting into semi-private office territory. This larger footprint is great for managers, engineers, or designers who might spread out blueprints or frequently have a colleague pull up a chair to collaborate.

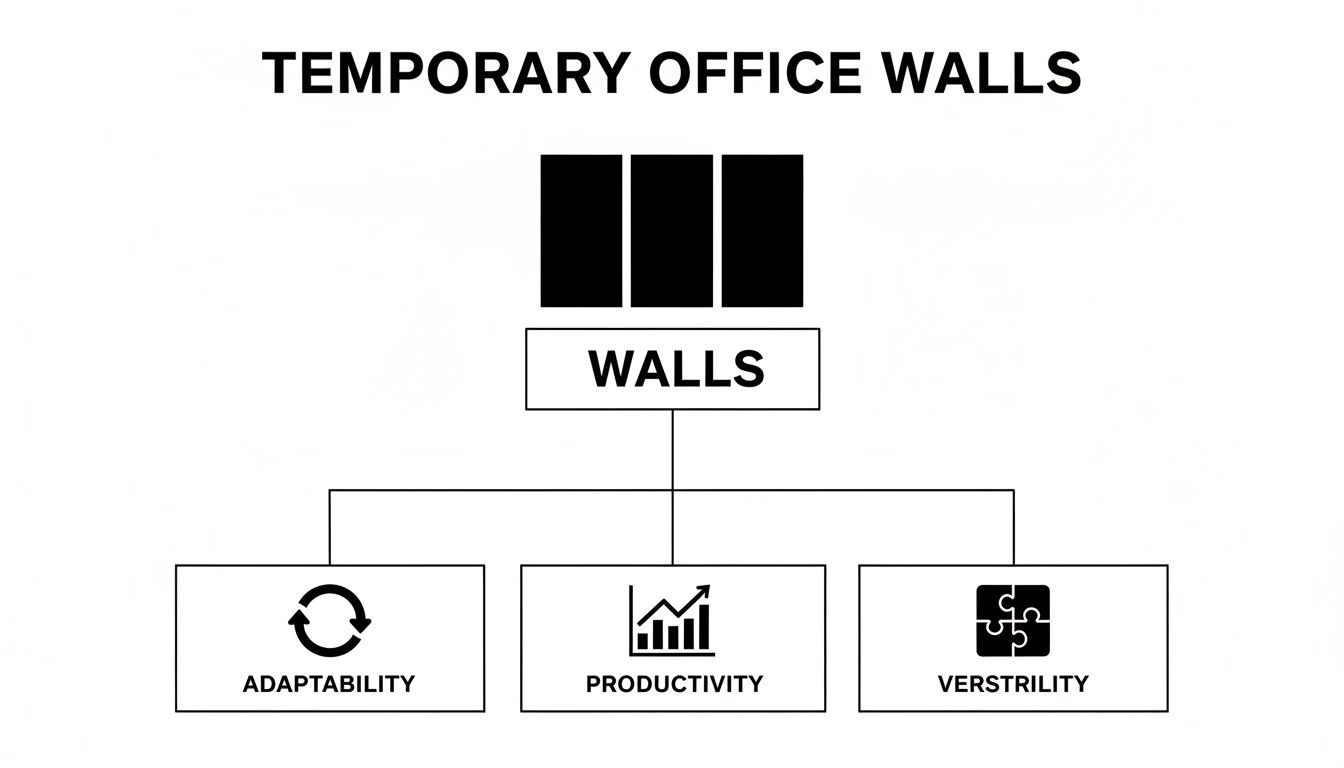
This concept map really helps visualize how these standard sizes line up with different roles in a company.

As you can see, the definition of "standard" just expands as responsibility and space requirements grow, moving from focused individual work up to managerial duties.

To help you get a quick handle on these options, here's a simple breakdown of the most common dimensions and where they fit best.

Common Cubicle Sizes and Their Applications

Cubicle Size (ft) Square Footage Primary Use Case Common Panel Height Range
5'x5' 25 sq ft Call centers, data entry, telemarketing 42" – 53"
6'x6' 36 sq ft Standard employee, administrative, customer service 53" – 65"
6'x8' 48 sq ft Supervisors, team leads, technical staff 53" – 65"
8'x8' 64 sq ft Mid-level managers, accountants, engineers 65" and up
8'x12' 96 sq ft Executive management, shared workstations 65" and up

This table gives you a great starting point for matching a specific job function with the right amount of real estate.

Visualizing Your Options

Trying to picture these sizes in your own space can be tough. Sometimes, the best way to figure out what works is to see it in action. Browsing through a gallery of office cubicles images can spark ideas and help you see how different layouts look and feel in a real environment.

The goal is to match the cubicle footprint to the job function. An undersized workstation can hinder productivity, while an oversized one wastes valuable real estate and budget.

Here at Cubicle By Design, we have solutions for all these standard sizes and everything in between. Whether you need compact workstation cubicles or spacious private office cubicles, we have you covered. Understanding the basics is the first step, and you might find our guide on cubicle configurations and their applications helpful. Even better, you can play around with different sizes and layouts yourself with our hands-on cubicle designer tool to find the perfect setup for your office.

Why Your Cubicle Dimensions Need a Purpose

Picking a standard cubicle size isn't just about grabbing numbers off a chart; it’s about assigning a specific mission to each workspace.

Think of it like setting up a professional kitchen. A pastry chef needs wide, sprawling counters for rolling dough, while a line cook thrives in a compact, efficient station where every single tool is within arm's reach. Each space is purpose-built for the task at hand.

That same logic is exactly how you should approach your office. A cubicle isn't just a box—it's a tool designed to help an employee do their best work. When you match the dimensions to the job, you stop furnishing an office and start engineering a high-performance environment. It's an investment in productivity, not just furniture.

Matching Size to Job Function

The day-to-day reality of your employees' tasks should be the number one driver behind your size decisions. A one-size-fits-all strategy almost never works because different roles have wildly different needs for space, equipment, and focus.

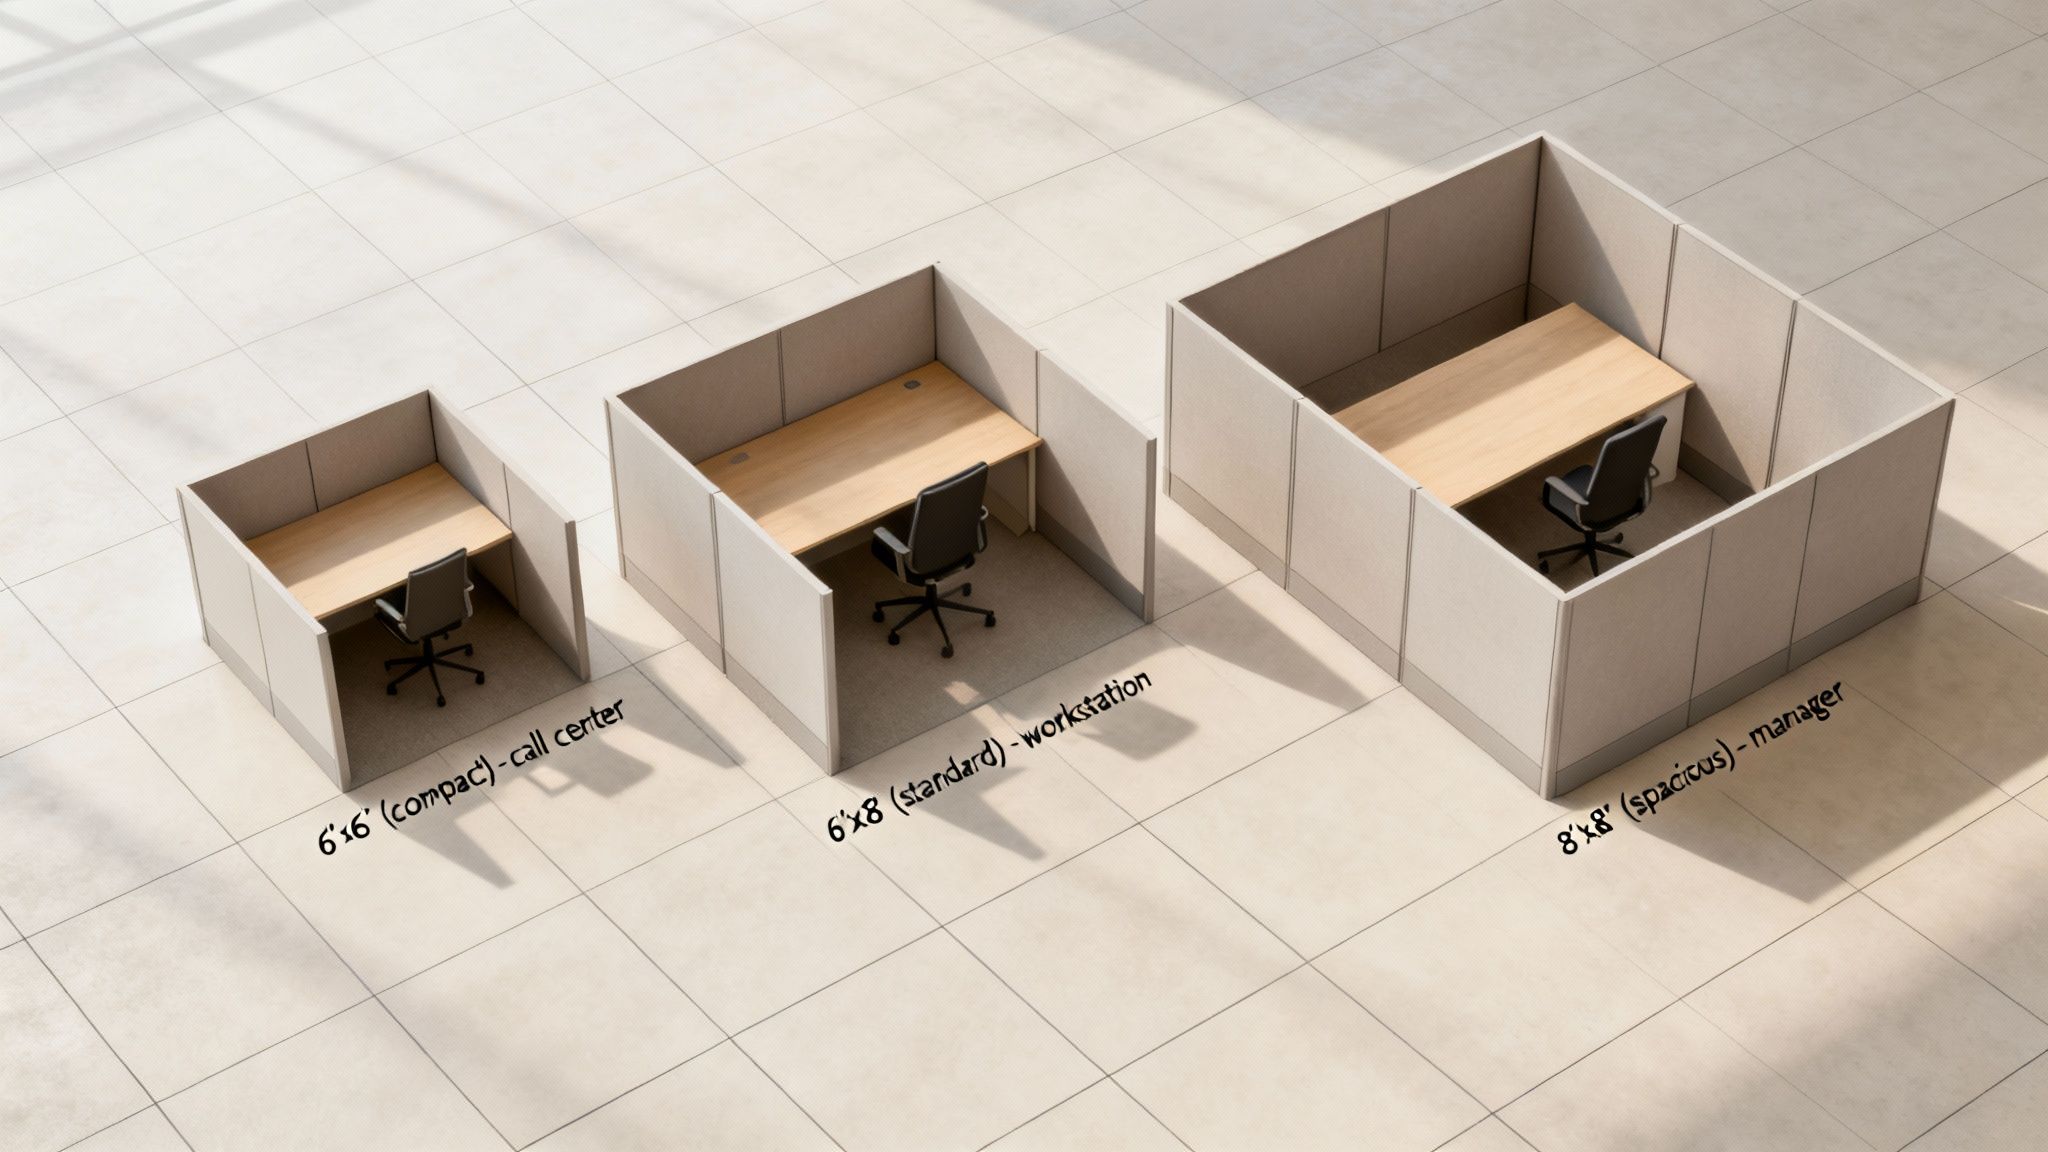
A high-density call center, for instance, might opt for compact 5'x5' workstation cubicles. This size minimizes the footprint for each person, letting you fit more staff into one area while still providing just enough room for a headset, monitor, and keyboard. The name of the game is efficiency.

On the flip side, an engineering or design team needs room to spread out and think. A much more spacious 8'x8' layout makes sense here. It can easily handle multiple large monitors and physical blueprints, and it gives a colleague enough space to pull up a chair and collaborate without everyone feeling jammed together.

Privacy and Seniority Considerations

Beyond job tasks, the need for privacy plays a huge role. Anyone handling sensitive information, like your HR or finance teams, often needs a larger footprint combined with higher panels to guarantee confidentiality.

Seniority is another factor to weigh. Giving managers and team leads a slightly larger cubicle, like a 6'x8', accomplishes two things:

  • Practicality: It gives them the extra desk space they need for planning, holding small team huddles, or storing more files.
  • Hierarchy: It offers a subtle, unspoken signal of their leadership role in the company, which can be a valuable part of office culture.

The most effective office layouts are the ones where every square foot has a job. When you align cubicle dimensions with roles and collaboration styles, you build a workspace that actively helps your team hit their goals instead of getting in their way.

This thoughtful approach to space planning is what makes or breaks an office design. If you're curious about the nitty-gritty details that create a truly functional workspace, you might want to read our insights on what makes a well-designed cubicle.

Fostering Collaboration and Focus

Finally, your choice of cubicle dimensions directly impacts the balance between teamwork and individual focus. Open, collaborative cultures might use smaller footprints clustered together to make interaction feel natural and easy. Teams that need deep, uninterrupted concentration, however, will do better in larger, more isolated workstations.

Think about how your teams actually work.

  • Do they need to constantly talk and bounce ideas off each other? Smaller, grouped stations could be perfect.
  • Do they need quiet time to crack complex problems? Larger, more enclosed private office cubicles would be a much better fit.

Ultimately, thinking strategically about the purpose behind each cubicle size is what separates a great office from a mediocre one. It turns a logistical headache into a genuine opportunity to boost both morale and productivity.

How Panel Height Shapes Your Office Environment

When people talk about the standard cubicle size, they usually focus on the footprint—the length and width. But it's the panel height, the vertical dimension, that truly defines how an office feels and functions. This single factor quietly dictates everything from privacy and noise control to your company’s entire culture.

Think of it like designing a house. Do you want an open-concept living room where everyone interacts, or a home with traditional, separate rooms for quiet and focus? Neither is better than the other; the right choice just depends on the lifestyle you want to support. In the office, it's about the work style.

Office design has swung back and forth on this for decades. The towering, maze-like cubicles of the past have mostly given way to more open setups, all reflecting shifts in how we work together.

Low Panels for Open Collaboration

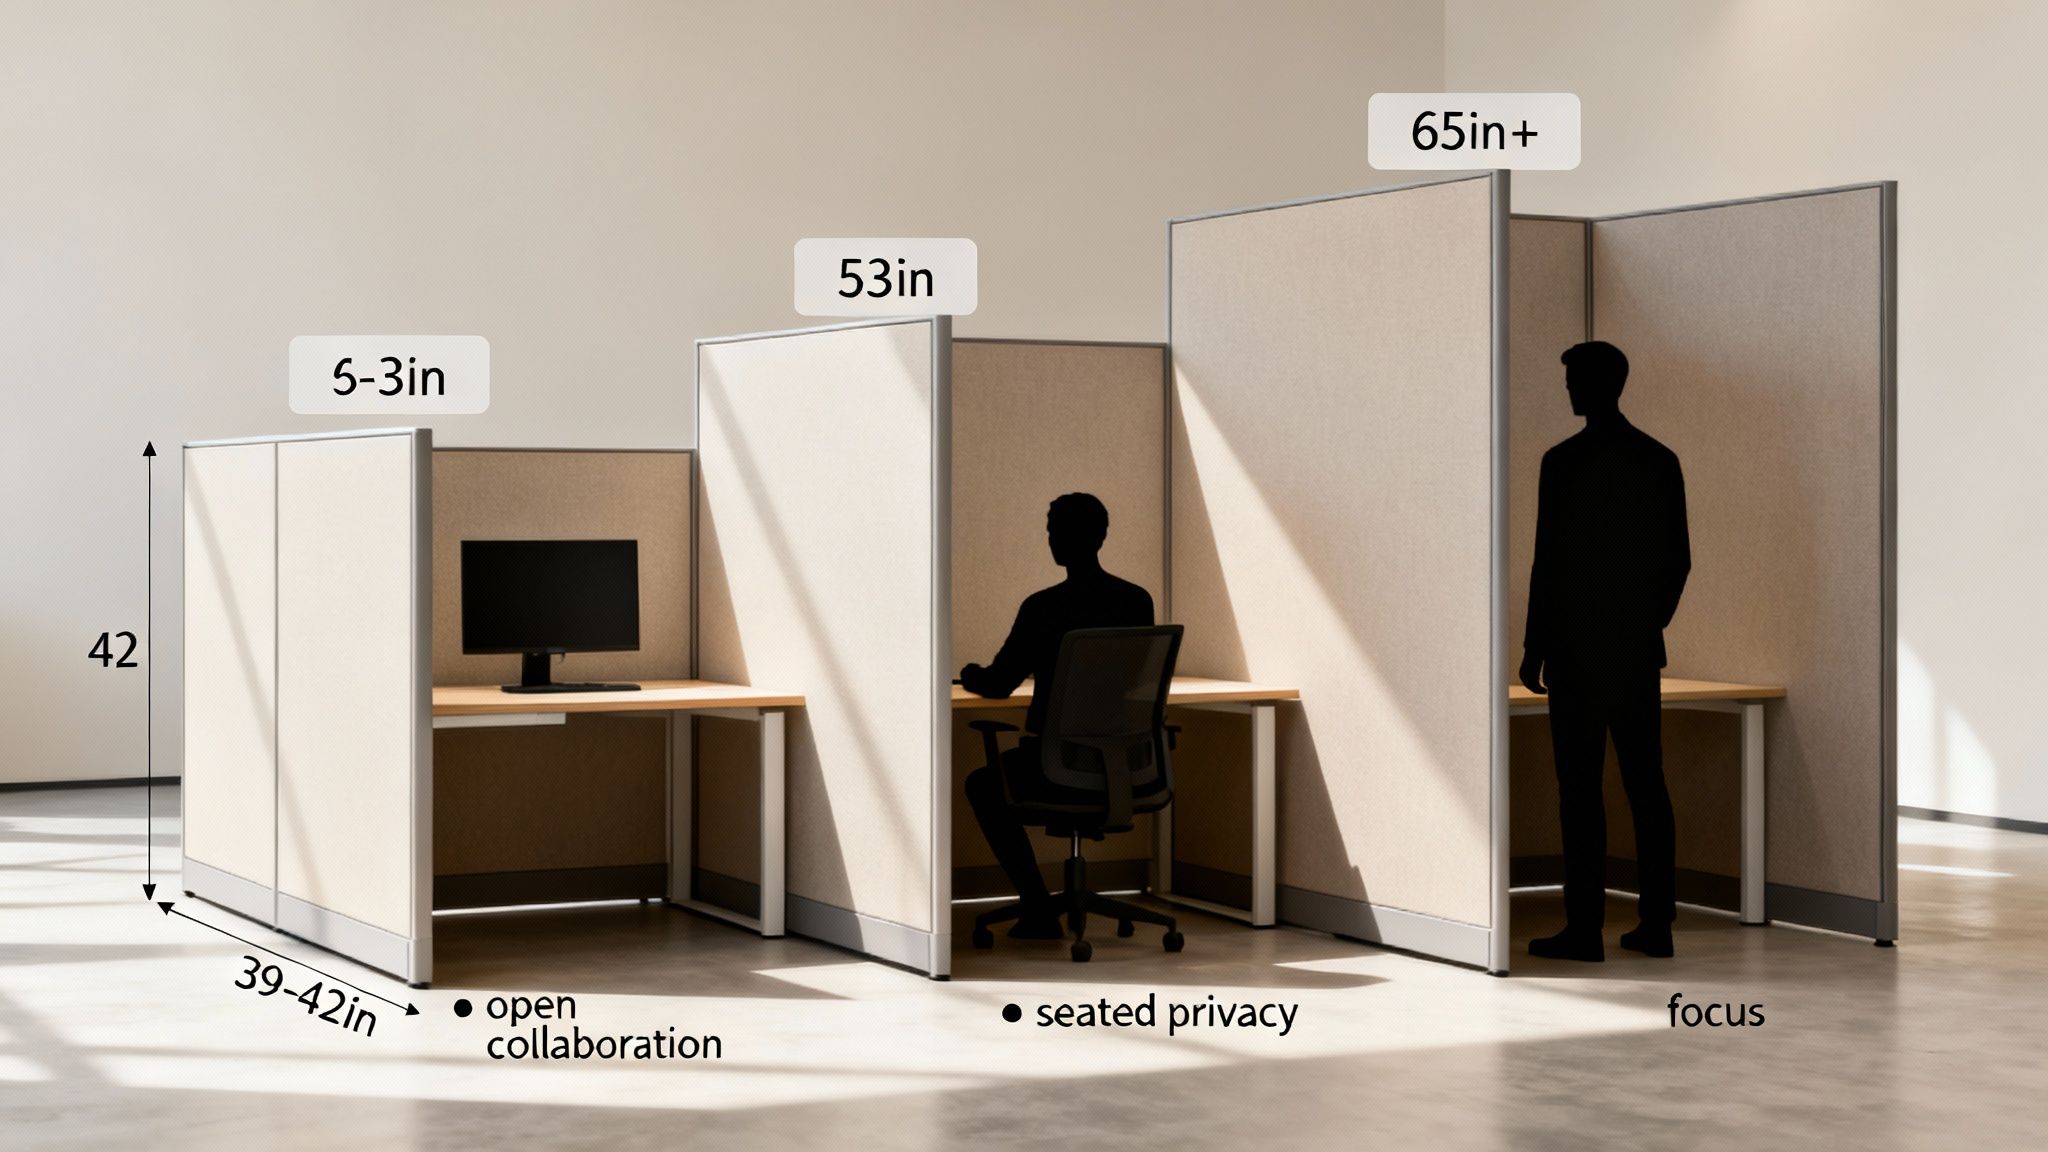
The shortest panels you'll find, typically around 39 to 42 inches high, are built for buzz. They sit just below eye level for someone who is seated, creating an environment that feels open, airy, and ready for teamwork.

These are perfect for departments that run on spontaneous conversation. Imagine a sales floor or a creative agency where bouncing ideas around is a constant. The low walls remove any real barrier, making it effortless to ask a quick question, share a screen, or just stay connected to the team's energy.

  • Best For: Sales teams, creative departments, and any role requiring constant interaction.
  • Key Benefit: Promotes a strong sense of community and makes the office feel larger and brighter.
  • Consideration: Offers minimal acoustic or visual privacy, which can lead to distractions.

Mid-Height Panels for Balanced Focus

This is the sweet spot. Mid-height panels, usually around 53 inches, are the most popular choice for a reason. They're tall enough to rise just above the eye level of a seated employee, giving them a clear sense of personal space and visual privacy.

This "seated privacy" is fantastic for focused, individual work, shielding people from the distraction of colleagues walking by. At the same time, all you have to do is stand up to see across the office, ask a neighbor a question, or feel like part of the group. It’s the best of both worlds—balancing the need for concentration with the desire for connection.

For many businesses, the 53-inch panel strikes the ideal compromise. It supports heads-down productivity while preventing employees from feeling completely isolated from their colleagues, making it a versatile choice for a wide range of administrative and technical roles.

Tall Panels for Maximum Privacy

When a job demands deep concentration, confidentiality, or serious noise control, tall panels are the only way to go. Ranging from 65 inches and up, these walls create a genuine semi-private office.

They are essential for roles in HR, finance, or legal departments where sensitive information is a daily reality. The high walls provide excellent visual privacy and, when built with acoustic materials, can dramatically cut down on office chatter. This setup is all about minimizing distractions so employees can tackle complex tasks without interruption. If you're looking to create quiet zones, our guide to improving office cubicle privacy has some great tips.

Ultimately, the right panel height for your standard cubicle size comes down to the work happening inside it. At Cubicle By Design, we offer a full range of panel heights across all our cubicle systems so you can find the perfect match. Whether you need collaborative workstation cubicles or focused private office cubicles, our cubicle designer tool lets you customize every detail to build a workplace that truly works.

Planning Your Office Layout for People and Workflow

Once you’ve locked in the right standard cubicle size for your teams, the next big step is arranging them. You're not just fitting desks into a room; you're building an ecosystem. A thoughtful layout can be the difference between a place that feels disjointed and one that buzzes with productive energy.

Think of it like planning a city grid. You need wide avenues for the main traffic and smaller side streets that connect different neighborhoods. In your office, this translates to clear walkways and logical groupings that actually support how your teams work together.

Common Cubicle Configurations

There are a few proven ways to arrange workstations, and the best one really comes down to your company’s workflow and culture.

  • Linear Rows: This is the most straightforward setup, with cubicles lined up back-to-back. It's incredibly efficient for departments like accounting or data entry, where individual focus is the name of the game and work moves sequentially down the line.
  • Clusters or Pods: Grouping four to six cubicles into a pod creates a natural neighborhood for a project team. This is perfect for encouraging collaboration, as team members can easily chat without broadcasting their conversations to the entire office.
  • Spine-Based Layouts: Here, a central "spine" houses all the power and data cabling, with workstations branching off it. This approach makes tech management a breeze and keeps the whole space looking clean and organized.

These are great starting points. For more design inspiration, you can also check out some transformative office study room ideas to see how others are creating productive workspaces.

The Non-Negotiables of Office Flow

Beyond just arranging the furniture, a few critical factors ensure your office is safe, comfortable, and compliant. Getting these wrong can lead to frustrated employees and even expensive code violations.

First up: walkway width. Your main traffic arteries—the paths leading to exits, break rooms, and conference rooms—need to be at least 44 inches wide. This gives two people enough room to pass comfortably and meets most accessibility standards. For the smaller aisles between cubicle rows, 36 inches is the minimum.

A well-planned office layout prioritizes easy movement. If people feel like they’re navigating an obstacle course just to get to their desk, it creates a low-grade, constant friction that chips away at morale and productivity.

You also have to think about building codes, especially when it comes to fire safety. Your layout can't block sprinkler systems or emergency exits. It’s always a smart move to check local regulations before you start moving anything.

To stay on track, a simple checklist can make all the difference.

Office Layout Planning Checklist

Here's a quick rundown to ensure your layout is functional, compliant, and optimized for how your team actually works.

Planning Step Key Consideration Best Practice Tip
1. Map Your Workflow How do teams and individuals interact throughout the day? Group collaborative teams in pods and place departments with sequential workflows in linear rows.
2. Measure Your Space What are the exact dimensions, including columns and doorways? Create a scaled floor plan before ordering furniture. Account for every pillar and outlet.
3. Define Walkways How will people move through the office? Designate main traffic paths (44" min) and secondary aisles (36" min) for clear, safe passage.
4. Check Local Codes Does the layout meet fire safety and ADA requirements? Consult local building codes to ensure all exits, sprinklers, and accessible routes are unobstructed.
5. Plan for Power & Data Where are the existing outlets and data ports located? Use a spine-based layout or power poles to avoid trip hazards from extension cords. Ensure every desk has access.
6. Get Feedback What do the people who will use the space actually need? Involve department heads or team leads in the planning process to avoid overlooking practical needs.

Following these steps will help you create a space that not only looks good on paper but works great in reality.

Power and Data Planning

In a world run by tech, planning for power and data is just as crucial as planning for people. Before you finalize anything, map out where your outlets and data ports are. A spine-based layout is a massive help here, but you still have to make sure every employee can plug in without a jungle of extension cords creating trip hazards.

This is where getting some expert guidance can save you a world of headaches. A professional space planner can help you create a layout that not only looks fantastic but functions flawlessly, taking care of every detail from walkway widths to power distribution. You can get a head start by exploring a detailed office space planning guide to get a handle on all the key factors.

Essential ADA and Building Code Considerations

Beyond just picking a layout that looks good, your office plan absolutely must be safe, accessible, and up to code. This isn't just about sidestepping some hefty fines or having to tear everything out and start over. It's about creating a workplace where every single employee can move around and work safely and comfortably.

You can't treat regulations like the Americans with Disabilities Act (ADA) and local fire codes as an afterthought. They are the non-negotiable foundation of any smart office plan. Navigating these rules might seem daunting, but it all comes down to a few core ideas of safety and access. Thinking about this stuff from the very beginning will save you a world of headaches later on.

Decoding ADA Requirements

The Americans with Disabilities Act (ADA) is there to make sure workspaces are accessible to everyone, including team members who use wheelchairs or have other mobility challenges. When you're planning your cubicle layout, this directly impacts your standard cubicle size and the pathways weaving through the office.

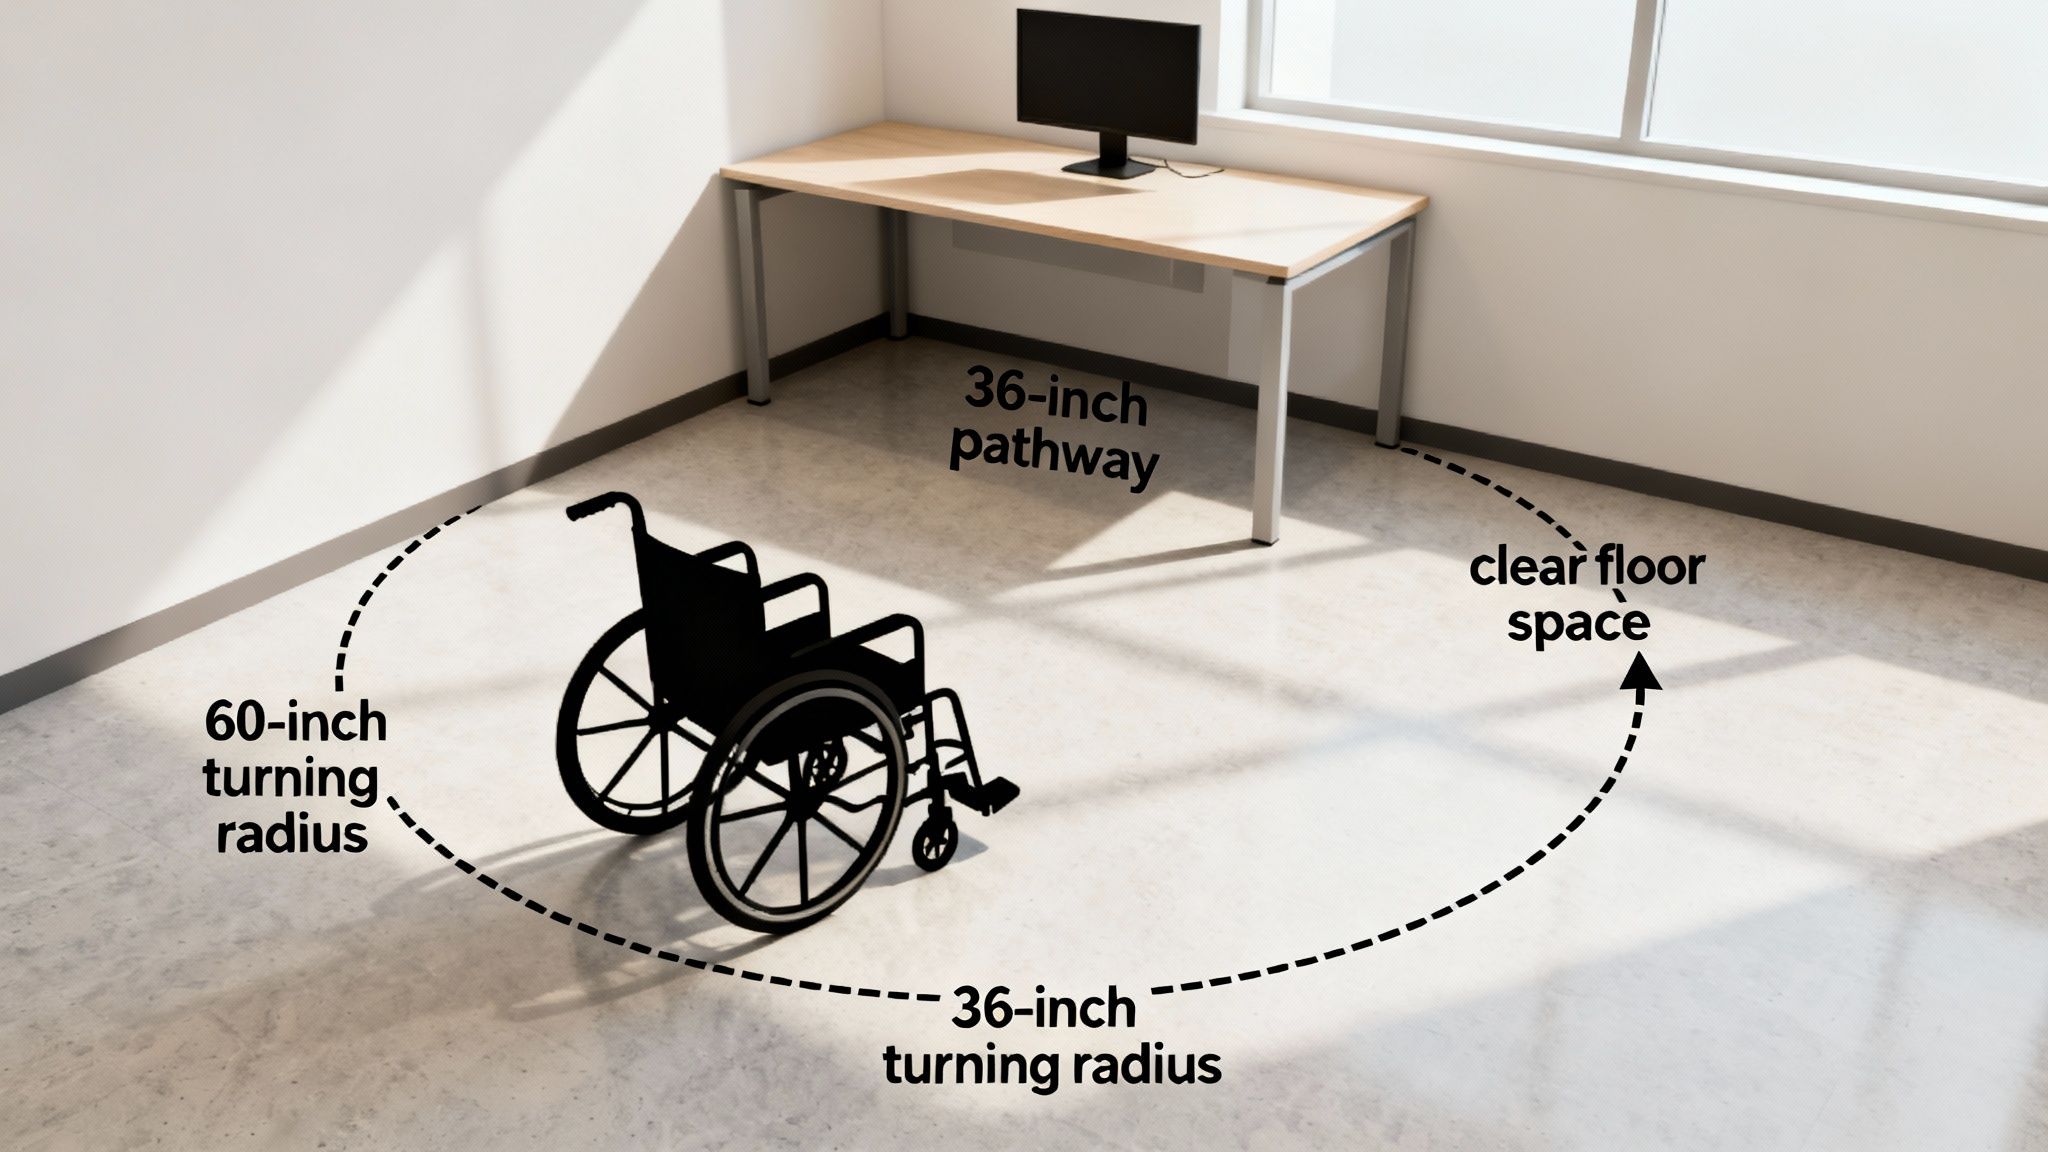
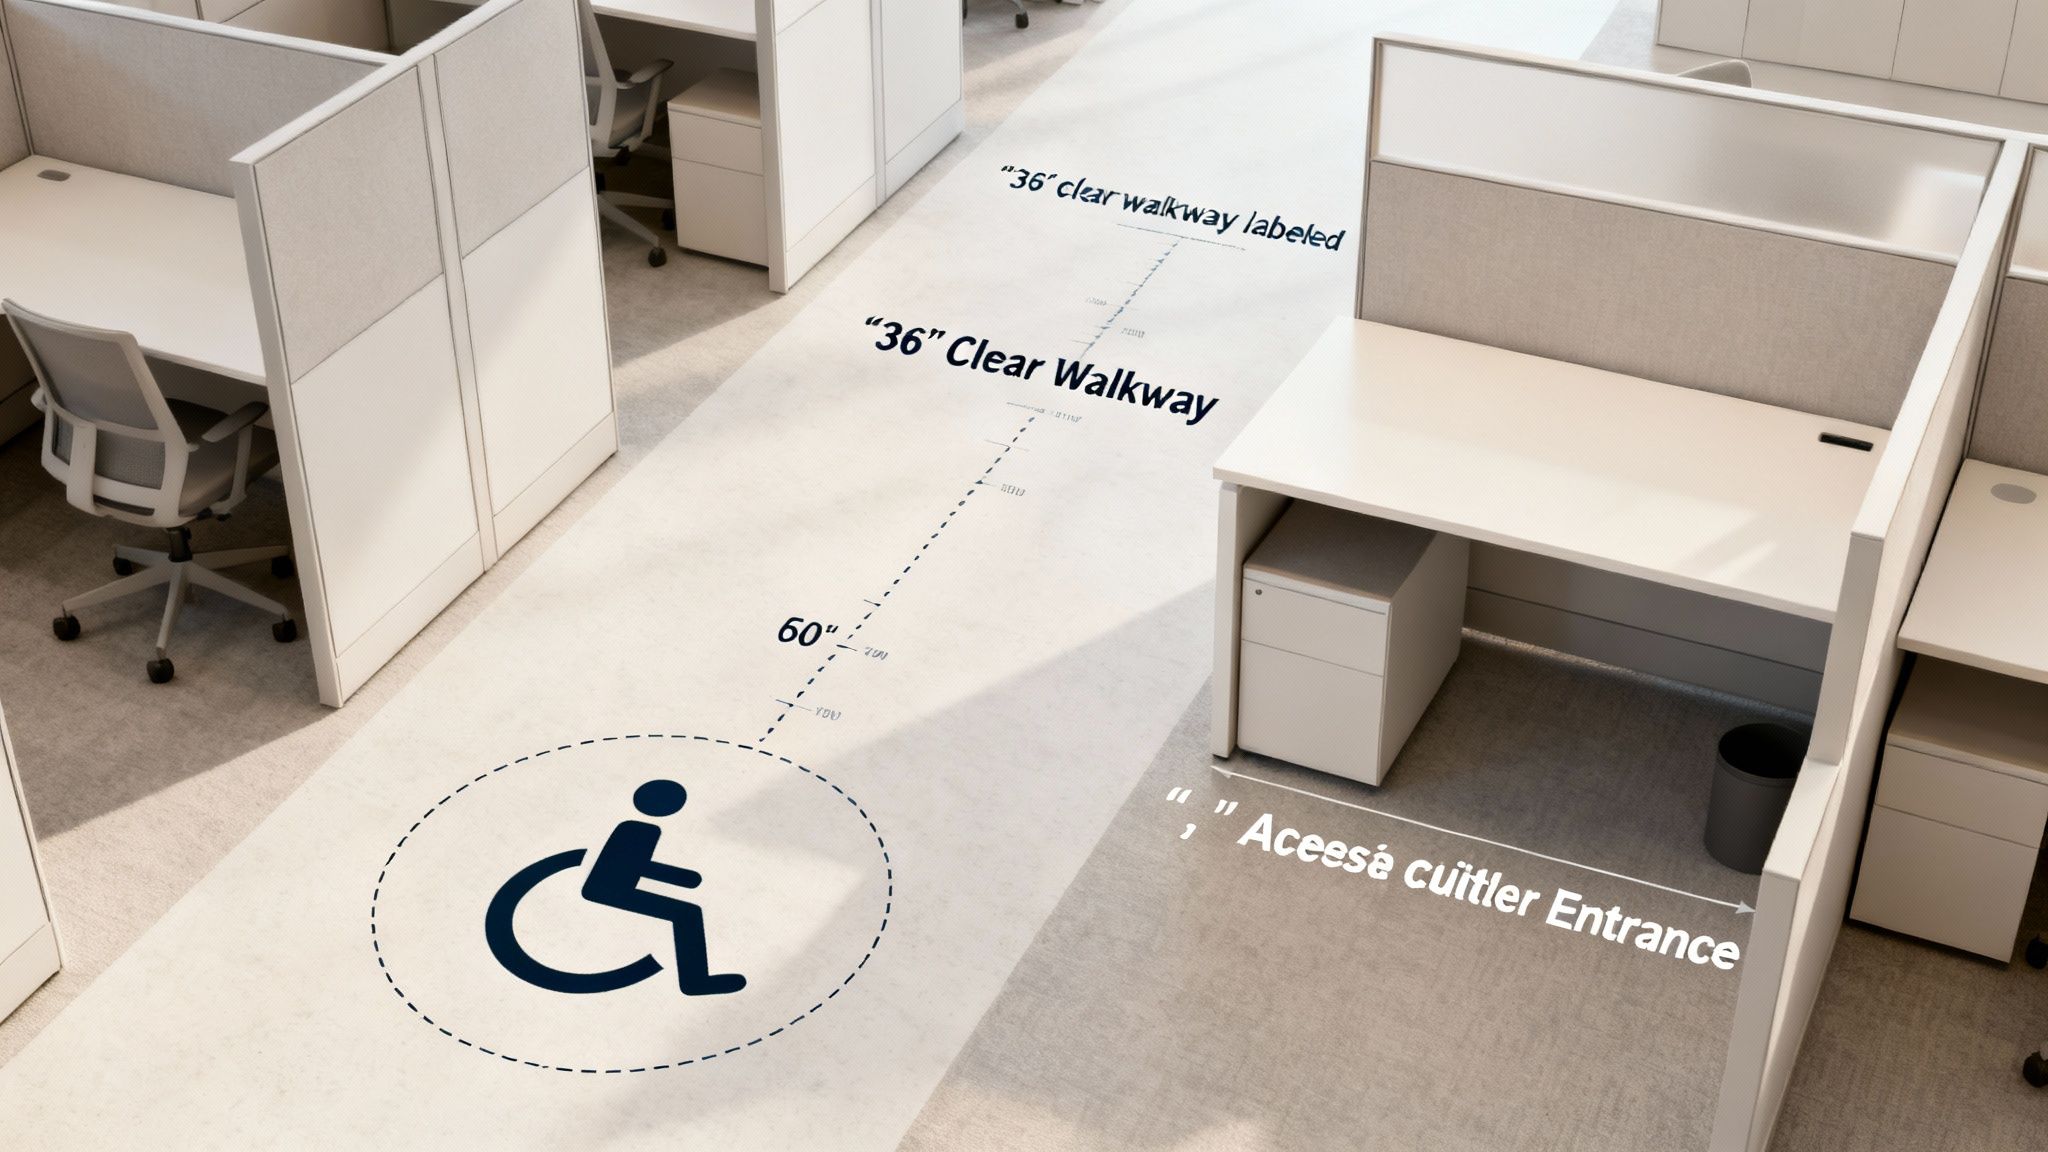
The biggest rule here is the accessible route. You need clear, unobstructed paths at least 36 inches wide that connect workstations to all the common areas—think entrances, restrooms, and the break room.

Your layout also needs to have enough room for people to actually maneuver. This often means designing certain workstations with a larger footprint to allow for a 60-inch diameter turning space for a wheelchair. Desk surfaces have to be at an accessible height, too, usually between 28 to 34 inches from the floor, with plenty of knee clearance underneath.

Compliance is proactive, not reactive. Building an accessible office from the ground up creates a genuinely welcoming culture and avoids the significant expense and disruption of a forced redesign down the road.

Meeting Fire and Safety Codes

Fire safety is the other critical piece of the puzzle that shapes your cubicle arrangement. Local building codes are written to ensure one simple thing: that everyone can get out of the building quickly and safely in an emergency.

A key focus is maintaining clear egress paths. Your cubicles cannot block any designated fire exits, and your main hallways must meet minimum width requirements—often 44 inches or more—to handle a crowd moving in a hurry.

Here's a detail people often miss: the relationship between your cubicle panels and the ceiling-mounted sprinkler system. Panel heights and their placement can't get in the way of the sprinklers' spray patterns. In most cases, you must have at least an 18-inch clearance between the top of the panels and the sprinkler heads. Getting this wrong is a serious safety violation.

  • Egress Paths: Keep all designated exit routes completely clear and wide enough for rapid evacuation.
  • Sprinkler Clearance: Ensure at least 18 inches of vertical space between cubicle panels and sprinkler heads.
  • Emergency Lighting: Don’t let tall cubicles block emergency lights or exit signs.

Proper planning makes sure your office isn't just a productive space, but a fundamentally safe one for every person in it. For layouts that demand this level of detail, like creating compliant private office cubicles, getting professional guidance is a smart move. The team at Cubicle By Design has the expertise to help you create a space that meets all necessary codes, ensuring your design is both functional and secure.

Choosing the Right Cubicle Solution for Your Business

Once you have a handle on cubicle sizes, heights, and potential layouts, you can start putting it all together for your own space. Picking the right standard cubicle size is really about matching the furniture to the job function. A smart investment here actively helps your team do their best work, and different types of businesses need completely different setups.

Think about a bustling call center. It’s all about efficiency and focus. In that scenario, compact workstation cubicles with good acoustic panels are the way to go. They knock down the noise and distractions while letting you fit more people into the floor plan, creating an environment that’s built from the ground up for high-volume, individual work.

Tailoring Solutions for Different Business Needs

A growing startup, on the other hand, is playing a totally different game. Their biggest challenge is often just keeping up with growth. For them, a scalable, modular system is a perfect match. These setups can be easily rearranged or added to as new people come on board, giving them the flexibility they need without having to rip everything out and start over every year.

An established corporate headquarters usually needs a bit of everything. The goal is to create spaces for teamwork while also providing the privacy that executives and focused workers need. This might look like open-plan clusters for project teams, paired with taller, more spacious private office cubicles for senior leadership. By the early 21st century, it was common for around 60-70% of office work to happen in modular workstations, showing just how popular this blended approach became. You can learn more about the history of the modern office on thenewatlantis.com.

The best office design is a direct reflection of the business it serves. By visualizing how different teams work, you can select cubicle solutions that address specific needs for collaboration, focus, density, and scalability.

Finding Your Perfect Fit with Cubicle By Design

These examples show that there’s no single “right” answer for every office. The perfect setup is completely tied to your company’s culture and how your teams operate. Whether you need a sea of high-density stations or a few quiet executive suites, the key is having options. You might even be surprised to find that custom-fit cubicles are more affordable than you think.

At Cubicle By Design, our product lines were built to meet these different needs. From our all-purpose general cubicles to more specialized workstations, we have the building blocks for any business. Our online cubicle designer tool makes it easy to play around with different sizes and layouts until you find the perfect fit for your vision and budget, making sure your office is truly built for success.

Your Cubicle Sizing Questions, Answered

Jumping into office furniture planning always brings up a few specific questions. To help you nail down the details, we've pulled together answers to the most common things people ask about cubicle sizes and layout planning.

What’s the Go-To Cubicle Size for a Typical Office Role?

The classic, most common cubicle size you'll see is 6'x6'. It gives you a solid 36 square feet of workspace and really hits the sweet spot between having enough personal room and being efficient with your floor plan. It’s pretty much perfect for most administrative and general office roles. That said, the 6'x8' is also a popular choice for folks who need a bit more desk surface or storage space.

How Much Room Do We Need for Walkways?

Think about how people move through the office. For those main arteries where there's two-way traffic, you'll want to aim for a minimum width of 44 inches. This keeps things from feeling cramped and helps with ADA compliance. For the smaller aisles that run between individual rows of cubes, 36 inches is usually enough. It’s always smart to double-check this against your local building and fire codes, just in case they have their own specific rules.

A great office layout isn't just about the desks—it's about the space in between. Getting the aisle width right is crucial for safety, accessibility, and a smooth flow of traffic, all of which are key for a happy, productive team.

Is It Okay to Mix Different Cubicle Sizes in the Same Office?

Absolutely. In fact, mixing sizes is often a really smart way to build a more dynamic and functional space. You could use standard 6'x6' workstation cubicles for most of your team, give managers a little more breathing room with 6'x8' or 8'x8' setups, and even use smaller pods for touchdown spots or high-density teams like a call center.

The trick is to stick with a cohesive system from one manufacturer. This ensures that even with different footprints, the whole office has a unified, professional look.

How Do I Pick the Right Panel Height for My Team?

Panel height really comes down to how your team works. Here's a simple way to think about it:

  • Low Panels (around 42 inches): These are fantastic for super-collaborative teams. They keep the lines of communication wide open and create a buzzing, energetic atmosphere.
  • Mid-Height Panels (53-55 inches): This is the most popular option for a reason. It gives people privacy to focus when they're sitting down but still makes it easy to chat with a neighbor by just standing up.
  • Tall Panels (65 inches and up): If your team handles sensitive information or needs to block out noise, this is the way to go. Think HR, finance, or legal departments where confidentiality is key.

Getting the right blend of size and height is what turns a good workspace into a great one.


Ready to design an office that truly works for your team? At Cubicle By Design, we specialize in creating flexible, modern workspaces that fit your vision and your budget. Get started with our interactive cubicle designer tool and build your ideal office today.

Read More

The Best Ergonomic Office Chairs for Back Pain Relief by Cubicle By Design

If you’re looking for the best ergonomic office chairs for back pain, you need to focus on a few key things: adjustable lumbar support, the right seat depth, and a synchronous tilt mechanism that moves right along with you. A great ergonomic chair is more than just a place to sit; it's a vital tool for your spinal health, engineered to head off the aches and pains that settle in after hours at a desk. At Cubicle By Design, we believe the right chair is the foundation of a productive workspace.

Why Your Office Chair Is Causing Back Pain

That nagging ache in your lower back that shows up like clockwork every afternoon? That’s not just you being tired. It’s a bright, flashing warning sign that your chair is actively working against your body.

For millions of us, this has become the new normal—a frustrating byproduct of spending eight hours a day in a seat that completely ignores the natural curve of the spine. When a chair doesn't offer the right support, it forces you into postures that lead to muscle fatigue, throw your spine out of alignment, and, eventually, cause chronic pain.

This isn't just about being uncomfortable, either. It torpedoes your productivity, shatters your focus, and sets you up for long-term health problems. Slouching day in and day out puts a ton of pressure on your spinal discs and weakens your core, creating the perfect conditions for more serious issues down the line.

The Staggering Scale of Sedentary Work

This isn't just a local problem; the link between sitting all day and poor spinal health is a global issue. According to the World Health Organization, low back pain was already affecting 619 million people globally in 2020. That number is expected to skyrocket to 843 million by 2050.

Here in the U.S., it’s one of the main reasons for job-related disability, costing businesses billions in lost productivity. The numbers are truly mind-boggling when you dig into them.

A Tool for Prevention, Not a Luxury Item

This is where finding the best ergonomic office chairs for back pain becomes non-negotiable. An ergonomic chair isn't a luxury—it's a foundational piece of equipment designed to prevent all these negative outcomes. It's built from the ground up to support your body correctly, encourage a healthier posture, and take the strain off your back, neck, and shoulders.

Here’s what a good one does for you:

  • Reduces Spinal Strain: Proper lumbar support is designed to maintain the natural S-curve of your spine, not force it flat.
  • Improves Circulation: A well-fitted seat pan stops that circulation-killing pressure on the back of your thighs.
  • Enhances Focus: It’s simple, really. When your body is comfortable and supported, your brain is free to concentrate on the task at hand.

At Cubicle By Design, we know that a healthier, more productive workspace starts with getting the fundamentals right. This guide will walk you through exactly what to look for in a chair that supports your team and your business goals. For some quick wins you can implement today, check out our tips on improving office posture.

How Real Ergonomics Fights Back Pain

The word "ergonomic" gets tossed around a lot, slapped onto everything from keyboards to office chairs. But what does it actually mean for your back? True ergonomics isn't about a cushy seat. It’s about a chair that acts as a dynamic support system, practically custom-fit to your body's specific needs. It's the science of aligning your spine, easing muscle strain, and letting you work without nagging pain.

Instead of just running down a checklist of features, it helps to understand how these parts work together as a team. A genuinely ergonomic chair is an active partner in your workday, constantly adjusting to keep you supported as you shift, reach, and type. It’s the difference between a chair that just holds your weight and one that actively helps you maintain a healthy posture.

This flowchart breaks down the usual suspects when it comes to workplace back pain.

As you can see, spending hours at a desk often leads to poor posture, which is a direct line to chronic back pain. A well-designed chair interrupts this cycle by tackling the problem head-on.

When selecting an ergonomic chair, certain features are non-negotiable for back health. Each one plays a specific role in keeping your spine aligned and your muscles relaxed.

The table below breaks down the most critical features and explains exactly how they provide support where you need it most.

Key Ergonomic Features That Relieve Back Pain

Feature How It Supports Your Back What to Look For
Dynamic Lumbar Support Maintains the natural inward curve of your lower spine as you move, preventing muscle fatigue from poor posture. Look for adjustable height and depth to fit the curve of your back perfectly. It should feel supportive, not pushy.
Seat Depth Adjustment Ensures your thighs are fully supported without cutting off circulation behind the knees. This prevents slouching and strain on the lower back. You should be able to fit 2-3 fingers between the edge of the seat and the back of your knees when your back is against the backrest.
Synchronous Tilt Allows the backrest and seat to recline in a coordinated motion, opening up your posture while keeping your feet on the floor. The backrest should recline more than the seat tilts up (2:1 ratio is common). This encourages "active sitting."
Adjustable Armrests Takes the weight of your arms off your shoulders and upper back, reducing tension in the neck and spine. Look for 4D armrests (height, width, depth, and pivot) to get the most customized support for your body and tasks.
Seat Height Adjustment Allows you to sit with your feet flat on the floor and your knees at a 90-degree angle, creating a stable base for your spine. A pneumatic lever that’s easy to reach while seated is the standard. Ensure the height range works for your desk.

Understanding these individual components helps you see how a truly ergonomic chair functions as a complete system to protect your back throughout the workday.

Dynamic Lumbar Support: The "Hand on Your Back"

Think of dynamic lumbar support as a gentle but firm hand that stays on your lower back all day long. Unlike a static pillow you have to constantly shove back into place, this feature moves with you. It provides continuous support to the natural inward curve of your spine, which is a big deal since the lumbar region takes on a huge amount of stress when you're sitting down.

Without that active support, the lower back tends to flatten out, forcing your muscles to work overtime just to hold you upright. That leads directly to muscle fatigue and that familiar, dull ache.

A great ergonomic chair encourages subtle, natural movements. It prevents the stiffness that comes from being locked into a single, rigid position for hours on end, which is a major contributor to spinal tension.

This constant, adaptive support is what separates the best ergonomic office chairs from the rest. It ensures your spine stays in a neutral, healthy alignment, no matter how you shift in your seat.

Seat Depth Adjustment: A Game Changer for Circulation

Ever stand up from your chair and get that pins-and-needles feeling in your legs? That’s often a red flag for poor circulation, caused by a seat that’s either too deep or too shallow. Getting the seat depth right is crucial for taking pressure off the back of your thighs.

Here’s how you know the fit is right:

  • The Sweet Spot: You should be able to sit with your back flush against the backrest, with a gap of about two to three fingers' width between the front edge of the seat and the back of your knees.
  • Too Deep: If the seat edge presses into your calves, it can restrict blood flow. It also might cause you to slouch forward to compensate, which totally defeats the purpose of the backrest.
  • Too Shallow: If there's too much space, your thighs won't be properly supported, putting extra strain on your lower back muscles.

This one simple adjustment ensures your weight is distributed evenly across the seat. It promotes better blood flow and cuts down the risk of numbness or discomfort. You can learn more about how small tweaks make a big impact when you maximize the ergonomics of your office.

Synchronous Tilt: The Secret to Active Sitting

A synchronous tilt mechanism is one of the most powerful features for preventing stiffness and fatigue. Here’s how it works: when you lean back, the backrest and the seat pan tilt together, but at different ratios. The backrest reclines more than the seat tilts up. This clever design lets your body open up and stretch while keeping your feet firmly on the floor and your eyes level with your monitor.

This coordinated movement encourages what we call "active sitting," where you're making small, almost subconscious adjustments throughout the day. These micro-movements stimulate your muscles, improve circulation, and prevent the static load on your spine that leads to aches and pains. The right chair makes a real difference.

Of course, even the best chair needs to be paired with good habits. It’s important to learn additional strategies to improve posture at your desk to round out your approach to a pain-free workday.

How to Choose the Right Chair for Your Body Type

Finding the right ergonomic chair isn't a one-size-fits-all deal. A chair that feels like a dream for one person might be a nightmare for you. It all comes down to a personal fit, matching the chair’s design to your body's unique shape and the way you work every day.

Think of it like buying a good pair of running shoes. You wouldn't just grab any size off the shelf. You’d find one that supports your specific foot length, width, and arch. A great office chair works exactly the same way—it needs to align with your frame to provide real support, not just generic cushioning.

Let's walk through a simple "test-drive" process. We’ll skip the abstract jargon and get right to the hands-on checks you need to make sure a chair is the perfect match for you.

Start With Your Foundation: Your Height and Weight

Before you even sit down, the first thing to check is whether a chair is built for your stature. Most standard office chairs are engineered for a pretty specific range, usually accommodating people between 5'4" and 6'2" and up to 250 pounds. If you’re outside that range, you’ll want to hunt for chairs specifically made for petite or big-and-tall users.

For taller folks, a standard chair just won't cut it—the backrest will be too short and the seat too low. For smaller users, the seat depth might be too long, digging into the back of the knees and messing with circulation. Always look at the manufacturer's specs for height and weight capacity first. It’s your baseline.

The Five-Point "Test-Drive" Checklist

Okay, you've found a chair that matches your basic frame. Now it’s time for a quick fit test. Run through these five checkpoints to see if the chair actually helps you maintain a neutral, relaxed posture.

  1. Feet Firmly on the Floor: Adjust the seat height so your feet are resting flat on the ground. Your knees should form a 90-degree angle, with your thighs parallel to the floor. If your feet are dangling or your knees are bunched up, it's a no-go.
  2. The Two-Finger Rule for Seat Depth: Scoot all the way back until your lower back makes contact with the lumbar support. Now, check the gap between the front edge of the seat and the back of your knees. You should be able to slide two to three fingers in there comfortably.
  3. Lumbar Support That Cradles, Not Pokes: The lumbar curve should fit perfectly into the natural inward curve of your lower back. It should feel supportive and gentle, not like something is aggressively shoving your spine forward. Play with the height and depth until it feels just right.
  4. Armrests at Elbow Height: Let your shoulders completely relax and drop your arms to your sides. The armrests need to adjust to a height where your elbows can rest at a natural 90-degree angle. Your shoulders shouldn't be shrugged up to meet them.
  5. Easy-to-Reach Adjustments: While you’re sitting, can you actually reach and use all the adjustment levers for height, tilt, and armrests without straining? If you have to stand up or contort yourself to make a simple change, you’re far less likely to use those critical features.

A chair’s value isn't just in its features, but in how easily you can use them. Intuitive, accessible controls encourage you to make micro-adjustments throughout the day, which is key to preventing the static posture that leads to back pain.

Consider Your Daily Work Habits

Finally, think about how you work. The tasks you do all day long should play a big role in your choice.

  • For Heavy Typists: Do you spend most of your day with your hands on a keyboard? If so, 4D armrests are a game-changer. Being able to adjust the width, depth, and pivot of the armrests gives your wrists and forearms proper support, taking a ton of strain off your upper back and shoulders.
  • For Collaborative Roles: If you're constantly swiveling to talk with colleagues or moving around your workstation, you'll want a chair with a smooth swivel and high-quality casters. A synchronous tilt is also great for easily shifting between focused keyboard work and more relaxed, conversational postures.
  • For Dynamic Workflows: Do you jump between different tasks all day? A chair with an easy-to-use tension control lets you quickly change how much force it takes to recline, giving you the right amount of support for every activity.

Choosing the right fit is about finding a long-term solution for back pain, not just a temporary fix. For a deeper dive, explore our guide on office seating options that aren't a pain in the neck to find even more solutions. You can even bring your ideal workspace to life by planning your entire ergonomic setup with our Cubicle By Design Cubicle Designer tool.

Building an Ergonomic Workspace Beyond the Chair

Getting the right ergonomic chair is a huge first step, but it’s really only half the battle. A truly pain-free workspace is a whole ecosystem, where every single piece works in harmony to support your body. When you start thinking beyond the chair, you create an environment that fights strain from all angles.

It’s all about how your chair interacts with your desk, your monitor, and even the flow of your office. By dialing in the whole system, you build a supportive bubble that encourages good posture and natural movement all day long.

The Essential Pairing: Your Chair and Desk

Think of your chair and desk as a team; one can't do its job well without the other. If your desk is too high, you’ll spend the day shrugging your shoulders just to type, creating a knot of tension in your neck. If it's too low, you'll hunch over, completely canceling out all the good work your chair's lumbar support is trying to do.

The sweet spot is a neutral posture where your elbows rest comfortably at a 90-degree angle. This is why adjustable-height and standing desks are the perfect partners for ergonomic chairs. They let you fine-tune that relationship, ensuring your arms, wrists, and shoulders stay relaxed and preventing that nagging upper back and neck pain.

Monitor Height and Neck Strain

Another sneaky culprit behind workplace pain is a poorly placed monitor. When you spend hours staring down at a screen, you're forcing your neck into an unnatural forward bend. Over time, that constant strain on your cervical spine leads to "tech neck," that all-too-familiar feeling of stiffness and pain.

To fix this, your monitor needs to be directly in front of you, about an arm's length away. The top of the screen should sit right at or just below your eye level. This simple adjustment lets you keep a neutral neck posture, allowing your head to balance naturally on your spine instead of craning forward. A monitor arm or even a stack of books can be a game-changer.

An ergonomic workspace is not static. It’s an environment that encourages movement and allows for easy adjustments to suit different tasks, preventing the fatigue and strain that come from being locked in a single position for hours.

Integrating Ergonomics into Your Office Layout

A truly ergonomic office looks at the bigger picture, weaving supportive principles into the very design of the workspace. This is where well-planned furniture systems really make a difference. At Cubicle By Design, we specialize in creating spaces built for well-being from the ground up, whether we're outfitting rows of workstation cubicles or designing private office cubicles.

Here are a few key pieces of that puzzle:

  • Keyboard Placement: Your keyboard needs to be positioned so your wrists stay straight and your shoulders are down. Bad placement is a fast track to repetitive strain injuries. An easy fix is installing ergonomic https://cubiclebydesign.com/sliding-keyboard-trays/, which puts your keyboard at the perfect height and angle.
  • Encouraging Movement: Placing printers, water coolers, or break areas away from desks encourages people to get up and move. These little micro-breaks are crucial for boosting circulation and keeping muscles from getting stiff.
  • Proper Lighting: Bad lighting causes eye strain, which makes you lean forward and slouch. Making sure every workspace has good ambient and task lighting reduces glare and helps everyone maintain better posture without even thinking about it.

When you create a complete ergonomic zone, you’re tackling health and productivity from every direction. For more ideas on improving your space, check out these great tips for designing a home office that inspires productivity. This holistic approach makes sure your investment in a great chair pays off for years to come.

The True Cost of a Bad Office Chair

It’s easy to get sticker shock when you’re looking at the best ergonomic office chairs for back pain. That initial price tag can feel steep, and it's tempting to just grab a cheaper, standard model. But what’s the real, long-term cost of that "budget-friendly" chair? The hard truth is that poor seating is a serious financial drain disguised as a short-term saving.

When you invest in a quality ergonomic chair, you’re not just buying another piece of office furniture. You're making a critical investment in your company's most valuable asset—its people. The real expenses of cheaping out show up later, trickling down in ways that quietly sabotage your bottom line.

The Financial Drain of Poor Seating

A non-ergonomic chair is a direct path to physical discomfort, a problem that quickly snowballs into much larger business issues. Over time, these chairs actively encourage poor posture, which leads to chronic muscle strain, reduced focus, and a steady decline in an employee's overall well-being. This creates a ripple effect of tangible costs that far exceed the price of a proper chair.

The hidden financial toll is staggering. Cheap chairs may save a few bucks upfront, but they breed chronic issues like spinal strain and kill concentration. That leads directly to medical expenses, lost work hours, and having to replace the chairs sooner anyway—all costs that a good ergonomic alternative slashes dramatically.

In fact, systematic reviews confirm that ergonomic chairs meeting key standards—think proper lumbar support for the sacrum, adjustable depth, and a healthy recline—dramatically cut the severity, intensity, and frequency of musculoskeletal symptoms among desk workers.

This leads to a number of direct and indirect expenses:

  • Increased Absenteeism: Back pain is a leading cause of sick days. When an employee is out, projects stall, deadlines get pushed, and other team members have to pick up the slack, often leading to burnout.
  • Plummeting Productivity: An employee in pain is a distracted employee. It’s nearly impossible to concentrate when you're constantly uncomfortable, which means more errors, slower work, and a noticeable dip in output.
  • Higher Workers' Compensation Claims: Musculoskeletal disorders developed from poor ergonomics are a major driver of workplace injury claims. That translates to higher insurance premiums and potential legal costs down the road.

The question isn't whether you can afford to buy ergonomic chairs. The real question is whether you can afford not to. The cumulative cost of lost productivity and absenteeism from just one employee with chronic back pain can easily surpass the one-time cost of an entire fleet of supportive chairs.

Calculating the Return on Investment

Investing in proper ergonomic seating isn't an expense; it's a strategic move with a clear, measurable return. Businesses that put employee health first see significant improvements across the board. Providing the best ergonomic office chairs for back pain is a proactive step that pays for itself many times over.

Think of it this way: what is the cost of one of your key employees being out of commission for a week with a bad back? Now, compare that number to the one-time cost of a chair specifically designed to prevent that exact scenario from happening.

When you equip your team with chairs that support their bodies correctly, you're directly investing in their ability to perform at their best. Our team at Cubicle By Design can help you plan an office environment that prioritizes health from the ground up, whether you need workstation cubicles or completely private office cubicles.

Morale and Employee Retention

The costs of a bad chair aren't just financial. When employees feel their basic comfort and health aren't a priority, morale suffers. A workspace filled with uncomfortable, unsupportive chairs sends a clear message: the company is cutting corners at their expense.

On the flip side, a commitment to ergonomics shows you value your team's well-being. This fosters loyalty, improves job satisfaction, and can be a powerful tool for retaining top talent. In a competitive job market, a healthy and comfortable work environment is a significant advantage. It demonstrates a culture of care that employees notice and appreciate. To learn more about the financial benefits of a well-designed workspace, you can explore how good ergonomics can save you money.

Design a Healthier Office with Cubicle By Design

Now you have a solid game plan for tracking down the best ergonomic office chairs for back pain. It all starts with understanding how crucial features like lumbar support, seat depth, and synchronous tilt actually work together to create a comfortable workday. But picking the right chair, as important as it is, is just one piece of a much larger puzzle.

At Cubicle By Design, we’re all about seeing that bigger picture. We aren't just here to sell you furniture; we partner with you to design and build healthier, more effective office spaces from the ground up. Our job is to help you take all this newfound knowledge and turn it into a high-performance workspace your team will genuinely love coming to every day.

We handle everything from start to finish, making the whole process simple and ensuring the final result is cohesive and functional.

From Blueprint to Reality

Our services are built to take your vision for a healthier office and make it a reality. We're with you every step of the way, from the first sketch to the final walkthrough.

  • Custom Space Planning: You can jump right in with our interactive Cubicle Designer tool to visualize and map out your entire layout. It’s the perfect way to see exactly how your new ergonomic seating will fit into different areas, whether you’re planning open-plan workstations or need dedicated private offices.

  • Integrated Furniture Solutions: We specialize in creating entire office ecosystems where every piece works in harmony. Whether you need flexible workstation cubicles to get teams collaborating or focused private office cubicles for heads-down work, we make sure it all fits together.

  • Professional Installation: Our crew handles the professional installation of entire cubicle systems. This guarantees that everything is assembled correctly, giving your team optimal comfort and performance from day one.

A well-designed office does more than just look good—it actively supports the well-being and productivity of its people. Investing in a holistic ergonomic strategy is an investment in your company’s greatest asset.

Don't let a poorly designed office become a source of pain and distraction. Let us help you create a workspace that prevents back pain, lifts morale, and gives your team the support they need to do their best work.

Contact Cubicle By Design today to start planning a healthier, more productive office.

Got Questions About Ergonomic Chairs? We’ve Got Answers.

Picking out the right ergonomic chair is a big deal, and it’s only natural to have a few questions swirling around. To help you feel completely confident in your decision, we’ve rounded up some of the most common things people ask us when they’re looking for a chair that will finally put an end to their back pain.

How Long Does It Take to Get Used to a New Ergonomic Chair?

You'll probably need a little time to get used to a new ergonomic chair—think anywhere from a few days to a couple of weeks. Your body has to unlearn its old habits, especially if you've spent years slumped in a less-than-ideal seat. Now, it's learning to hold a healthier, more supported posture.

At first, you might even feel a little sore in your back or core muscles. Don't worry, that's completely normal. It’s actually a good sign! It means muscles that weren't doing much before are finally waking up and engaging to hold you in proper alignment. Stick with it, and that new posture will soon feel like second nature—and a whole lot more comfortable.

Will an Ergonomic Chair Actually Fix My Back Pain?

While a great ergonomic chair is a game-changer for managing and preventing back pain, it’s not a magic wand. Think of it as creating the perfect environment for your body to heal and strengthen by taking the daily strain off your spine and encouraging correct alignment.

An ergonomic chair is a critical piece of the puzzle. It dramatically reduces the stress that makes back problems worse, giving your body a fighting chance. It’s one part of a bigger strategy for spinal health, which also includes regular movement and being mindful of your posture.

To get the best results, mix in other healthy habits. Get up and walk around for a few minutes every hour. Do some simple stretches at your desk. It’s this combination—a supportive chair and active habits—that really delivers long-term relief.

Are the More Expensive Ergonomic Chairs Really Worth It?

The price tag on an ergonomic chair usually tells a story about the quality of its materials, the engineering behind its adjustment mechanisms, and the research that went into its design. A higher price doesn't automatically mean it's the perfect chair for you, but premium models definitely tend to offer better durability and a much deeper level of customization.

Here’s what you’re often paying for:

  • Warranty: The best chairs on the market often come with warranties for 10 years or more, covering everything from the casters to the hydraulic lift.
  • Adjustability: Pricier models tend to have more precise controls, like 4D armrests that move in every direction or advanced tilt mechanisms that let you lock in the perfect angle. This means a truly tailored fit.
  • Durability: They’re built like tanks, using high-grade metals, fabrics, and plastics designed to stand up to years of daily use without sagging or breaking down.

Ultimately, investing in a well-made chair is an investment in your own health and productivity. It’s designed to head off the much bigger costs—both physical and financial—that come from sitting in a bad chair day after day.


Ready to build a workspace that actively supports your team's health and focus? At Cubicle By Design, we specialize in creating complete office solutions, from planning to installation. We can help you integrate the perfect ergonomic seating into a productive and comfortable environment.

Explore our full range of services and products to get started.

Read More

Finding the Best Ergonomic Office Chairs for Your Team with Cubicle By Design

When you start searching for the best ergonomic office chairs, you’ll quickly notice one thing that sets the great ones apart: adjustability. It's no accident that brands like Herman Miller, Steelcase, and Haworth consistently top the charts. Their chairs are engineered to adapt to the human body, not force the body to adapt to the chair.

This guide is all about helping you make a smart, long-term investment in your team’s well-being and, by extension, their productivity. At Cubicle By Design, we believe the right chair is the foundation of a productive workspace.

Why Ergonomic Chairs Are a Smart Business Investment

It’s time to stop thinking of office chairs as just another furniture purchase and start seeing them for what they are: a critical business decision. It's easy to look at a chair and see only a place to sit, but if you frame it as an essential tool for focus and wellness, its real value becomes crystal clear.

A high-quality ergonomic chair isn't just an expense; it's a direct investment in your company's most valuable asset—your people. The hidden costs of poor posture from sitting in a non-supportive chair add up fast. Musculoskeletal problems are a major reason for missed workdays, and that cheap chair in the corner is often the main culprit.

Think about it: when someone is constantly fidgeting to get comfortable or trying to work through nagging back pain, their focus is shattered. Productivity tanks. The link between physical comfort and professional output is impossible to ignore.

The Financial Impact of Workplace Wellness

The numbers tell a compelling story. The global market for ergonomic chairs is projected to grow by USD 9.14 billion between 2025 and 2029. This isn't a trend; it's a fundamental shift in how smart businesses operate.

Companies that get it right and invest in proper ergonomics often report a 15% increase in productivity and a 20% drop in sick days. Beyond the hard numbers, providing a genuinely comfortable workspace is one of the most powerful ways to enhance employee experience. It sends a clear message: we value your health.

This kind of proactive thinking doesn't just boost morale; it delivers a tangible return by cutting down on absenteeism and health-related costs. For a deeper dive into the numbers, check out our guide on how good ergonomics can save you money.

A better workplace starts with the right foundation. By connecting the dots between your team's health and your company's bottom line, prioritizing high-quality seating becomes a non-negotiable strategy for sustainable success.

Ultimately, choosing the right seating is about building an environment where people can do their best work. Whether you’re outfitting a new set of workstation cubicles or upgrading your current setup, the chair is the centerpiece of individual performance. It’s an investment that pays for itself every single day.

What Really Makes an Ergonomic Chair Ergonomic?

What’s the real difference between a top-tier ergonomic chair and a standard one you might grab off a shelf? It’s not about flashy materials or a hefty price tag. The secret lies in dynamic, personalized adjustability. A genuinely ergonomic chair is a sophisticated piece of equipment designed to mold to an individual's body, giving support exactly where it's needed most.

Once you understand these features, you're making an informed investment. When you can see the purpose behind each lever and knob, you move from just buying a chair to choosing a tool that actively boosts your team's health and focus. Let’s break down the critical components that deliver real, tangible benefits.

The Foundation of Support: Lumbar and Back Adjustments

If there's one make-or-break feature, it's the lumbar support. Your lower spine has a natural inward curve, and keeping that curve supported is essential for preventing strain and chronic back pain. A chair with a flat back forces the spine into an unnatural slouch, which is a fast track to fatigue and discomfort.

A great ergonomic chair offers dynamic lumbar support. This isn't just a static pillow wedged in the back; it's an adjustable mechanism. You should be able to move it up and down, and sometimes in and out, to perfectly match the user's spinal curve. This customized fit ensures the lower back is always supported, taking pressure off the spinal discs and surrounding muscles. When you're testing chairs, the support should feel present but not pushy.

To help you zero in on what truly matters, here's a quick breakdown of the most critical ergonomic features and the direct impact they have on well-being and productivity.

Key Ergonomic Features and Their Impact on Wellness

Ergonomic Feature What It Does Primary Benefit
Dynamic Lumbar Support Adjusts vertically and (sometimes) horizontally to fit the user's lower back curve. Reduces lower back strain and prevents slouching, which is a major cause of spinal disc pressure.
Adjustable Seat Depth Allows the seat pan to slide forward or backward. Ensures proper thigh support and prevents pressure on the back of the knees, improving circulation.
4D Armrests Adjusts in height, width, depth, and pivot angle. Alleviates strain on the neck, shoulders, and upper back by supporting the arms during various tasks.
Synchro-Tilt Mechanism Reclines the backrest and seat at different ratios. Encourages gentle movement ("active sitting"), which improves circulation and reduces spinal pressure.

Ultimately, a chair that fits properly is a chair that gets out of the way, allowing your team to focus on their work without physical distraction.

Perfecting Your Position: Seat and Armrest Adjustability

Beyond the back, the seat itself is a major player in comfort and circulation. One of the most overlooked—but vital—features is adjustable seat depth. This lets you slide the seat pan forward or backward, ensuring there’s a small gap of about two to three fingers between the edge of the seat and the back of your knees.

Why does this tiny adjustment matter so much? If the seat is too deep, it can dig into the back of the knees and restrict blood flow. If it's too shallow, it doesn't support the thighs properly, putting extra strain on the lower back. A seat slider is non-negotiable if you have a diverse workforce. For more tips on setting up a workspace correctly, explore our guide on achieving proper posture in the office.

Armrests aren't just for resting your elbows, either. 4D armrests—which adjust up/down, forward/backward, side-to-side, and pivot in/out—are the gold standard for a reason.

  • Height Adjustment: Keeps elbows aligned with the desk, preventing shrugged shoulders.
  • Width Adjustment: Accommodates different body frames so arms can rest naturally.
  • Depth Adjustment: Lets users pull the armrests forward for typing or push them back to get closer to their desk.
  • Pivot Function: Angles the armrests inward to support forearms while using a keyboard.

When armrests are set correctly, they take a huge amount of strain off the neck, shoulders, and upper back, which are common tension spots for desk workers.

The goal of every adjustment is to minimize physical strain so that mental energy can be fully dedicated to the task at hand. A chair that fits perfectly allows the body to relax, freeing the mind to focus.

Promoting Movement: Tilt and Swivel Functions

Static posture is the enemy. The human body is built to move, and even the "perfect" posture becomes a problem if held for too long. That’s where tilt and swivel mechanisms come into play.

A good synchro-tilt mechanism is key. It allows the backrest and seat to recline at different, synchronized ratios, opening up the angle at your hips. This encourages tiny movements throughout the day, which helps with blood flow and reduces pressure on your spine. Combine that with a smooth swivel, and employees can reach different parts of their desk without twisting their back. These features promote what's called "active sitting," turning a chair into a dynamic tool instead of a static box.

Of course, the chair is just one piece of the ergonomic puzzle. Don't forget about complementary ergonomic accessories for your workspace, like monitor arms and keyboard trays, to create a fully supportive environment. Integrating all these elements is central to our holistic approach at Cubicle By Design, ensuring every part of your office cubicles contributes to wellness.

Matching the Right Chair to Your Team's Needs

A one-size-fits-all approach to office seating is a fast track to unhappy, distracted employees. Different roles have completely different physical demands, and the best ergonomic chairs are the ones that meet those specific needs head-on.

Think about it like this: you wouldn’t give a race car to a delivery driver. The same logic applies here. By matching the chair to the job, you create an environment where everyone is supported, comfortable, and ready to do their best work. Let's walk through a few common scenarios.

For the Dedicated Desk Worker

Picture an accountant, a software developer, or a graphic designer. These are the folks who spend the majority of their day—often eight hours or more—at their desk. Their work demands deep focus, and their chair is their most important tool for staying comfortable and locked in.

For this group, adjustability isn't a perk; it's a core requirement.

  • Priority Features: You absolutely need a full suite of ergonomic adjustments. Look for dynamic lumbar support, adjustable seat depth, 4D armrests, and a synchro-tilt mechanism.
  • Real-World Impact: A developer needs to get their armrests just right to support their arms while coding, which takes a ton of strain off their shoulders. An accountant can use a seat slider to keep proper leg circulation going during those long end-of-quarter sessions. These small tweaks make all the difference.

These roles are often perfect for more focused setups, like our purpose-built private office cubicles, where a highly adjustable chair can be perfectly dialed in and left that way.

This chart quickly shows how to connect common physical complaints to the specific features that will help.

As you can see, figuring out where it hurts is the first step to finding a chair with the right solution.

For the Agile Hot-Desker

Now, let’s shift gears to a hybrid office with hot-desking. A sales rep might pop in two days a week and grab any open spot. A project manager might bounce between a collaborative table and a quiet pod. These users need a chair that’s dead simple to adjust on the fly.

In a flexible workspace, a chair that takes ten minutes to figure out is a chair that won't be adjusted at all. Simplicity and intuitive design are paramount for shared seating.

A hot-desker's needs are all about speed and ease. They'll trade a dozen complex controls for a few that are fast and obvious.

  • Priority Features: Your best bets are chairs with straightforward, clearly marked levers for height and back tension. Auto-adjusting lumbar support can be a game-changer here. The goal is for someone to sit down and get 80% of their optimal posture in under 30 seconds.
  • Real-World Impact: When a chair is this easy to use, people will actually make the quick adjustments they need, even if they’re only sitting for an hour. This prevents all that cumulative strain that builds up from using poorly configured shared furniture.

For the High-Durability Call Center

Call centers are a whole different ballgame. Employees are often seated for long, continuous stretches, and the chairs themselves get used around the clock, sometimes across multiple shifts. Here, durability is just as crucial as ergonomics.

The chair for a call center agent has to be an absolute workhorse. It needs to stand up to constant use while providing rock-solid support that keeps people from fidgeting and losing focus during long calls.

  • Priority Features: Focus on high-density foam cushions that won’t flatten out in a few months, tough upholstery, and heavy-duty mechanisms. A solid warranty is non-negotiable. While you still need good adjustability, the components themselves must be built to last.
  • Real-World Impact: In a busy call center, a broken chair is a real operational headache. Investing in durable, high-quality seating cuts down on replacement costs and ensures agents stay comfortable and focused on the customer. Figuring out what your employees need to succeed starts with giving them reliable tools, and a solid chair is foundational.

Calculating the True Cost of Your Office Chairs

That initial price tag on a high-end ergonomic chair can make you pause. We get it. But that number is just one piece of a much larger puzzle. To make a smart investment that actually saves you money, you have to look past the upfront cost and think about the Total Cost of Ownership (TCO).

A cheap chair might feel like a win today, but it often becomes a nagging, recurring expense. We’ve seen it happen time and time again: the foam flattens, the gas lift gives out, or the armrests crack after just a couple of years. When that happens, you’re not just buying a replacement—you’re spending more time and money solving a problem that a quality chair would have prevented for a decade or more.

Beyond the Price Tag to Long-Term Value

The key is to shift your mindset from short-term cost to long-term value. A premium ergonomic chair isn't just an expense; it's a capital investment in your team's health, focus, and productivity.

This isn’t just a hunch—it’s a massive trend. The global ergonomic chair market was valued at around USD 10.22 billion in 2025 and is projected to hit USD 16.62 billion by 2032. Businesses are waking up to the real costs of poor seating, especially when you consider that over 1 million workers take time off annually for musculoskeletal issues. Investing in quality chairs can cut absenteeism by up to 20% and measurably boost concentration. You can dig into the growing ergonomic chair market trends to see the data for yourself.

It’s the same long-term thinking that should go into your entire office plan. A well-built chair saves money over time, and a thoughtfully designed workspace prevents you from having to do costly reconfigurations down the line.

Decoding Warranties and Durability

A chair's warranty is one of the most honest signals of its quality and how long the manufacturer expects it to last. But you have to read the fine print, because not all warranties are created equal.

A "Limited Lifetime" warranty sounds fantastic, but it often only covers the big metal parts like the frame. High-wear components like casters, fabric, and foam? Those are usually covered for a much shorter, separate period.

Here’s what we look for to gauge real-world durability:

  • Mechanism Warranty: The guts of the chair—the tilt, gas lift, and adjustment levers—are what take a beating every day. Look for at least a 5 to 10-year warranty on these parts. Anything less is a red flag.
  • Material Quality: Ask about the foam density and the "double rub" count for the fabric. A double rub count of 100,000 or more is considered commercial-grade and means the upholstery can withstand serious daily use without fraying or thinning.
  • Replacement Parts: This is a big one. Can you easily order a new set of wheels or arm pads five years from now? Good brands make replacement parts available. This simple thing can extend a chair’s life by years, keeping it out of a landfill over one broken part.

Thinking about the full lifecycle cost of your furniture is critical. For more on how these costs stack up across your entire office, our detailed cubicle price guide is a great resource. A strategic investment now saves you from major logistical and financial headaches later. By focusing on TCO, you ensure that your investment pays you back for years to come.

How to Test and Deploy New Chairs Effectively

Picking out the best ergonomic chairs for your team is a big win, but the job isn't over just yet. A smart rollout plan is what turns a great choice on paper into a real-world benefit for your employees. If you fumble the deployment, you can end up with disruption, frustration, and a very expensive investment that nobody likes.

The idea is to bridge the gap between theory and practice as smoothly as possible. This involves testing your top picks with actual employees, collecting feedback that you can actually use, and then managing the final purchase and installation without throwing a wrench in your company's daily operations.

Let's walk through a clear framework for getting this done right.

Running an Effective Pilot Program

Before you sign a purchase order for hundreds of chairs, you absolutely have to run a small-scale pilot program. This is where your research gets a reality check from direct user experience. A common mistake is only testing one model—don't do it. Shortlist two or three of your top contenders so you can compare them head-to-head.

Make sure your test group is as diverse as your actual workforce. Don't just grab a few people from the same department. Instead, pull together a cross-functional team that includes:

  • A mix of body types to see how well the chairs accommodate different heights, weights, and builds.
  • Employees in various roles, like a developer who's mostly stationary and a sales manager who's constantly getting up and moving around.
  • People with known comfort issues (like chronic back pain) along with those who don't. Their feedback is pure gold.

Let this group use the chairs for at least a full work week, though two is even better. First impressions are one thing, but what really matters is how the chair feels after sitting in it for eight hours a day.

Gathering Meaningful Feedback

Once the trial period is up, it's time to collect specific, structured feedback. A simple "Did you like it?" isn't going to give you what you need. Put together a short survey or conduct quick one-on-one interviews with pointed questions.

The best feedback comes from asking about specific situations. Instead of asking if a chair is 'comfortable,' ask, 'After that two-hour video call, how did your lower back feel?' This is how you get the detailed insights needed to make the right call.

Your feedback form should hit a few key areas:

  1. All-Day Comfort: How did they feel at 9 AM versus 5 PM?
  2. Ease of Adjustment: Were the controls intuitive? Could they find their sweet spot without hunting for a manual?
  3. Task-Specific Support: Did the chair support them well while typing? What about leaning back to take a phone call?
  4. Overall Preference: If they had to pick just one, which would it be and why?

This kind of targeted feedback almost always reveals a clear winner. It gives you the confidence to move forward with a big purchase, which is critical in a market where North America holds over 40% of global revenue. With 12.5 million ergonomic chair units sold in the region annually, companies clearly understand that good seating is good business. In fact, tackling poor ergonomics can boost productivity by 12-18%. You can explore the research on the North American ergonomic chair market to see just how significant this trend is.

Managing Large-Scale Procurement and Installation

Okay, you've made your final choice. Now, the logistics of a bulk order kick in. Clear, constant communication with your vendor is absolutely essential. You need to confirm lead times, delivery schedules, and the exact installation process right from the start to avoid any nasty surprises.

A massive delivery of office chairs can easily disrupt the entire office. If you can, schedule the installation for off-hours, like an evening or a weekend. Work with your facilities team to get old chairs moved out and the space prepped ahead of time. A well-managed installation means your team walks in on Monday morning to a refreshed, ready-to-use workspace, not a chaotic mess.

At Cubicle By Design, we know that a chair is just one piece of a much larger puzzle. That's why we offer support that goes way beyond just selling you furniture. Our team can help you plan the entire deployment, making sure your new chairs fit perfectly with your existing workstation cubicles and the overall flow of your office.

We can also take the entire installation process off your hands, removing that logistical headache. For a full look at how we manage these projects from start to finish, check out our guide on professional office furniture installation. This complete support ensures a seamless transition, letting your team start enjoying the benefits of their new ergonomic chairs from day one.

Common Questions About Ergonomic Office Chairs

Even after digging into all the features and planning, you've probably still got a few questions. That's completely natural. Investing in the right ergonomic chairs for your team is a big decision, and it’s smart to get clarity on the details before you commit.

Let's tackle some of the most common questions we hear from business owners and office managers. The goal here is to give you direct, practical answers to help you feel confident you're making the right call for your workplace.

What Actually Makes an Office Chair Ergonomic?

In a word: adjustability. A truly ergonomic chair isn't just about a comfy cushion or a high back. It’s about being able to fine-tune the chair to fit each person’s unique body shape and size. The whole point is to support a healthy, neutral posture and cut down on physical strain during the workday.

Forget about a simple up-and-down lever. True ergonomics comes from a combination of key adjustable features working together.

  • Adjustable Seat Height: This is the baseline. It lets you plant your feet flat on the floor with your knees at a 90-degree angle, which is ground zero for good posture.
  • Adjustable Seat Depth: This feature is often overlooked but it's critical. It allows you to slide the seat pan forward or back, leaving a small gap (about two to three fingers' width) behind your knees to improve circulation.
  • Dynamic Lumbar Support: This isn't just a static curve. A good lumbar support moves up and down (and sometimes in and out) to perfectly match the natural curve of your lower back.
  • 3D or 4D Armrests: These are game-changers. They adjust for height, width, depth, and pivot, properly supporting your arms and taking a massive load off your neck and shoulders.

When a chair has multiple, independent points of adjustment, it empowers each person to create a truly personalized fit. That's the real test of an ergonomic design.

How Long Should a Quality Ergonomic Chair Last?

A high-quality ergonomic office chair from a solid brand is a long-term investment. You should expect it to last anywhere from 7 to 15 years with daily use. The lifespan really comes down to the quality of the materials and the sturdiness of the build.

Cheaper, off-the-shelf chairs might seem like a deal, but they often only last a year or two before they lose their support and start to fail. Their total cost of ownership ends up being much higher in the long run.

A strong warranty tells you everything you need to know about a manufacturer's confidence in their product. Look for chairs with warranties of 10 years or more on the most important parts, like the mechanisms and casters. It’s a clear sign of durability and long-term value.

Is a Mesh Back Better Than a Cushioned Fabric Back?

This is a classic debate, and honestly, there's no single right answer. Both mesh and cushioned fabric have their own strengths, and the "better" choice really depends on your office climate, what your employees prefer, and even the type of work they do.

Offering both is often the smartest play. Here’s a quick breakdown:

Feature Mesh Back Chairs Cushioned Fabric Chairs
Breathability Top-notch. The open weave allows for constant airflow, which is a huge plus for keeping users cool. Good. Modern fabrics breathe well, but they will almost always retain more heat than mesh.
Support Flexible and form-fitting. It tends to conform to the user's back for a more responsive feel. Often provides a plusher, more uniform support that distributes pressure very evenly.
Durability High-end mesh is incredibly tough, but be warned: cheaper versions can sag over time. Depends on the fabric's "double rub" count. A commercial-grade fabric is built to last.
Maintenance Super easy. You can just wipe it down. Can be more prone to stains and might need a deeper clean every so often.

Because comfort is so subjective, we always recommend including both mesh and fabric chairs in your pilot program. It's the only way to get real feedback from your team on what works best for them day-to-day.

How Do Ergonomic Chairs Fit into a Modular Office Design?

Ergonomic chairs and modular office systems, like the ones we design at Cubicle By Design, are a perfect match. A modular layout is all about flexibility and efficiency, and an adjustable chair is the final piece of the puzzle, locking in individual comfort within a standardized workstation footprint.

It's crucial to think of the chair and the desk as a single, integrated unit. The chair's adjustability ensures every employee can find their sweet spot, whether they’re in one of our private office cubicles or a more collaborative workstation cubicle.

When you're planning your space, don't forget to account for the chair's full range of motion—its swivel and recline. You need to make sure there’s enough room for people to move freely without feeling boxed in. This holistic approach, which you can map out with our Custom Cubicle Designer, is what makes a workspace truly work for your team.


Ready to build a workplace that puts comfort, wellness, and productivity first? The team at Cubicle By Design can help you select the best ergonomic chairs and integrate them flawlessly into a workspace designed for your success.

Explore our full range of office solutions at https://cubiclebydesign.com/.

Read More

How to Create the Perfect Floor Plan of the Office

A great office floor plan is much more than just a blueprint for where to put the desks. Think of it as a strategic asset, one that perfectly balances how your teams actually work with your company’s bigger, long-term goals. It’s about consciously creating an environment that sparks collaboration, protects focused work, and can pivot right along with you as your business evolves.

Defining Your Workspace Goals and Needs

Before you even think about sketching a layout or browsing furniture, you have to nail down the most critical step: defining what you need your office to accomplish. A truly effective floor plan is built on a foundation of clear goals and a real-world understanding of your team’s day-to-day grind.

If you skip this initial discovery phase, you risk ending up with a space that looks sharp but functions poorly. That’s a recipe for bottlenecks, constant distractions, and expensive re-dos down the line.

The whole process starts by making sure the physical space aligns with your company culture and strategic direction. Is your main goal to get different departments talking and sparking new ideas? Or is it to carve out quiet, distraction-free zones for deep, concentrated work? Answering that one question will shape every single decision you make from here on out.

Analyzing Workflows and Team Proximity

First, get a feel for the daily rhythm of your office. Watch how your teams move and interact. You need to identify which departments genuinely benefit from being shoulder-to-shoulder.

Your marketing and sales teams, for instance, probably need to be close enough for quick huddles and strategy sessions. On the flip side, putting the finance department right next to a loud, high-energy sales floor could make it impossible for them to concentrate. It’s about creating an internal ecosystem where every part supports the others—not just for convenience, but to cut down on friction and boost efficiency all day long.

Engaging Stakeholders for Essential Feedback

You simply can’t design a functional office in a vacuum. Your next move is to get direct feedback from department heads and, just as importantly, their teams. They’re the ones on the ground, and they know exactly what’s working and what’s driving them crazy about the current setup.

A successful floor plan isn’t designed for people; it’s designed with them. Engaging your team in the planning process uncovers critical insights that a top-down approach will almost always miss, ensuring the final layout meets real-world needs.

A simple survey or checklist can get the ball rolling. Ask pointed questions like:

  • What are your team’s biggest daily frustrations with the current layout? It could be anything from a chronic lack of meeting rooms to not enough storage space.
  • Which other teams do you interact with most frequently? Knowing these key relationships is crucial for “zoning” your departments effectively.
  • What is the ideal balance of collaborative vs. quiet space for your team? A group of software engineers will have vastly different needs than a creative agency’s design team.
  • Are there any specific equipment or technology needs that require dedicated space? Think about shared printers, servers, or other specialized hardware.

Gathering this information is a foundational step we detail in our complete office space planning guide, which can help you structure these crucial conversations.

Planning for Modern Work Patterns

Let’s be honest, the way we use offices has fundamentally changed. With hybrid work now the norm, designing for 100% capacity every single day just doesn’t make sense anymore.

Modern office design is smarter. It relies on utilization data, recognizing that even on the busiest days, you might only hit 50-60% occupancy. In fact, major real estate studies from firms like JLL show that global workplace utilization hovers near 40%, a number that’s pushing companies to completely rethink traditional layouts.

Instead of endless grids of assigned desks that sit empty half the week, successful floor plans now mix it up. They incorporate reservable touchdown stations, flexible collaboration zones, and multi-purpose rooms that actually match how people are using the office. This data-driven approach ensures your investment in square footage is efficient, supporting peak collaboration days without wasting money on empty desks. When you focus on how your space is actually used, you create a far more dynamic and cost-effective environment.

Designing a Floor Plan for People and Productivity

A great office is more than just a place to work; it’s an environment that genuinely helps people do their best work. Once you’ve got your basic goals down, the human side of the design is where a good floor plan of the office becomes a great one. This is all about creating a layout that supports different work styles, promotes well-being, and makes employees actually want to come in.

It really boils down to balance. You need vibrant, open areas that spark teamwork and those spontaneous “aha!” moments, but you also need quiet, distraction-free zones for deep concentration. Get that balance wrong, and you end up with a space where nobody can work effectively.

Creating Zones for Different Work Styles

Let’s be honest: not all work is the same. A developer coding a new feature needs a totally different setup than a sales team brainstorming a campaign. This is where the idea of “neighborhoods” or “zones” becomes so powerful. By grouping teams with similar workflows, you can create distinct areas perfectly suited to their specific tasks.

For instance, you could set up a high-energy zone for your collaborative teams, complete with whiteboards, flexible seating, and easy access to meeting rooms. Then, in another part of the office, you establish a dedicated quiet zone. This area is a sanctuary for tasks that demand intense focus. It’s the perfect place for solutions like our sound-dampening Private Office Cubicles, which essentially act as low-stimulus pods for concentration.

When you intentionally design for different modes of work, you’re giving your employees the power to choose the space that best fits what they need to do at that moment. This autonomy is a game-changer for job satisfaction and productivity because people feel trusted to manage their own focus and energy.

This data shows just how critical getting space utilization right has become for modern offices.

Office utilization statistics with charts displaying 40% utilization, 74% data collection, and 7% excellent data.

As you can see, there’s a big gap: while 74% of companies are collecting data on how their space is used, only 7% have what’s considered “excellent” data. This leads directly to underutilized, inefficient offices—a problem a well-zoned floor plan helps solve.

Balancing Collaboration and Focus

Nailing the right mix of collaborative and private space is one of the most common challenges we see. It’s not just a gut feeling; workplace studies consistently tie this balance to real results. Data from thousands of office workers shows a clear preference for workplaces that offer both.

Many companies are now aiming for a mix of roughly 30–40% collaboration space and 60–70% individual or focus settings. A foundational step in achieving this is deeply understanding the nuts and bolts of commercial floor plans and how different layouts can serve these ratios.

Our online Cubicle Designer tool is a huge help here, allowing you to experiment with layouts and find that perfect balance before committing to anything. You can play around with different arrangements of Workstation Cubicles and other furniture with a simple drag-and-drop interface. And if you need a spark of creativity, check out some of our other office cubicle design ideas for more inspiration.

Encouraging Movement and Interaction

A static office can feel pretty stale. A thoughtfully designed floor plan encourages people to move around and interact throughout the day. I’m not talking about constant interruptions, but creating opportunities for those valuable, unplanned conversations that often spark the best ideas.

Here are a few ways to get people moving:

  • Centralize Amenities: Put the high-traffic spots—the kitchen, coffee stations, printers—in a central location. It’s a simple trick that encourages people from different departments to cross paths naturally.
  • Create “Third Spaces”: These are the comfortable, informal areas away from desks. Think lounge chairs, small café-style nooks, or even an outdoor patio. They give employees a place to recharge, have a casual chat, or work in a more relaxed setting.
  • Design Clear Pathways: Make sure walkways are wide, intuitive, and don’t create bottlenecks. A clear circulation path makes the office feel more open and accessible, which subtly encourages people to move around.

By weaving these elements into your design, you transform the office from a collection of desks into a living, breathing environment. The goal is to build a space that doesn’t just accommodate the work being done, but actively makes it better.

Building for Agility with Modular Office Systems

Let’s be honest: your business is always evolving. So why is your office floor plan stuck in the past? In today’s world, static, drywall-heavy layouts are more of a liability than an asset. The real key to a future-proof workspace is agility, and that starts with modular office systems from a trusted provider like Cubicle By Design.

Two men setting up a modular office partition wall in a modern, sunlit office space for a new floor plan.

Think of your office furniture and walls less like permanent fixtures and more like a versatile ‘kit of parts’ you can adapt whenever you need to. Imagine reconfiguring a team area overnight for a new project sprint or adding a private office in an afternoon—all without the dust, disruption, and cost of a construction crew. This isn’t a luxury anymore; it’s a strategic necessity.

The Power of a Reconfigurable Workspace

Traditional office renovations are a massive headache. They’re expensive, disruptive, and take forever. When your needs shift—maybe your team grows, you adopt a hybrid model, or a new department forms—a fixed layout forces you right back into another costly construction cycle. Modular systems flip that script entirely.

With solutions from Cubicle By Design, you can create a space that actually grows with you. Our versatile cubicles can be rearranged, expanded, or even downsized with minimal fuss. This gives you the power to tweak your floor plan of the office to meet new challenges without the huge capital expense and downtime that comes with conventional construction.

A modular office is more than just movable furniture—it’s a completely different mindset. It’s about seeing your physical workspace as a dynamic tool you can reshape to solve business problems, improve collaboration, and support your team as their needs change.

This adaptability is exactly what modern workplaces need. As companies figure out the rhythm of hybrid work, being able to quickly scale up collaborative zones or dial up quiet focus areas is crucial. A modular framework gives you the freedom to test new layouts and discover what truly makes your team productive.

Real-World Scenarios, Adaptable Solutions

So, how does this actually play out in a real office? Let’s look at a few examples I’ve seen firsthand.

  • The Growing Startup: A tech company lands a huge new client and needs to hire five developers, fast. Instead of a frantic search for more office space, they use their existing modular workstation cubicles. In just a few hours, they transform an underused open area into a dedicated, semi-private pod for the new team. Problem solved.
  • The Project-Based Agency: A marketing firm needs a “war room” for a three-month campaign. Using movable glass partitions, they section off part of their open-plan space to create a secure, focused hub. Once the project wraps, the walls come down just as easily, and the space returns to its original configuration. We see this all the time with our modular office walls.
  • The Hybrid Workforce: A company notices that Tuesdays and Wednesdays are packed, but the office is a ghost town the rest of the week. They use our Custom Cubicle Designer to plan a layout with fewer assigned desks and more shared, reservable workstations and collaborative lounges. They end up optimizing every square foot.

Slashing Future Costs and Embracing Long-Term Value

The financial argument for going modular is pretty compelling. It’s not just a trend; it’s a smart business move. Industry data shows that 55% of global occupiers are now using flexible office solutions, driven by a desire to lower long-term costs and avoid expensive refits.

As office vacancy rates in the U.S. have stabilized, the focus has shifted to modernizing existing spaces for maximum efficiency. Companies that adopt modular systems drastically reduce construction waste and shorten the time it takes to reconfigure their space. This makes their real estate dollars work a whole lot smarter, which is critical as the demand for well-designed, adaptable offices continues to grow.

By investing in a flexible foundation, you’re not just buying furniture—you’re investing in your company’s ability to pivot and adapt for years to come.

Navigating Power, Data, and Building Compliance

A brilliant floor plan can look perfect on paper but fall apart in the real world without a solid technical foundation. This is where we get into the nuts and bolts—tackling the critical infrastructure that actually brings an office to life: power, data, and building compliance. I’ve seen it happen time and again: overlooking these details early on is one of the most common and costly mistakes you can make.

It’s easy to get caught up in furniture placement and aesthetics, but a truly successful floor plan of the office weaves in technical requirements right from the start. When you plan your electrical and network layout alongside your furniture, you ensure every employee has the connectivity they need from day one. No one wants to see a jungle of hazardous extension cords ruining a brand-new space.

Integrating Power and Data Seamlessly

Let’s face it, modern offices are power-hungry. Every single workstation needs outlets for monitors, laptops, and phone chargers, not to mention reliable network ports for high-speed internet. The trick is to map these needs directly onto your floor plan before a single cubicle is ordered.

Loop in your IT team and an electrician to plot out exactly where power and data drops are needed. Think about high-demand areas, like conference rooms that need beefy connectivity for presentations and video calls. For open-plan layouts, power poles or integrated raceways within modular cubicle systems are your best friend. These solutions cleanly deliver electricity and data from the ceiling or floor, keeping wires safely tucked away and out of sight. You can dive deeper into the specifics with this detailed guide on cubicle electrical setup.

Planning for power and data isn’t just an IT problem—it’s a core design function. Integrating connectivity into the floor plan from the start prevents expensive retrofitting, improves safety, and creates a cleaner, more professional look.

Smart Cable Management Strategies

A clean office is a safe and productive one, and nothing torpedoes a great design faster than a mess of tangled cables. Beyond just looking sloppy, poor cable management is a serious tripping hazard and can lead to damaged equipment or network outages.

Here are a few practical tips I always recommend for keeping wiring under control:

  • Use Integrated Raceways: Many modern cubicle systems have built-in channels designed specifically to hide and organize cables. This is hands-down the cleanest and most efficient way to manage wiring at the desk level.
  • Leverage Cable Trays: For rows or pods of desks, under-desk cable trays or baskets are perfect for keeping power strips and adapters off the floor.
  • Plan for Both Wi-Fi and Hardwired Connections: While great Wi-Fi is a must, don’t forget about hardwired Ethernet ports. They offer more stable and secure connections for desktops and other critical equipment that isn’t moving around.

Demystifying Building Codes and Accessibility

Compliance isn’t just a good idea—it’s the law. Every office floor plan must follow local building codes and federal regulations like the Americans with Disabilities Act (ADA). These rules exist for a very important reason: to ensure your workspace is safe and accessible for every single person.

The ADA, for example, has specific requirements for things like hallway width and door clearance. Main circulation paths generally must be at least 36 inches wide to allow for wheelchair access. You have to factor this into your layout from the beginning to avoid creating pinch points or dead ends. There needs to be enough room around desks and in common areas for everyone to navigate comfortably and safely.

Fire codes are just as critical, dictating everything from the number and location of exits to how far someone has to travel to reach one. It is absolutely crucial to have a professional—like an architect or a contractor who knows local commercial codes—review your plan. Getting this wrong can lead to failed inspections, fines, and expensive, last-minute fixes.

To help keep these critical points top-of-mind, here is a quick checklist to review during your planning process.

Office Planning Compliance Checklist

This table summarizes key compliance areas to review during the floor plan design phase. It’s a great starting point for conversations with your architect or contractor to ensure your new office is safe, accessible, and up to code.

Compliance Area Key Consideration Action Item
ADA Accessibility Are all pathways, doorways, and common areas at least 36 inches wide? Measure and mark all circulation paths on the floor plan to confirm clearance.
Fire Safety Are all exit routes clearly marked and unobstructed? Review local fire code for maximum travel distance to an exit and verify your plan.
Electrical Code Is the number of planned outlets sufficient to avoid overloading circuits? Consult an electrician to validate the power distribution plan.
Ergonomics Do workstations allow for proper posture and movement? Ensure adequate desk depth and clearance for ergonomic chairs.
Egress Pathways Can every employee reach two separate exits from their primary workspace? Trace primary and secondary exit paths for all zones on the floor plan.
Restroom Access Do restrooms meet ADA requirements for stalls, sinks, and turning radius? Confirm all restroom dimensions and fixture placements with an ADA expert.

Taking the time to check these boxes ensures your beautiful new office is also a safe, compliant, and inclusive one for everyone on your team.

Bringing Your New Office Plan to Life

You’ve got the final design in hand, and this is where things get really exciting. It’s time to take that detailed floor plan of the office off the page and turn it into the functional, physical workspace you envisioned. The secret to getting this right is a well-orchestrated execution plan that minimizes headaches and gets your team settled and productive from day one.

A team works together to set up a modern office space, illustrating the final steps of executing a floor plan.

This final phase isn’t just about moving desks around. It’s a logistical puzzle involving vendors, timelines, and most importantly, your people. A smooth transition is absolutely essential for keeping morale high and business moving forward.

Creating a Phased Installation Plan

Trying to overhaul an entire office at once is a recipe for chaos and downtime. I’ve seen it happen, and it’s not pretty. A phased approach is almost always the smarter strategy. This just means breaking the project down into smaller, more manageable chunks.

You could start by setting up a currently vacant section of the office or maybe tackle one department’s area over a weekend. This lets the rest of your team keep working with minimal interruption. A phased rollout also gives you a chance to spot and fix any small issues in one area before you replicate them across the entire floor.

The whole point of a phased installation is to control the chaos. By systematically building out your new office, you prevent operational downtime and ensure each stage meets your standards before you move on to the next.

Getting everyone on the same page is crucial. To really help your team and the installers grasp the final vision, using tools like rendered floor plans can make a world of difference. When people can see what you’re building, the process goes much more smoothly.

Coordinating Vendors and Managing Logistics

The installation phase is a busy time, bringing together everyone from furniture dealers like us at Cubicle By Design to electricians and IT technicians. Having one person act as the central point of contact is non-negotiable for keeping things on track.

A simple shared calendar can do wonders for scheduling. And before a single box of furniture arrives, you need to do a thorough pre-installation site check. Trust me, this saves so many headaches later.

  • Confirm Measurements: Double-check that doorways, elevators, and stairwells are actually wide enough for the furniture to get through.
  • Verify Site Conditions: Make sure the installation area is clean, clear, and totally ready for the crew to get to work.
  • Check Power and Data: Confirm that electrical outlets and data ports are active and exactly where your plan says they should be.

These simple checks prevent costly surprises and delays on the big day. Working with an experienced partner makes this much easier. For instance, our team provides a full rundown on what to expect during a professional office furniture installation, taking a huge logistical weight off your shoulders.

The Human Side of the Transition

Never, ever underestimate the importance of communication during an office move. Your team is going to have questions. Keeping them in the loop is the best way to build excitement and calm any anxieties about the change.

Start by sharing the new floor plan well ahead of time. But don’t just show them the layout—explain the why behind it. Talk about how it’s designed to improve collaboration, provide better focus areas, or support hybrid work.

Once the space is ready, a simple welcome guide or a quick orientation can go a long way. Point out the new amenities, explain how to book meeting rooms, or show off the different work zones.

Finally, make it clear you’re open to feedback. There will always be small adjustments needed in the first few weeks. Gathering that input shows your team that their comfort and productivity are what this was all about in the first place.

Questions We Hear All the Time About Office Floor Plans

When you’re staring at an empty office space, the questions start piling up fast. It’s a big job, and getting the layout right from the start is absolutely critical. Over the years, we’ve helped countless businesses navigate this process, and a few key questions always seem to come up.

Let’s walk through the most common ones we hear and get you some clear, practical answers.

How Do I Strike the Right Balance Between Open and Private Spaces?

This is probably the number one question, and the honest answer is: it depends entirely on how your team actually works. There’s no magic formula, but a 60/40 or 70/30 split—leaning toward individual focus space—is a solid starting point for most companies.

The best way to figure this out is to simply ask your people. Talk to them about their day-to-day.

If you’ve got teams of developers or financial analysts who need long, quiet stretches to concentrate, you’ll want to lean into solutions like our sound-dampening Private Office Cubicles. On the other hand, if your office buzzes with creative brainstorms and constant team huddles, then dedicating more real estate to open, flexible collaboration zones just makes sense.

The real goal here isn’t just about walls and desks; it’s about empowerment. When you give people a variety of spaces to choose from, they can pick the right environment for the task at hand. That trust does wonders for morale and, you guessed it, productivity.

What Are the Biggest Mistakes to Avoid When Planning a Layout?

We’ve seen a few common missteps that can quickly turn a beautiful new office into a daily frustration. One of the biggest is completely ignoring how people need to move through the space. If you don’t plan for workflow and clear circulation paths, you end up with a cramped, awkward office where people are constantly bumping into each other.

Another huge one is acoustics. An office that’s an echo chamber makes it impossible for anyone to get deep work done. It’s a productivity killer. Similarly, forgetting to map out power and data access from day one is a recipe for a tangled mess of extension cords and spotty Wi-Fi later on.

And finally, don’t design yourself into a corner. Your business will grow and change. Choosing a rigid, inflexible layout is a massive mistake. Opting for adaptable, modular furniture ensures your workspace can evolve with you, saving you from a costly and disruptive overhaul every couple of years.

How Can I Design a Floor Plan That Actually Works for a Hybrid Team?

Designing for a hybrid team boils down to two key things: flexibility and choice. The old model of one desk per person just doesn’t work anymore. Instead, you’ll want to embrace reservable “hot desks” or modular Workstation Cubicles that can be booked on demand. This approach frees up valuable square footage for spaces people actually need.

You’ll also want to seriously ramp up the number and variety of your meeting rooms. Make sure every single one is outfitted with top-notch video conferencing gear so your remote and in-office folks can connect without a hitch.

Think about creating comfortable “touchdown” spots with soft seating and easy-to-reach outlets for employees who are just popping in for a few hours. The modern office isn’t just a sea of desks; it’s a destination. It should be the absolute best place for the things people can’t do well from their kitchen table: collaborating face-to-face, building camaraderie, and sparking new ideas together.


Ready to turn these ideas into a concrete plan? The Cubicle By Design team is here to help. Explore our full range of cubicles or start creating your perfect layout instantly with our free Custom Cubicle Designer tool.

Read More

Office Cubicles Standard Dimensions: Your Quick Guide to Space-Saving Layouts

When you’re laying out an office, there are a few standard cubicle sizes that have become the go-to for a reason. The most common footprints you’ll see are 6’x6′ (36 sq. ft.), 6’x8′ (48 sq. ft.), and 8’x8′ (64 sq. ft.). These three sizes are pretty much the industry standard, giving you a solid, scalable starting point for anything from a high-density call center to more spacious setups for managers.

Getting the size right from the beginning is one of the most important first steps you can take in planning your office space. It impacts everything that comes after. At Cubicle By Design, we help businesses find the perfect fit every day.

Why Standard Dimensions Matter for Your Office

Sticking with standard dimensions when you’re planning an office layout has some major upsides, especially when it comes to cost, flexibility, and just plain efficiency. There’s no need to reinvent the wheel. These tried-and-true footprints give you a reliable foundation for building a productive work environment. For most businesses, cubicles are going to fall somewhere in that 36 to 64 square foot range.

Choosing from these common sizes makes everything easier, from figuring out your budget to planning for future growth. It creates a modular, predictable system that can change right along with your team or workflow.

This infographic gives a quick breakdown of which roles are typically best suited for each standard cubicle size.

Infographic showing modern office cubicle sizes for office workers, managers, and executives, detailing dimensions and features.

As you can see, the workstation’s footprint grows with the needs of the job, scaling up from a compact, efficient space to one large enough for holding small, private meetings.

For a quick reference, here’s a simple table summarizing the most common footprints.

Standard Office Cubicle Footprints At A Glance

Footprint (Width x Depth) Square Footage Common Use Case Recommended Panel Height
6′ x 6′ 36 sq. ft. Call centers, data entry, high-density task work 42″ – 53″
6′ x 8′ 48 sq. ft. Administrative staff, cubicles with guest seating 53″ – 65″
8′ x 8′ 64 sq. ft. Managers, supervisors, employees needing more storage 65″ or higher

This table gives you a great starting point for matching a cubicle’s physical space to the actual work being done inside it.

The Benefits of Using Standard Sizes

Working with established dimensions brings some real advantages for anyone managing a facility or running a business.

  • Cost-Effectiveness: Manufacturers produce standard-sized panels and surfaces in massive quantities. That volume almost always means a lower cost per station compared to fully custom solutions.
  • Simplified Space Planning: When you’re working with predictable footprints, laying out a floor plan is much faster and more straightforward. You can easily figure out your office’s capacity and make sure you have proper walkways.
  • Future-Proof Flexibility: A modular system based on standard sizes means you can reconfigure, add on, or move workstations with way less hassle as your business needs change down the road.

At the end of the day, getting a handle on these core dimensions is the first real step toward creating a workspace that works for you now and can adapt for the future. For a deeper look at all the layout possibilities, check out our guide on cubicle configurations.

A Practical Look at Core Workstation Footprints

Numbers on a floor plan are one thing, but understanding how a cubicle footprint actually works in a real office is what matters. Each standard size isn’t arbitrary; it’s been refined over years to suit specific roles, balancing how much space you use with how comfortable your team is. The goal is simple: match the cubicle’s square footage to the day-to-day tasks of the person using it.

Getting this right affects everything—from an employee’s workflow and focus to office acoustics and even team dynamics. A layout that’s too tight can kill concentration, but one that’s too spread out is just a waste of expensive real estate. Let’s break down the three most common office cubicles standard dimensions to see how they play out in the real world.

Three office cubicles showcasing different standard dimensions for call center, workstation, and manager roles.

The Compact And Efficient 6×6 Cubicle

There’s a reason the 6’x6′ cubicle is the workhorse of the modern office. Clocking in at 36 square feet, it hits that sweet spot for high-density setups where getting the most out of your floor plan is the top priority.

  • Best For: Call centers, data entry teams, and touchdown stations for hybrid or remote staff who are only in the office part-time.
  • Pros: It’s the most space-efficient option, period. You can fit more people per square foot, which keeps costs down and makes planning layouts for large, open offices much simpler.
  • Cons: The compact space can feel a bit tight for anyone who juggles a lot of paperwork or needs multiple large monitors. There’s also not much room left over for personal items or a guest chair.

This footprint is really designed for focused, heads-down computer work where collaboration isn’t the main event. We see a lot of companies use the 6×6 as their go-to for general workstation cubicles because it’s such a versatile and practical starting point.

The Versatile 6×8 Workstation

By adding just 12 more square feet, the 6’x8′ cubicle delivers a serious upgrade in both comfort and utility. This size is often considered the perfect middle ground, adaptable enough for a huge range of professional roles.

That extra two feet of depth or width makes a world of difference. It easily allows for an L-shaped desk, more filing cabinets, or even squeezing in a small guest chair without making the space feel cramped. It’s a fantastic choice for employees who need a bit more elbow room to spread out their projects or keep reference materials handy.

The Spacious 8×8 Managerial Hub

At a generous 64 square feet, the 8’x8′ cubicle is a major step up. We typically see these reserved for managers, supervisors, or team members with specialized equipment needs. In practice, this size functions almost like a mini-office right on the main floor.

An 8×8 can comfortably house a U-shaped worksurface, plenty of storage, and proper seating for one-on-one meetings. The larger footprint is also what you need if you’re creating private office cubicles with taller panels, making them ideal for roles that demand confidentiality and frequent private conversations. When you start laying out these larger stations, it’s a good idea to consult an office space planning guide to make sure you’re leaving enough room for people to move around them comfortably. And while you’re thinking about footprints, don’t forget the floor itself; for anyone setting up a workspace at home, this guide to the Best Flooring for Home Office has some great pointers.

Choosing The Right Panel Height For Privacy And Collaboration

While a cubicle’s footprint defines the physical workspace, it’s the panel height that really dictates the atmosphere. This single dimension has a massive impact on privacy, ambient noise, and whether your teams collaborate naturally or stay siloed. Picking the right height is more than just a design choice—it’s a strategic move that directly shapes your company’s workflow and culture.

Generally, panel heights for office cubicles fall into three standard dimensions, each serving a different function. The most effective office layouts I’ve seen usually mix and match all three to create dedicated zones for different kinds of work. Getting a handle on these categories is the secret to balancing individual focus with team synergy.

Comparison of three office cubicle systems with dimensions for open collaboration, seated privacy, and focused work.

Low Panels For Open Collaboration

Low panels, which typically stand between 39 to 42 inches tall, are all about creating an open, connected environment. At this height, employees can easily see and talk to colleagues right from their chairs, making it a perfect fit for teams that run on constant communication.

  • Best For: Sales teams, creative departments, and any project group that needs to bounce ideas off each other constantly.
  • Key Benefit: These panels don’t just encourage teamwork; they also let natural light flow freely across the office, which makes the whole space feel brighter and more energetic.
  • Consideration: The trade-off is pretty clear: you get minimal acoustic and visual privacy. This can be a major source of distraction for anyone trying to do deep, focused work.

Mid-Height Panels For Seated Privacy

Striking a great balance, mid-height panels usually measure around 53 inches tall. We often call this the “seated privacy” height because it blocks sightlines when an employee is sitting down but still allows them to see across the office when they stand up.

This is the sweet spot for many modern offices. It gives people the ability to concentrate on their own tasks without feeling totally walled off from their team. It’s a design that supports both focused work and easy accessibility.

This versatility makes 53-inch panels our most popular choice for general workstations, administrative roles, and any department that juggles independent tasks with occasional teamwork. It’s a simple, effective way to reduce visual clutter while keeping everyone connected. For a deeper look at creating the right level of separation, check out our guide on office cubicle privacy.

High Panels For Maximum Focus

When deep concentration is non-negotiable, high panels are the only way to go. Ranging from 65 inches and up, these walls provide serious visual and acoustic separation from the rest of the office.

High panels are essential for roles dealing with sensitive information or requiring long stretches of uninterrupted focus—think finance, HR, or legal departments. They effectively create a private bubble, minimizing both noise and visual distractions. Many companies use these taller panels to build out dedicated quiet zones or even full private office cubicles without the expense and hassle of permanent construction.

Navigating ADA Compliance For Accessible Workspaces

When you’re mapping out cubicle dimensions, you have to think beyond just comfort and productivity. Office layouts are governed by some very real legal requirements, namely the Americans with Disabilities Act (ADA) and local building codes. This isn’t just about being considerate—it’s a non-negotiable part of creating a workspace that’s safe and functional for every single employee. Trying to cut corners here is a recipe for hefty fines and expensive redesigns later on.

The smartest move is to plan for accessibility right from the get-go. This means looking past the footprint of a single workstation and thinking about how people actually move through the entire office. A layout that’s designed to be compliant from the start ends up benefiting everyone, creating a more open, spacious, and easy-to-navigate environment.

An office space with a wheelchair, illustrating ADA-compliant 60-inch turning radius and 36-inch clear pathways.

Key ADA Dimensional Requirements

While your local building codes might have their own quirks, the ADA sets a clear baseline for accessible design. As you plan your cubicle layout, these are the critical numbers you need to have baked into your design to make sure your space is truly open to all.

  • Clear Pathway Width: Your main walkways and corridors need a minimum clear width of 36 inches. This is the absolute minimum to allow for wheelchair passage. For busier areas where people are likely to pass each other, we always recommend going up to 48 inches.
  • Turning Space: Every accessible workspace needs a clear spot for turning around. The standard is a 60-inch diameter circle, which gives a person using a wheelchair enough room to complete a 180-degree turn without bumping into anything.
  • Accessible Routes: The path to an accessible workstation has to be just as clear as the workstation itself. Make sure furniture, filing cabinets, or other items don’t jut out into that required clear width.

These rules have a direct impact on how small you can realistically make an accessible workstation. To accommodate the necessary clearances for turning and movement, you’re often looking at a footprint of at least 8’x8′ (64 sq. ft.) or larger. It’s simply what’s needed to create a usable, unobstructed space.

Weaving Accessibility Into Your Floor Plan

Getting these standards into your design is more than just dropping a bigger cubicle in a corner somewhere. It requires a holistic look at your entire office. You have to ensure that shared resources—like printers, break rooms, and conference areas—are all located along accessible routes.

An accessible office is simply a more effective office. When you design for everyone, you end up with a less cluttered, more functional environment that improves traffic flow and usability for the whole team, not just for those with mobility challenges.

Nailing these guidelines can be a complex job. Working with experts can take the guesswork out of the process and ensure your layout is fully compliant from day one. If you need some hands-on help, check out our professional office space planning and design services to make sure your workplace is set up for success.

Essential Space Planning Rules For Office Layouts

Getting the dimensions of a single cubicle right is one thing, but how your entire office flows is what truly makes or breaks the space. Good space planning isn’t just about cramming in as many desks as possible. It’s about creating an environment where people can move around, collaborate when they need to, and get their work done without constant interruption. This all starts with clear walkways and smart placement of common areas.

If you don’t nail down the basics of circulation, even the most thoughtfully designed cubicles will feel cramped and clumsy. Planning these paths correctly prevents bottlenecks and ensures your office is safe and accessible for every single person.

Defining Walkways And Clearances

To keep foot traffic moving smoothly, office layouts really need two different kinds of walkways, and each has its own minimum width.

  • Major Walkways: Think of these as the main arteries of your office. They’re the primary routes from the entrance to different departments or to the emergency exits. A minimum width of 48 inches is the standard here. This gives enough space for two people to pass by each other comfortably and meets most accessibility codes.
  • Minor Walkways: These are the smaller paths you find between rows of cubicles or between a desk and a wall. You absolutely need at least 36 inches of clearance to give a single person a clear path and allow employees to push their chairs back without blocking the way.

Sticking to these minimums is non-negotiable for a functional layout. Squeezing walkways to fit one more desk almost always backfires, leading to daily frustration and a cluttered feel that can hurt productivity.

As you map out your office and choose cubicle sizes, it’s critical to have a solid financial plan. For a deeper look into the costs involved, it’s worth reading up on understanding tenant improvement costs per square foot.

Strategically Placing Common Resources

Where you put shared equipment like printers, copiers, and break areas has a huge impact on your office’s workflow. It’s tempting to stick them in any open corner, but they really need to be in central, easy-to-reach spots.

The trick is to also keep them away from zones where people are trying to do deep, focused work. This simple step prevents noise and foot traffic from becoming a constant headache for employees who need to concentrate.

This table is a handy reference for the most critical clearances you’ll need to create a successful and code-compliant office design.

Minimum Clearance Checklist For Office Layouts

Area/Element Minimum Recommended Clearance Reason
Main Aisle/Corridor 48 inches (4 ft) Allows for two-way traffic and wheelchair accessibility.
Minor Aisle 36 inches (3 ft) Provides a clear path for a single person.
Behind Seated Employee 36 inches (3 ft) Ensures enough room for chair pushback without blocking a walkway.
Facing a Wall/File Cabinet 42 inches (3.5 ft) Allows an employee to work and access drawers without feeling cramped.

Customizing Your Space With The Cubicle Designer Tool

Standard dimensions are a great starting point, but let’s be honest—they’re just that, a start. Your office has its own quirks, its own workflow, and its own personality that an off-the-shelf solution can’t fully capture. This is where customization really makes a difference, letting you move beyond the basics to build an environment that truly works for you.

True optimization happens when you fine-tune your workstations to fit your team’s specific needs. By adjusting dimensions, finishes, and storage, you design a space that actively supports productivity and comfort, ensuring every square foot is pulling its weight.

Bringing Your Vision to Life

It’s one thing to read about different footprints and panel heights; it’s another to actually picture how they’ll look and feel in your own space. That’s a tough gap to bridge, which is why we offer a powerful, free online tool to put you in the driver’s seat. The interactive Cubicle Designer lets you experiment with layouts in real-time.

With this tool, you can take everything you’ve learned here and build a tangible plan. It lets you drag and drop components, play around with different configurations, and see exactly how your choices will come together.

Being able to pre-visualize your layout is a game-changer. It gets rid of the guesswork, prevents costly measurement mistakes, and makes sure the final installation is exactly what you envisioned.

Benefits of Using the Designer Tool

Hopping on a digital planning tool before you commit to an order offers some serious advantages for any office manager or business owner.

  • Experiment Freely: You can test out different layouts for collaborative workstation cubicles or build high-privacy setups without any risk. See what fits and what doesn’t.
  • Select Finishes: Browse through a wide range of fabrics, laminates, and trim colors to make sure everything lines up with your company’s brand and style.
  • Generate a Precise Plan: When you’re done, you’ll have a detailed design our team can use to give you an accurate quote and make the installation process a whole lot smoother.

This tool is the essential bridge between knowing the standard sizes and creating a personalized, highly functional office. For a deeper dive, check out our guide on how to transform your office with our interactive cubicle designer.

Common Questions About Cubicle Dimensions

When you’re trying to figure out the world of office cubicle standard dimensions, it’s easy to get bogged down in the details. Getting straight answers to your questions is the key to designing a workspace that actually works—one that’s efficient, comfortable, and up to code. We get these questions all the time from office managers and business owners, so we’ve gathered the most common ones here.

Think of this as your quick reference guide. It builds on everything we’ve covered and acts as a final check to make sure you’ve thought through all the critical angles before you commit to a layout.

What’s The Most Popular And Versatile Cubicle Size?

Hands down, the 6’x8′ cubicle is the industry go-to. It’s seen as the most versatile and popular choice for most modern offices, and for good reason. At 48 square feet, it hits that sweet spot between giving an employee enough personal workspace without eating up your entire floor plan.

A 6’x8′ footprint can easily handle a standard desk, a good ergonomic chair, and necessary storage like a filing pedestal. There’s even plenty of room for a dual-monitor setup without making things feel tight. Its adaptability makes it a solid starting point for all kinds of general office roles, from administrative staff to project managers. It’s the footprint many of our clients begin with for their general workstation cubicles.

How Much Space Should I Leave For Walkways Between Cubicles?

This one is absolutely critical for both safety and accessibility, so don’t eyeball it. For any main walkways that get a lot of foot traffic, you need to plan for a minimum width of 48 inches. This gives enough room for two people to pass by each other without issue and keeps you in line with most ADA guidelines.

For smaller, secondary walkways—like the path between a row of cubicles and a wall—the absolute minimum is 36 inches. This ensures a clear, safe path for one person. But always, always double-check your local building codes. They have the final say and may have specific requirements for your building.

Can I Combine Different Panel Heights In My Office Layout?

Yes, you absolutely can, and you should! Mixing different panel heights is a smart and effective office design strategy. People often call it “zoning,” and it lets you create different kinds of work environments for different teams, all within the same open-plan office.

For instance, you could use tall panels (65″ or higher) to build quiet, focused zones for your finance or development teams. At the same time, you can use low panels (around 42″) for more collaborative groups like sales or marketing to keep communication open and easy. Mid-height panels are perfect for creating a transition between these areas.

This kind of strategic mix helps you support different work styles, which directly impacts productivity and keeps your team happy. If you’re planning zones that require high walls for real concentration, our private office cubicles can be a great modular option.


At Cubicle By Design, we know from experience that the right dimensions are the foundation of a better workplace. You don’t have to stick with standard sizes—let’s create a layout that’s perfectly suited to your team’s unique needs. Start bringing your ideal office to life today with our free, interactive tool.

Design Your Custom Cubicle Layout Now

Read More

A Complete Guide To Desk Divider Panels For Modern Offices | Cubicle By Design

Let’s be honest, the modern open-plan office can be a double-edged sword. It’s great for collaboration, but that wide-open space often leads to a constant barrage of visual and auditory distractions, killing individual focus and productivity. This is exactly where desk divider panels come in, and they do a lot more than just separate desks—they fundamentally redefine personal workspace within a shared environment.

How Desk Divider Panels Reinvent The Modern Office

Think of it this way: instead of just adding more furniture, you’re strategically restoring order. By putting up simple physical and acoustic barriers, you’re directly tackling the biggest complaints about open layouts. It’s a straightforward, powerful way to bring back a sense of calm and focus, making the entire office more comfortable and efficient. This isn’t just an equipment purchase; it’s an investment in a better work atmosphere.

As you can see, even low-profile panels can establish that much-needed personal space without completely closing off the collaborative feel of the office.

The Core Benefits of Desk Dividers

The advantages of adding desk dividers are pretty much immediate. They attack several problems at once to create a noticeably better work experience.

  • Enhanced Acoustic Control: The right panels, especially ones made with sound-absorbing materials, do a fantastic job of soaking up ambient noise. This means fewer distractions from nearby phone calls and conversations, letting people actually concentrate.
  • Crucial Visual Privacy: Simply blocking sightlines creates a powerful psychological boundary. Employees feel less like they’re “on stage,” which is key for any task that requires deep focus and helps cut down on workplace stress.
  • Logical Space Division: Dividers bring a clear sense of order and structure to a big, open floor. They define individual workstations, giving people a sense of ownership over their own little corner of the office.

A Growing Trend in Office Design

It’s no surprise that the demand for these kinds of flexible solutions is booming. More and more companies are catching on to their value.

The global market for commercial room dividers was valued at USD 1.5 billion in 2024 and is expected to hit USD 2.8 billion by 2033—that’s a growth rate of about 7.5% every year. This isn’t just a fad; it’s a major shift toward creating smarter, employee-focused workspaces.

When you understand the basics of modern office cubicle design, you start to see how these simple additions fit into a much bigger strategy for optimizing your office. This guide will walk you through everything you need to know to pick the perfect desk divider panels for your team.

Choosing The Right Materials For Your Workspace

Picking the right desk divider is a lot like choosing the right tool for a job. You wouldn’t use a hammer to turn a screw, right? The material you select for your panels directly impacts everything from noise levels and natural light to the overall vibe of your workspace, so it’s a decision worth getting right.

But don’t worry, it’s not as complicated as it sounds. Once you understand the strengths of each material and where they shine, you can easily pick an option that solves your office’s specific challenges—whether you’re building a buzzing collaborative hub or carving out quiet zones for deep focus.

Fabric Panels For Acoustics And Branding

Fabric-wrapped panels are probably the most common choice you’ll see, and for good reason: they’re fantastic at absorbing sound. Think of the soft, porous surface as a sponge for ambient office chatter, soaking up the noise from phone calls and nearby conversations. This makes them a go-to solution for taming distractions in a busy office.

But their talents don’t stop at acoustics. Fabric panels are also a great opportunity to inject some personality and branding into your space. With a massive spectrum of colors available, you can pick shades that match your company logo, reinforce your brand identity, or simply set a specific mood. They add a warmth and texture that harder materials just can’t match.

When your top priorities are cutting down on noise and creating a cohesive look, fabric-wrapped panels are a versatile and effective tool. They tackle the practical problem of sound while making your office look great.

Glass And Acrylic For An Open Feel

What if you need to create separation but don’t want to sacrifice that bright, open-office feel? This is exactly where glass and acrylic panels come in. These transparent or translucent barriers keep sightlines clear and let natural light pour through, preventing the space from feeling walled-off or claustrophobic.

They are a perfect fit for modern offices going for a sleek, airy look while still giving people their own defined workstations. You can learn more about how larger installations create this effect in our article on glass partition walls for offices. Whether you choose a frosted finish for a bit more privacy or crystal clear for total transparency, these panels deliver a clean, contemporary vibe.

Specialized Acoustic Panels For Maximum Focus

Sometimes, standard noise reduction just isn’t enough. For high-energy environments like call centers, sales floors, or any area where deep concentration is non-negotiable, you need to bring in the heavy hitters. That’s where you’ll find specialized acoustic desk divider panels, often made from high-density materials like PET felt.

These panels are engineered from the ground up for one thing: superior sound absorption. They’re significantly better at dampening noise than standard fabric panels, allowing you to create true “heads-down” zones where employees can work with minimal interruptions.

It’s no surprise that the market is leaning this way. Recent analysis shows that high-performance, multi-functional dividers now account for 40% of new installations. People want solutions that really work, and acoustic dividers are incredibly effective and easy to install in both corporate and home offices.

Desk Divider Material Comparison

Choosing the right material often comes down to balancing a few key priorities. To make it easier, we’ve broken down the most common options to help you see how they stack up against each other in terms of privacy, sound control, aesthetics, and light.

Material Type Primary Benefit Best For Acoustic Performance Light Transmission
Fabric-Wrapped Panels Sound Absorption & Aesthetics General office use, reducing ambient chatter, branding Good to Excellent None
Glass Panels Maintaining Openness & Light Modern offices, collaborative areas, spaces with good natural light Poor Excellent
Acrylic (Plexiglass) Lightweight & Durable Openness High-traffic areas, budget-conscious modern designs Poor Excellent (Clear) to Good (Frosted)
PET Felt Panels Superior Sound Absorption Call centers, sales floors, “heads-down” focus zones Excellent None

Ultimately, the “best” material is the one that best solves your office’s unique challenges. Use this table as a starting point to narrow down your options and focus on what will deliver the biggest impact for your team.

Decoding Acoustics And Privacy Levels

Picking the right desk divider panels is about more than just aesthetics; it’s about getting a handle on sound and privacy. This can feel a little technical, but the core ideas are pretty simple. Once you grasp a couple of key concepts, you can confidently choose panels that actually solve your office’s noise problems and turn a chaotic space into a focused one.

Think of sound control in two basic ways: soaking it up or blocking it out. Soaking up sound (absorption) is like putting a giant sponge in the room to sop up echoes and background chatter. Blocking it, on the other hand, is like closing a door to keep a conversation from getting in. Both are important, but they tackle different acoustic issues.

Understanding Key Acoustic Ratings

When you start shopping for panels, especially the acoustic kind, you’ll probably run into two terms: Noise Reduction Coefficient (NRC) and Sound Transmission Class (STC). They sound complicated, but a simple analogy makes them easy to remember.

Noise Reduction Coefficient (NRC) is the “sponge.” It tells you how well a material absorbs sound within a room. The higher the NRC, the better that panel is at soaking up ambient noise, killing echoes, and just generally making the space feel quieter.

Sound Transmission Class (STC) is the “wall.” This rating measures how well a material stops sound from passing straight through it. A higher STC means the panel is better at preventing your neighbor’s phone call from bleeding over to your desk.

Most of the fabric and PET felt dividers you’ll see are all about that high NRC rating—they’re designed to dial down the overall office buzz. Harder materials like glass have a terrible NRC (they just bounce sound around) but can help with STC when built into full-height partitions. For desk-mounted panels, though, NRC is usually the number you want to watch.

This infographic does a great job showing how different materials trade visual openness for sound control.

As you can see, there are trade-offs. Materials like fabric and felt are the champs of sound management, while you pick acrylic when you want to keep sightlines clear, not because it does anything for noise.

How Panel Height Creates Privacy

Just as critical as acoustics is plain old visual privacy. The height of your desk dividers directly impacts how much focus and personal space someone feels they have. It’s a simple formula: higher panels mean more seclusion and fewer things catching your eye.

The right height really just depends on the kind of work getting done.

  • Low Dividers (12-18 inches): These are great for setting a subtle boundary without cutting people off from each other. They’re perfect for collaborative teams who need to chat easily but still want their own defined turf.
  • Medium Dividers (18-24 inches): This is the sweet spot for “seated privacy.” At this height, panels block the view of neighboring desks when you’re sitting down, which is a must-have for focused tasks like writing, coding, or data entry.
  • High Dividers (Above 24 inches): Taller panels offer the most visual and acoustic privacy. They create that classic cubicle feel, slashing distractions from all sides. These are ideal for roles that demand deep concentration or confidentiality.

By thinking through both the acoustic ratings and the panel height, you can make a much smarter decision. For a deeper dive, check out our complete guide on achieving office cubicle privacy. It’ll help you dial in the exact level of focus your team needs to do their best work.

Mastering Installation And Layout Planning

Picking out the perfect desk divider panels is a huge first step, but the real magic happens when you plan the layout and get to the installation. Let’s be honest: even the best acoustic panels on the market are useless if they’re installed incorrectly or just don’t fit the space. A little proactive planning here makes sure you get every bit of value from your investment, turning that vision in your head into a genuinely functional office.

This is the hands-on part of bringing a workspace to life. Precision and the right tools are everything when it comes to getting a stable, effective setup that actually works for your team.

Choosing Your Mounting Method

How you attach the panels to your desks is one of the first calls you’ll have to make. This decision impacts their stability, how permanent they are, and how easy it will be to change things up down the road. Each method has its own clear advantages depending on what you’re trying to achieve.

  • Desk-Clamp Mounts: This is far and away the most popular and versatile choice. These panels use adjustable clamps that grip the edge of a desk, so there’s no drilling or permanent damage. They’re rock-solid for most panel heights and are a perfect fit for companies wanting a secure setup without marking up their furniture.
  • Freestanding Dividers: Just like the name says, these panels stand up on their own with wide, stable feet. They offer the ultimate flexibility and can be moved and repositioned in seconds. This makes them ideal for creating temporary focus areas or for agile teams who are constantly reconfiguring their space.
  • Permanent Panel Systems: These are built right into the desk or cubicle structure itself, often as part of a bigger modular system. While they give you the highest level of stability and a completely seamless look, they are the least flexible option. This route is best for businesses building out a fixed, long-term office layout.

If you want to zoom out and look at bigger-picture strategies, this practical guide to partitioning systems is a great resource.

The Importance Of Accurate Measurements

The most common—and most expensive—mistake people make when ordering desk dividers is getting the measurements wrong. A panel that’s a half-inch too short or bumps into a monitor arm can bring your entire project to a screeching halt.

To avoid that headache, just follow a simple, precise process:

  1. Measure Desk Surface: Start with the exact length and width of the worksurface where the panel will go. Don’t eyeball it—get a tape measure out for precise numbers.
  2. Check Desk Thickness: For clamp-on panels, you absolutely need to measure the thickness of your desk to make sure the clamps will fit.
  3. Account for Obstructions: This is the step everyone forgets. Look for anything that could get in the way of the panel or its mount. We’re talking monitor arms, power grommets, cable trays, and even those curved “waterfall” edges on some desks. Note their locations carefully.
  4. Confirm Clearance: Think about what’s above and below the desk. Will the panel block an under-desk keyboard tray or hit an overhead shelf? Double-check every single clearance before you place your order.

Getting the measurements right upfront saves you time, money, and a major headache. Taking ten extra minutes to be precise is far better than receiving panels that simply don’t fit.

While most desk-clamp dividers are pretty straightforward to install, bigger projects with full cubicle systems require real expertise. For complex jobs, it’s always smart to look into professional office furniture installation to ensure everything is put together safely and correctly.

Visualize Your New Layout With Confidence

Measuring is one thing, but truly seeing how your new layout will look and function is another challenge entirely. This is where planning tools become so valuable, letting you move past abstract numbers and actually see your space come to life.

At Cubicle By Design, we make this easy with our online Cubicle Designer tool. This platform lets you build out your ideal workspace virtually before you commit to anything. You can set the dimensions for your workstation cubicles or lay out some private office cubicles, play with different panel heights, and pick out finishes.

It gives you the power to create a precise plan that you know will work, ensuring the final result perfectly matches what your team needs. Tools like our Cubicle Designer take all the guesswork out of office planning.

Weaving In Power And Your Company’s Vibe

In any modern office, you can’t have function without form. It all needs to work together. Your desk dividers are a perfect example—they have to do more than just build a little privacy. They need to support the tech your team relies on and look like they belong in your space.

When done right, your dividers stop being just accessories and become a core part of the office ecosystem. They deliver power where it’s needed and pull the whole design of the room together.

Powering Up Without The Mess

We all know a clean desk helps you think clearly, but that’s a tough goal to hit when you’re swimming in a sea of power cords and cables. Thankfully, modern desk divider panels have a clever solution: built-in power raceways.

Think of these as hidden channels, usually tucked away along the base of the panel, that let you neatly route all your wiring. This setup puts power outlets right at the desktop level, so you can finally ditch those messy, hazardous extension cords snaking across the floor. To get this right, you’ll want to pair it with the proper hardware; our guide on choosing an under-desk power strip is a great place to start.

A great workspace makes technology easy to use but hard to see. Integrated raceways take that tangled mess of cables and turn it into a clean, functional design, letting people plug in and get to work without the visual clutter.

Just remember, getting electricity to every workstation is a job for the pros. A reliable commercial power outlet installation service is crucial to make sure your building’s infrastructure can safely handle a fully powered cubicle system.

Finishes That Feel Like You

Beyond the practical stuff, desk dividers are a massive opportunity to inject your brand’s personality into the office. They’re basically large canvases you can use to reflect your company’s identity and create the exact atmosphere you’re going for.

And we’re talking about more than just picking a color. You can fine-tune every little detail to create a polished, cohesive look that’s all your own.

  • Fabric Choices: Pick from a huge spectrum of fabric colors. You could match your logo, color-code different departments, or set a mood—maybe calm blues for a quiet, focused area or bright yellows for a high-energy collaboration zone.
  • Trim Finishes: The trim around the panel can be customized to match your desks and other decor. Brushed aluminum, for instance, gives off a sleek, modern vibe, while a simple black or grey trim feels more classic and understated.

This is exactly why businesses are the biggest buyers, making up about 50% of the global office partitions market. Companies, especially in North America and Europe, don’t just want something that works; they want solutions that fit into a sophisticated design plan.

By putting some thought into the finishes, you turn what could be generic hardware into a key part of your office’s story. The right fabric and trim combo makes the whole space feel custom-built, reinforcing who you are as a company at every single desk.

So, What’s Next? Time to Build a Better Workspace

You’ve made it through the guide. Now you have the inside scoop on everything from divider materials to acoustic ratings, which means you’re ready to pick the right desk divider panels for your team. Moving from a loud, distracting open office to a focused, productive one isn’t magic—it’s just a series of smart, deliberate choices.

Now comes the fun part: putting all that knowledge to work. It’s time to take your plan off the page and start building the real thing.

A Quick Recap of Your Game Plan

Let’s quickly run through the key points that will shape your final decision. Think of it as a logical checklist to make sure your investment pays off in both productivity and happier employees.

  • Nail Down Your “Why”: First, what’s the biggest problem you’re trying to solve? Is it constant noise that’s killing concentration, or do you just need to give people some visual privacy when they’re sitting down? Your answer here will point you in the right direction for everything else.
  • Pick the Right Materials for the Job: Match the panel material to your main goal. If noise is the enemy, go with high-performance acoustic panels. If you want to create separation but keep the space feeling bright and open, glass or acrylic is your best bet.
  • Don’t Forget the Technicals: Pay attention to the numbers that actually matter, like the Noise Reduction Coefficient (NRC). Also, choose a panel height that gives your team the exact level of privacy they need to get their heads down and work.
  • Plan Your Layout Like a Pro: Remember the old rule: measure twice, order once. Double-check every desk dimension, account for pillars or outlets, and make sure you have enough clearance. A little extra planning now prevents major headaches later.

Bring Your Vision to Life with the Right Tools

With a solid plan in hand, the best next step is to actually see what it will look like. We suggest browsing our full range of cubicles—from private office cubicles to more flexible workstation cubicles—to see how these ideas play out in the real world.

The most powerful tool you have is the ability to experiment without risk. When you can visualize your layout before you buy, you can be sure the final result is exactly what you need.

To make this super simple, play around with our free online Cubicle Designer tool. It’s an easy way to drag and drop different layouts, test out configurations, and see what finishes you like best. It completely takes the guesswork out of space planning.

Of course, if you want a more personal touch, the team at Cubicle By Design is here to help. Get in touch for a professional consultation. Let us be your partner in creating a workspace that’s more productive, focused, and just a better place to be for everyone on your team.

Desk Divider Panels: Your Questions Answered

When you’re knee-deep in planning an office redesign, the details start to matter. To help you sort through them, we’ve put together answers to the questions we hear most often about choosing and setting up desk divider panels. Think of this as your quick-start guide to making smart, confident decisions for your space.

How Tall Should Desk Divider Panels Be?

There’s no single “best” height; the right choice really hinges on how you want your team to work. Are you aiming for easy collaboration or deep, focused work? Your answer will point you to the right panel height.

  • 12-18 inches: This is your go-to for a subtle visual break. It’s perfect for teams that chat frequently but still need a defined personal zone. It marks the space without putting up a real barrier.
  • 18-24 inches: Welcome to the sweet spot for “seated visual privacy.” At this height, panels block sightlines to neighboring desks when everyone is sitting down, cutting down on the distractions that kill focus.
  • Over 24 inches: When you need serious acoustic control and a real sense of personal territory, go tall. These panels are ideal for roles that demand high concentration or for taming a noisy, open-plan environment.

Can Desk Dividers Be Added To Existing Desks?

Absolutely. In fact, most modern desk dividers are designed specifically to be retrofitted onto the desks you already own. This is a huge plus, letting you upgrade your office flexibly and affordably without having to buy all new furniture.

For this kind of project, desk-clamp and freestanding models are your best friends because they don’t require drilling or permanent changes. Just do yourself a favor and measure your desk’s thickness and surface depth beforehand to make sure the mounting hardware will fit securely.

What’s The Real Difference Between Acoustic And Fabric Panels?

This is a great question because it gets to the heart of performance. While pretty much any fabric-covered panel will absorb a tiny bit of sound, a true acoustic panel is a whole different animal, engineered from the inside out.

A standard fabric panel is often just a simple core wrapped in cloth for looks. An acoustic panel, on the other hand, is built with a high-density core—think mineral wool or specialized PET felt—that’s been scientifically tested and rated with a Noise Reduction Coefficient (NRC).

So, if chatter and background noise are genuine problems in your office, don’t just settle for fabric. Investing in a properly rated acoustic panel is the most direct and effective way to create a quieter, more productive atmosphere.


Ready to transform your office with the perfect blend of privacy and collaboration? The expert team at Cubicle By Design is here to help you plan and implement the ideal workspace solution. Explore our full range of customizable cubicles to get started.

Read More

A Guide to Office Cubicle Size Standards

When it comes to office cubicle size standards, there really isn’t a single magic number. It’s more of a spectrum of common footprints, with the most popular sizes being 6’x6′ for general workstations, a slightly roomier 6’x8′ for roles needing more surface area, and larger 8’x12′ configurations for managers who need space for private meetings.

Ultimately, the right size is always a trade-off between the job function, the equipment someone needs, and how efficiently you can lay out your whole floor plan.

Overhead view of four distinct office cubicles, showcasing various size standards with desks and chairs.

Why One Size Never Fits All

Picking the right cubicle size is all about finding that sweet spot between employee comfort and pure spatial efficiency. A compact footprint that’s perfect for a high-density call center would feel cramped and frustrating for a senior analyst who needs to spread out blueprints or reports. That’s why understanding the nuances of different dimensions is so crucial for creating a place where people can actually get work done.

Modern office planning has thankfully moved away from cookie-cutter uniformity and toward solutions built for specific roles. Think about the day-to-day tasks. Does their job demand quiet, focused work, or is it all about quick collaboration? Do they need a bank of filing cabinets or just enough room for a laptop and a second monitor? Answering these questions is the first step in figuring out the right dimensions for different teams.

Key Factors That Shape Your Decision

Several things will push you toward one size over another, even within the same office. Getting this mix right is what makes a workspace feel truly functional.

  • Job Function: Roles that demand deep concentration—think accounting, programming, or research—really benefit from larger footprints and higher walls, like our private office cubicles. On the flip side, highly collaborative teams often do better in smaller, lower-walled spaces that encourage interaction.
  • Space Density: The total square footage you have to work with is a huge factor. A denser layout might rely on compact 6’x6′ workstation cubicles to fit everyone in comfortably.
  • Company Culture: Is your organization built on open communication? You might lean toward smaller cubicles with low partitions. A more traditional company culture might value the privacy and status that come with larger, more enclosed setups.
  • Future Growth: This is a big one. Choosing modular cubicles from the start gives you the power to reconfigure everything as your company evolves. Planning for that flexibility now saves a ton of headaches and money down the road.

We’ve put together a quick reference table to make sense of the most common options and where they fit best.

Common Office Cubicle Sizes and Their Typical Uses

Cubicle Size (Feet) Common Role/Use Case Recommended Panel Height Best For
5’x5′ Call Center, Data Entry, Telemarketing 42″ – 53″ High-density environments where minimal surface area is needed.
6’x6′ General Administrative, IT Support, Clerical 53″ – 65″ The industry standard; offers a good balance of personal space and efficiency.
6’x8′ Senior Staff, Accountants, Project Leads 53″ – 65″ Roles needing extra surface area for documents or a small guest chair.
8’x8′ Mid-Level Management, Engineers, Designers 65″+ Ample room for multiple monitors, storage, and spreading out complex work.
8’x12′ Senior Management, Executive Suites 65″+ Private office feel with space for a small meeting table and personal storage.

This chart is a great starting point, but remember that every office is unique. The best layout is always one that’s been thoughtfully tailored to the people who use it every day.

At Cubicle By Design, we live and breathe this stuff. We specialize in creating these kinds of tailored solutions. You can even play around with different layouts yourself using our interactive cubicle designer tool to see what’s possible.

How We Got Here: A Brief History of Cubicle Sizes

To really get a handle on today’s office cubicle size standards, it helps to know where they came from. The cubicle wasn’t invented to cram people into tiny boxes. Far from it. The original idea was all about giving people flexible, functional workspaces they could control. But over the decades, that vision got squeezed by economic pressures and changing ideas about how an office should work.

What started as a worker-focused ideal ran headlong into the realities of corporate cost-cutting. That collision dramatically changed how offices allocate space for their people.

From Action Office to Cube Farms

The cubicle as we know it was born from a desire to escape the rigid, noisy open-plan offices common in the mid-20th century. The goal was to give employees a little privacy and a sense of ownership over their environment, with the belief that this would help them do better work.

That philosophy was baked into the very first design. Back in 1968, a designer named Robert Propst introduced the ‘Action Office II’ system for Herman Miller, a concept meant to boost productivity with adaptable, personal workstations. But by the 1980s, corporations had twisted this flexible idea into monotonous ‘cube farms.’ They used strict 90-degree panel setups to pack 30-40% more workers onto a floor, shrinking the average cubicle down to a cramped 4.5 by 4.5 feet.

This era was all about density. It established the compact cubicle footprint that many of us still picture today. For a deeper dive into this whole story, check out our article on the evolution of the office cubicle.

The Modern Shift Back to Employee Well-Being

Thankfully, the pendulum is swinging back. There’s a growing understanding now that employee well-being isn’t just a buzzword; it’s directly linked to productivity and keeping good people. This has kicked off a reversal of the “shrinking cubicle” trend.

Companies are realizing that giving people adequate personal space isn’t a perk—it’s a smart investment. A few key things are driving this change:

  • The Need for Deep Work: So many jobs today require intense concentration. To do that, people need a space that minimizes constant distractions.
  • The Rise of Hybrid Work: When employees split their time between home and the office, the workplace has to be worth the commute. A comfortable, spacious workstation is a huge part of that equation.
  • A Focus on Mental Health: A less cramped, more personal environment helps lower stress and just makes for a healthier, more positive company culture.

This modern, people-first approach is what we focus on with the modular systems at Cubicle By Design. It’s all about finding the right balance of personal space, privacy, and opportunities for collaboration. The goal is no longer about just fitting more bodies in a room, but about creating a workspace where people can actually thrive.

A Detailed Breakdown of Common Cubicle Footprints

When you’re trying to lay out a functional office, getting a handle on the different cubicle footprints is absolutely critical. While you can find a huge range of options out there, a few key dimensions have really become the unofficial office cubicle size standards. They’ve stuck around because they hit that sweet spot between efficiency and comfort.

Each size serves a different purpose, and understanding them is key to matching the space to the role. Let’s dig into the most common footprints and see how they’re typically used, which will make it much easier to decide what your team really needs.

The Compact Standard: 6’x6′

The 6’x6′ cubicle is, without a doubt, the most popular size you’ll see in offices today. Its 36-square-foot area offers a fantastic balance between giving an employee enough personal workspace while still allowing you to maximize your floor plan’s density. This makes it a go-to choice for all sorts of roles.

You’ll often find this footprint is perfect for administrative staff, IT support, or really anyone who spends most of their day on a computer and just needs a reasonable amount of surface area. A typical 6’x6′ setup will have an L-shaped worksurface, which is plenty of room for dual monitors, a keyboard, and some paperwork without feeling cramped. If this sounds like what you need, you can learn more about our 6×6 office cubicles.

The Enhanced Workspace: 6’x8′

When a job requires a bit more elbow room, the 6’x8′ cubicle is a noticeable upgrade. That extra 12 square feet makes a huge difference, offering much more flexibility for extra storage and equipment.

This size works really well for project leads, accountants, or senior staff who often deal with physical files or need space for an occasional guest to pull up a chair. The larger footprint can comfortably fit the standard L-shaped desk plus a two-drawer lateral file cabinet or a personal storage tower. This helps keep the main desk clear for focused work, which is why our workstation cubicles in this size are so popular for boosting productivity.

The Professional’s Choice: 8’x8′

Moving up to an 8’x8′ station gives an employee a generous 64 square feet of personal territory. You’ll often see this footprint reserved for mid-level managers, engineers, or designers who need plenty of room to spread out with complex projects, blueprints, or multiple large monitors.

The spacious layout can easily accommodate a large U-shaped desk, creating distinct zones for computer work, paperwork, and reference materials. It also has ample room for extensive storage like overhead bins and full-height cabinets. This size, especially with higher panels, starts to create a more enclosed, office-like environment that’s great for deep concentration.

An 8’x8′ footprint is the sweet spot where a workstation begins to feel like a personal office. It offers enough room for both focused individual work and small, informal collaborations without compromising on storage or comfort.

The Managerial Suite: 8’x12′

At the high end of standard sizes, the 8’x12′ cubicle provides a substantial 96 square feet. This dimension isn’t just a workstation; it effectively creates a semi-private office within a larger open-plan space, making it ideal for senior managers and executives.

This expansive footprint has enough room for a full desk and credenza setup, plus a small meeting table with a couple of guest chairs. It allows a manager to hold private conversations or one-on-one meetings right at their station. When you configure these private office cubicles with high walls and a door, you get the privacy and status of a traditional office but with all the flexibility of a modular system.

Choosing the Right Panel Height for Privacy and Collaboration

While a cubicle’s footprint sets the physical boundaries of a workstation, it’s the panel height that truly defines the work environment. This vertical dimension is a huge part of office cubicle size standards, and it directly shapes everything from privacy and noise levels to how easily people can collaborate. A 6’x8′ space with low walls feels completely different than the exact same footprint with high walls—the experience isn’t even comparable.

The real key is matching the panel height to the job function. A team that’s constantly bouncing ideas off each other will feel right at home with low barriers. On the other hand, someone who needs to get into deep focus mode will be far more productive with taller, more enclosing panels.

Low-Height Panels for Open Collaboration

Low-height panels, which usually run between 39 to 42 inches, are all about creating an open, collaborative vibe. These walls are just low enough for people to easily see and talk over them while seated, making them perfect for sparking those spontaneous conversations that solve problems fast.

This setup works great for dynamic teams in sales, marketing, or creative design where that constant interaction is baked into the daily workflow. The trade-off, of course, is a major drop in both visual and acoustic privacy.

Mid-Height Panels for Balanced Privacy

Mid-height panels are the most common choice you’ll see in offices, and for good reason. Standing between 53 and 54 inches tall, they hit a sweet spot. This height is engineered to give a seated employee complete visual privacy, cutting out the distractions of people walking by.

At the same time, it’s low enough that you can simply stand up to chat with a colleague. This balance makes it an incredibly versatile option for all sorts of roles, from administrative staff to project managers—anyone who needs to hunker down and focus but still be accessible.

By offering seated privacy without complete isolation, mid-height panels create a functional middle ground that supports both individual tasks and team-based work, making them a staple in modern office design.

The infographic below shows how different job roles often get specific cubicle footprints, which naturally influences the choice of panel height.

A bar chart illustrates typical office cubicle sizes: 6'x6" for Workers, 6'x8" for Analysts, and 8'x12" for Managers.

As you can see, when a workstation gets bigger to accommodate more senior or focus-heavy roles, the need for higher panels usually grows right along with it.

High-Height Panels for Maximum Focus

For those roles where concentration and confidentiality are non-negotiable, high-height panels are the way to go. These panels typically start at 65 to 67 inches or taller, creating a semi-private office that drastically cuts down on both visual and auditory distractions.

This level of enclosure is ideal for people working in finance, human resources, or legal departments who regularly handle sensitive information. High panels are also a must-have for anyone who spends a lot of their day on the phone. Finding that perfect level of separation is crucial, and you can dig deeper into strategies in our guide to office cubicle privacy. When you pair high walls with a larger footprint, you can even add a door, essentially creating a modular office without the cost of construction.

To make the choice clearer, here’s a quick breakdown of how panel heights stack up.

Cubicle Panel Height Standards and Workplace Impact

This table compares the standard panel heights and what they mean for your office environment, from privacy levels to their effect on teamwork.

Panel Height Range (Inches) Privacy Level Typical Use Case Impact on Collaboration
39″ – 42″ Low (Seated view) Call centers, collaborative teams, sales floors High – Encourages frequent, spontaneous interaction.
53″ – 54″ Medium (Seated privacy) General office staff, project managers Moderate – Allows for easy communication when standing.
65″ – 67″+ High (Standing privacy) HR, finance, legal, focused individual work Low – Creates significant separation to minimize noise.

Ultimately, choosing the right height is about understanding what your teams need to do their best work. Mixing and matching these options can help you create a dynamic office layout that serves everyone.

Navigating ADA Compliance and Aisle Widths

When you’re planning an office layout, thinking about workflow and comfort is just the start. You also have to factor in the legal and safety requirements that govern office cubicle size standards. This isn’t just about ticking a box; it’s about creating a genuinely inclusive and safe workspace for everyone on your team. That means getting to know the Americans with Disabilities Act (ADA) and your local fire codes.

These regulations ensure your office has enough space for people to move around freely and, crucially, to get out safely during an emergency. Getting this wrong can lead to hefty penalties, but more importantly, it can create a dangerous environment. At Cubicle By Design, we make it a priority to help our clients design layouts that are both highly functional and fully compliant.

An office walkway illustrating 36-inch clear space for accessibility, marked with a wheelchair symbol.

Key ADA Accessibility Rules

The ADA lays out some very clear minimums for accessibility, specifically to accommodate employees who use wheelchairs or have other mobility needs. If you overlook these rules, you risk making parts of your office completely unusable for some of your staff.

Here are the key requirements for office pathways:

  • Minimum Clear Width: All accessible routes, and that includes the aisles between your cubicles, need a clear width of at least 36 inches. This is the non-negotiable space needed for a wheelchair to pass through without getting stuck.
  • Turning Spaces: You must provide a 60-inch diameter clear circle (or a T-shaped space of equivalent dimensions) to allow someone in a wheelchair to complete a 180-degree turn. These turning spaces are critical, especially at the end of aisles or in larger common areas.
  • Accessible Desk Height: For a desk or workstation to be truly accessible, it has to have clear knee space that is at least 27 inches high, 30 inches wide, and 19 inches deep.

Keep in mind, these are the absolute minimums. If you can plan for slightly more generous spacing, you’ll dramatically improve maneuverability and comfort for everyone, not just those with mobility challenges. And don’t forget that office accessibility goes beyond just pathways; things like proper ADA sign compliance are just as important.

Fire Codes and Egress Paths

While the ADA is focused on accessibility in daily use, local fire codes are all about safe and quick evacuation. The two sets of rules definitely overlap, but they sometimes have different, stricter requirements for your main walkways.

Fire codes often demand wider main aisles to handle a crowd of people exiting all at once. So, while a smaller path between two workstation cubicles might be fine at 36 inches, a primary egress path often needs to be at least 44 inches wide.

It’s absolutely vital to check your specific local and state building codes because the rules can vary from one place to another. For more complex layouts, talking with our team or using a tool like our cubicle designer can help you get every pathway planned correctly from the get-go. A safe and accessible layout isn’t an afterthought—it’s the foundation of a great workplace.

How Modern Work Trends Influence Cubicle Design

The days of cramming workers into rigid, high-density layouts are numbered. As modern work dynamics reshape office cubicle size standards, those old-school cube farms are quickly becoming a thing of the past. The rise of hybrid models and a serious focus on employee well-being have sparked a major shift in how we think about office space.

Companies are starting to see the office not just as a place to clock in, but as a destination that has to compete with the comfort of working from home. This means the old strategy of squeezing in as many desks as possible is out. Instead, smart organizations are investing in more generous, flexible spaces designed to support focused work, collaboration, and mental health. The cubicle isn’t just a box anymore; it’s evolving into a thoughtfully designed personal workstation.

From Density to Destination

The hybrid work model has completely flipped the script on the office’s purpose. If you’re asking employees to make the commute, you’d better give them a good reason. A cramped, noisy cubicle isn’t it. A spacious, comfortable workstation, on the other hand, can be a powerful incentive.

In response, companies are creating more inviting and functional environments. This often translates to larger individual footprints, better ergonomic furniture, and improved acoustic privacy, giving people the personal space they need to be productive and feel valued.

The modern office has to be a “destination” workplace—a space that offers amenities, comfort, and a collaborative vibe that employees simply can’t get at home. Investing in larger, better-equipped cubicles is a direct strategy to make the office worth the trip.

Well-Being and Productivity

It’s no secret that there’s a strong link between personal space and job satisfaction. We’ve seen it time and again: generous workstations are proven to reduce stress and burnout while boosting an employee’s ability to focus. This isn’t just a gut feeling; the data backs it up.

For instance, today’s benchmarks often recommend 8’x8′ (6.5 square meters) or even larger workstations to enhance employee well-being. That’s a huge leap from the tiny cube farms of the 1980s. Research has even found that cubicles over six square meters are linked to 15% higher collaboration scores and 22% less burnout.

This shift directly impacts how companies lay out their floor plans. A larger footprint allows for features that support a healthier workday, like sit-stand desks, proper storage to cut down on clutter, and enough room to move around without feeling boxed in.

Modular systems from Cubicle By Design are perfectly suited to meet these modern demands. Our flexible workstation cubicles can be configured to create the spacious, comfortable environments that today’s workforce expects. We make it easy to design an office that not only looks great but also actively supports your team’s productivity and well-being. To see how this all comes together, you can learn more about how office trends boost employee productivity in a hybrid setting.

Plan Your Perfect Workspace with Our Cubicle Designer

Taking all the standards for office cubicle size from theory to a real-world floor plan is where the magic happens. Instead of just guessing, a visual planning tool lets you play around with different layouts, test various configurations, and see exactly how your choices impact the workspace. This is the crucial step where you can put all the numbers for footprints, panel heights, and clearance widths we’ve talked about into practice.

We actually built our online designer for this exact reason. It’s a powerful, easy-to-use tool that lets you bridge the gap between a great idea and a workable plan, making professional-grade space planning accessible to anyone.

From Blank Canvas to Detailed Blueprint

Our interactive designer walks you through a simple process to build a virtual model of your office. You start by plugging in your room’s dimensions and then begin dropping in different cubicle sizes to see how they fit.

The tool makes it easy to visualize different scenarios in an instant. For example, you can lay out a call center with compact 6’x6′ workstations to maximize density, or design a management area with roomy 8’x12′ private office cubicles for more privacy.

Here’s a peek at the designer tool interface, where you can select footprints and arrange them within your floor plan.

As you can see, the tool gives you a clear overhead view. This lets you make sure your aisle widths meet ADA and fire code requirements while you’re still in the design phase.

Customization at Your Fingertips

The real power of the designer is in its customization options. It allows you to apply the standards we’ve covered in this guide directly to your plan.

  • Select a Footprint: Choose from standard sizes like 6’x6′ or 8’x8′.
  • Choose Panel Heights: Experiment with low, medium, or high walls to get the right balance of privacy and collaboration.
  • Add Components: Place desks, storage, and electrical access points exactly where you need them.
  • Pick Finishes: Test different fabric and laminate colors to match your brand’s look and feel.

For those who want to see how the pros handle large-scale projects, it’s interesting to learn how AE design firms leverage BIM for design. Our tool simplifies these core concepts, putting powerful planning capabilities right in your hands.

Stop guessing and start designing. Visualizing your layout is the single best way to ensure your new office meets every standard for comfort, safety, and productivity.

Ready to build your ideal workspace? For more tips, check out our guide on how to transform your office with our interactive cubicle designer. Then, head over and start creating your perfect office layout today.

Your Cubicle Standards Questions, Answered

When you’re knee-deep in planning an office layout, specific questions always pop up. It’s one thing to know the general rules, but it’s another to apply them to your unique space. Let’s tackle some of the most common questions we hear from folks trying to get their cubicle setup just right.

What’s the Most Common Cubicle Size for an Office?

If you walk into a typical office, you’re most likely going to see 6’x6′ and 6’x8′ workstations. They’ve become the go-to choice for a reason. These sizes give an employee enough personal real estate to work comfortably without eating up your entire floor plan.

But honestly, the “feel” of a standard cubicle often has as much to do with the panel height as the footprint. A classic 6’x6′ station with mid-height walls is what most people picture when they think of a cubicle—it’s the perfect blend of privacy and connection.

How Much Space Do I Need Between Cubicles?

This is a critical one, as it involves safety and accessibility codes. For starters, The Americans with Disabilities Act (ADA) is non-negotiable: you absolutely must have a clear width of at least 36 inches for all accessible pathways. This ensures anyone using a wheelchair can navigate the office freely.

But don’t stop there. You need to check your local fire codes, too. Main walkways and emergency exit paths often require a wider clearance, usually 44 inches, to make sure everyone can get out quickly and safely in an emergency. When in doubt, always go with the stricter of the two requirements.

Can I Mix Different Cubicle Sizes in the Same Office?

Not only can you, but you probably should. A one-size-fits-all approach rarely works in a dynamic office. Mixing up cubicle sizes is a smart way to create a zoned floor plan that actually supports how your different teams work.

Think about it: you could set up some compact workstation cubicles for your fast-paced sales team and then give managers larger private office cubicles where they can hold confidential meetings. The modular systems we offer at Cubicle By Design are designed for exactly this kind of flexibility, making it simple to create a truly custom layout.

Are Cubicles Still Used in Modern Open Office Plans?

Absolutely, though they don’t look like they used to. The bulky, high-walled cubicles of the past have evolved. In today’s open-plan offices, you’re more likely to see lower-profile workstations or what we call “benching systems.” These use low panels to give each person their own defined space without blocking sightlines or conversation.

This approach strikes a great balance. You get that collaborative, airy vibe of an open concept, but employees still have a sense of their own turf, which helps cut down on noise and distractions. It just goes to show how versatile modern cubicles really are—they can be adapted to fit any kind of workplace philosophy.


Ready to turn all these standards and ideas into a reality? At Cubicle By Design, our experts can help you build out a workspace that’s not just compliant, but comfortable and perfectly matched to your team. Why not start sketching out your ideal layout right now?

Explore the Custom Cubicle Designer

Read More

A Guide to Modular Office Wall Systems | Cubicle By Design

Imagine being able to redesign your office layout as easily as you move a desk. That’s the real magic behind a modular office wall. Don’t think of these systems as permanent walls, but more like a high-end, customizable kit of parts for your workspace. They’re like architectural LEGOs, giving you the power to adapt to hybrid work models, shifting team sizes, and whatever business challenges come next. At Cubicle By Design, we help businesses harness this flexibility.

A Smarter Way to Define Your Workspace

Traditional construction is a commitment. Once the drywall is up, the dust settles, and the paint dries, your floor plan is locked in. A modular office wall, on the other hand, is a much more dynamic and intelligent way to shape your space. It’s a system of pre-engineered, factory-built panels designed to be assembled, taken down, and reassembled with incredible speed.

This approach lets you create private offices, quiet pods for focused work, and open collaboration zones without the mess and permanence of conventional building. To get a better feel for this concept, you can learn more about what modular furniture is and how it’s completely changing the modern office.

From Concept to Reality

The true value of a modular office wall is its ability to evolve with you. When a team gets bigger or a new project demands a different kind of space, these walls can be quickly demounted and set up in a new configuration. The whole process is clean, fast, and, most importantly, protects your initial investment.

Instead of demolishing and rebuilding, you simply reconfigure. This strategic advantage is why so many businesses are turning to modular systems to future-proof their physical environments.

This isn’t just a niche trend; it’s part of a massive shift in how we build. The wider modular construction market was valued at around USD 103.6 billion in 2024 and is expected to rocket past USD 162 billion by 2030. This growth shows just how widely prefabricated building methods are being adopted.

For office interiors, this translates into huge time savings. Manufacturers report that installation can be 30–60% faster than building with traditional drywall. For you, that means your teams are in their new space and back to work weeks sooner than you’d expect.

Modular Walls vs Traditional Drywall

To really get it, you have to understand the core differences between the old way and the new. One is a permanent, one-and-done solution, while the other is a reusable, adaptable asset that keeps paying you back.

Here’s a quick breakdown of how they stack up.

Feature Modular Office Wall Traditional Drywall
Installation Speed Drastically faster. Can often be installed in just days with minimal mess. Slow and disruptive, involving multiple crews and a long, messy schedule.
Flexibility A true asset. Easily taken down and reconfigured as your needs change. Completely permanent. Any changes require messy demolition and rebuilding.
Cost & ROI Higher upfront material cost, but lower labor and a fantastic long-term ROI. Lower initial material cost, but high labor costs and zero reuse value.
Environmental Impact Very little waste. Panels are reusable and often made from recycled content. Creates a ton of construction waste (dust, debris) that ends up in landfills.

Ultimately, choosing a modular office wall is an investment in your company’s agility. It gives you the power to create a workspace that not only works for you today but is ready for whatever tomorrow brings.

Exploring Different Modular Wall Types

Picking the right modular office wall isn’t a one-size-fits-all kind of deal. It’s more about striking the right balance between looks, acoustics, and how your team actually works day-to-day. The real beauty of these systems is their sheer variety, letting you find something that clicks perfectly with your company’s culture and what you need to get done. Whether you’re aiming for total transparency or complete privacy, there’s a solution out there.

This decision goes way beyond just aesthetics. Each type of modular wall brings something different to the table in terms of sound control, how much light it lets through, and how easily you can change things up later. All of these factors directly shape how your teams focus, collaborate, and feel in their space.

Frameless and Framed Glass Walls

Glass partitions have become a go-to for modern offices trying to create a bright, open, and connected vibe. When you’re looking at your options, it’s worth checking out modern solutions like glass walls and doors that offer a great mix of flexibility and visual punch. They generally come in two main flavors, each with its own distinct personality.

Frameless glass walls are the ultimate in minimalist design. We’re talking large panes of tempered or laminated glass held in place at the top and bottom, giving you a nearly invisible barrier that lets natural light flood the space. This style is a fantastic choice for conference rooms or breakout areas where you want to keep that open feeling without letting conversations bleed out.

Framed glass walls, on the other hand, have a more structured, traditional look. That metal framing isn’t just for show; it adds a strong design element while also beefing up the wall’s sturdiness and acoustic performance. You’ll often see these used for private offices where a bit more sound dampening is a must. To really dive deep, you can explore the specifics of glass partition walls for offices and see how they can completely change a room.

Solid Panel Walls for Maximum Privacy

When focus and confidentiality are absolutely critical, solid panel walls are the answer. These systems are built from the ground up for superior sound blocking, making them the default choice for executive suites, HR departments, or any spot where conversations need to stay under wraps. They’re perfect for carving out quiet zones in an otherwise buzzing office.

Think of solid panels as the acoustic heavyweights of the modular world. Their construction is specifically designed to absorb and block sound waves, creating true sanctuaries for deep work.

These walls also come with a huge array of customization options to make sure they match your brand’s style. You can pick from finishes like:

  • Fabric-wrapped panels: These add a touch of warmth and texture, and they pull double-duty by absorbing even more sound.
  • Wood veneers: For a classic, sophisticated look that brings a natural element into the office.
  • Durable laminates: Available in just about any color or pattern you can imagine, offering a practical and stylish finish.
  • Writable surfaces: Turn any wall into a brainstorming powerhouse with whiteboard or magnetic capabilities.

This level of personalization means creating a private office cubicle doesn’t require you to compromise on style or your brand identity. You get complete acoustic privacy while keeping a professional, cohesive design.

Hybrid Systems: The Best of Both Worlds

Why force yourself to choose between transparency and privacy when you can have both? Hybrid systems are designed to seamlessly blend glass and solid panels into a single, cohesive wall. It’s a hugely popular approach because it strikes the perfect balance, letting light flow through the glass sections while giving you privacy and sound control exactly where you need it.

For instance, a hybrid wall might have a solid base for privacy and durability, with a glass panel on top to keep the space from feeling boxed in. This design is incredibly versatile and can be tweaked to fit the unique needs of different departments, creating an environment that’s both dynamic and highly functional.

What Are the Real Benefits of Modular Office Walls?

When you think about dividing a room, you might just picture a simple barrier. But a modern modular office wall does so much more. It’s a strategic tool that directly boosts your company’s flexibility, focus, and financial health. These aren’t just panels; they’re solutions designed to tackle the real challenges of today’s fast-moving workplaces.

The true value comes from how they perform across four key areas.

These benefits range from adaptability that future-proofs your investment to serious acoustic control that helps your team get real work done. Put them all together, and you get an office that’s not just more efficient, but healthier and more engaging for everyone.

Unmatched Flexibility and Scalability

Imagine you just landed a huge new client. You need to get a new project team of ten people up and running in a month. With traditional construction, that’s a nightmare of dust, delays, and high costs. But with a modular wall system? You can reconfigure an entire section of your office over a single weekend.

This incredible flexibility is the number one reason people choose modular. It allows your workspace to grow, shrink, and adapt right alongside your business.

  • Add private offices as your management team grows.
  • Create dedicated collaborative zones for new projects.
  • Downsize or reassign space with almost no disruption or cost.

This on-demand adaptability means your office layout is never set in stone. You can get ahead of change instead of just reacting to it. To see how this works in practice, you can explore the benefits of a modern office cubicle and how they share these modular principles.

Superior Acoustic Performance

An open office can look great, but we all know that constant noise is a productivity killer. A modular office wall is specifically engineered to control sound, creating quiet, private spaces where people can actually concentrate. This isn’t just about blocking noise; it’s about creating acoustic comfort.

“Facility managers love modular walls because a ‘renovation’ that used to take six weeks of dust, noise, and disruption can now be handled cleanly by a small team over a weekend. It transforms a capital-intensive construction project into a simple operational adjustment.”

High-quality systems use specialized seals, sound-rated core materials, and options like double-paned glass to achieve impressive Sound Transmission Class (STC) ratings. This kind of performance is absolutely essential for:

  • Executive Offices: Keeping confidential conversations private.
  • HR and Legal Departments: Protecting sensitive information.
  • Quiet Zones: Giving employees a true sanctuary for deep, focused work.

Enhanced Aesthetics and Natural Light

Forget the dull, drab partitions you might be picturing from the past. Today’s modular wall systems are built with style and elegance in mind. Glass partitions, especially, can completely transform a workspace by opening it up and letting natural light flow through the entire office.

This visual openness does more than just look good—it has a proven positive impact on employee morale and well-being. A bright, airy environment simply feels more energetic and welcoming, which helps build a better, more productive company culture.

Significant Cost and Time Savings

It’s true that the upfront material cost of a modular wall can sometimes be higher than drywall. But that’s not the whole story. The real savings come from slashing labor costs and dramatically speeding up your project timeline. Installation is fast, clean, and requires a much smaller crew.

Even better, modular walls are often considered tangible personal property. This can offer huge tax advantages through accelerated depreciation—something you can’t do with permanent drywall. And because the panels are 100% reusable, your initial investment holds its value. You can reconfigure them over and over, eliminating future demolition and construction costs and making them a much smarter long-term financial decision.

Customizing Your Space to Reflect Your Brand

A modular office wall is so much more than a simple barrier. Think of it as a blank canvas, just waiting for you to paint your company’s unique identity all over it. This is the point where your workspace stops being just a location and starts becoming a branded environment. The potential for customization is huge, letting you move way beyond generic layouts to create something that actually tells your story.

Every surface becomes an opportunity. By thoughtfully picking out materials and features, you can reinforce what your brand is all about, whether you’re going for a look that’s sophisticated, innovative, or all about collaboration.

A World of Finishes and Materials

The first place you get to be creative is with the massive array of available finishes. Each material brings its own distinct character into the space, giving you the power to craft a very specific atmosphere.

Your options include things like:

  • Sophisticated Wood Veneers: These are perfect for creating a warm, classic, and high-end feel in executive offices or the areas your clients see first.
  • Durable Laminates: Available in just about any color or texture you can imagine, they offer a practical and budget-friendly way to match your brand’s color palette perfectly.
  • Writable Surfaces: Why not turn a wall into an interactive brainstorming hub? Integrated whiteboard or magnetic panels can promote creativity on the fly.
  • Custom Graphics: You can put your company logo, core values, or inspirational imagery right on the walls with high-resolution printed graphics.

These choices aren’t just for show. They’re functional tools that help shape your company culture and how work gets done every day. To take it a step further, think about how you can start creating personalized workspaces with custom cubicles that tie into these branding efforts.

Smart Door and Technology Integration

Beyond the surfaces, modular walls allow for the smart integration of crucial elements like doors and technology. The right door can completely change the traffic flow, accessibility, and overall style of a room.

By integrating your brand directly into the architecture, you create a cohesive and immersive experience for both employees and visitors. Every detail, from the color of a panel to the type of door, becomes a subtle reinforcement of who you are as a company.

For instance, sleek sliding doors save valuable floor space and add to a modern, minimalist vibe. On the other hand, elegant frameless glass doors can keep that sense of openness while still providing the acoustic separation you need for a meeting room.

Seamless tech integration is another game-changer. Modern systems come with pre-wired raceways that cleanly hide all your cables, putting power outlets and data ports exactly where your team needs them. This gets rid of messy extension cords and makes sure every workspace is clean, safe, and connected from day one. To get a real feel for how your final selections will look, playing around with different architectural rendering programs can be a huge help.

This level of customization is part of a fast-growing trend. One analysis estimates the global office modular partition market will hit about USD 640 million in 2025. On the ground, vendors are reporting that 30–50% of new product inquiries since 2020 specifically ask for demountable or recyclable components. It’s clear people want adaptable and sustainable office solutions, and these walls deliver.

How to Plan Your Modular Wall Project

Thinking about a modular office wall project can feel like a huge undertaking. But with a solid plan, it stops being a challenge and starts becoming a smart, strategic move for your business. A great outcome isn’t just about picking out some cool-looking panels; it’s about really digging into your space, figuring out your goals, and getting the right people on your team to make it all happen.

The real work begins long before the first wall goes up. It all starts with asking the right questions. What are you actually trying to accomplish here? Do you need to quiet down a noisy call center, build out some private offices for the leadership team, or create flexible hubs for different project teams to gather? Your answers will guide every decision you make down the road.

Evaluating Your Space and Defining Goals

First things first, take a good, hard look at your current office layout. What are the pain points? Where are teams getting constantly distracted by noise? Where do you desperately need more privacy? Getting a handle on these day-to-day functional needs is the absolute first step.

Next, think about the bigger picture. Are you planning to grow the team in the next couple of years? Shifting to a more hybrid work model? A modular wall system is an investment in your company’s agility, so your plan should be built for the future, not just for today.

This whole phase is about creating a blueprint for success. To make sure you don’t miss any important details, getting professional guidance is a game-changer. Expert office space planning and design services can help translate your big ideas into a floor plan that’s functional, efficient, and up to code.

Partnering with Experts for a Seamless Experience

Once you’ve got a clear vision, it’s time to find a specialist who can bring it to life. This is where a team like Cubicle By Design really makes a difference. A dedicated partner takes all the mystery out of the process, walking you through everything from the initial chat and design concepts all the way to the final walkthrough. Our Cubicle Designer tool is a great starting point for visualizing your space.

Good project management makes sure every step is handled right:

  • Initial Consultation: A deep dive into your needs, budget, and ideal timeline.
  • 3D Renderings: You get to see exactly how the new layout will look and feel before committing.
  • Installation Coordination: All the logistics are managed to keep disruption to your daily business at an absolute minimum.

This kind of partnership is a huge reason the modular wall systems market is booming. It was valued at around USD 10.5 billion in 2023 and is projected to hit USD 20.8 billion by 2032, all because companies want flexible spaces managed by pros who know what they’re doing.

This infographic shows the key customization steps that come after you have a solid plan in place.

It really highlights how finishes, doors, and tech integration come together to turn a basic floor plan into a fully functional environment that reflects your brand.

Preparing for Your First Consultation

To get the most out of your first meeting, it pays to do a little homework. Showing up with the right information helps your design partner give you much more accurate recommendations and a preliminary quote right off the bat.

A well-prepared client is the foundation of a successful project. By gathering key details upfront, you empower your design partner to create a solution that is perfectly aligned with your vision, budget, and operational needs from day one.

Here’s a quick checklist to get you started:

  1. Floor Plans: Bring any architectural drawings you have. Even a simple, hand-drawn sketch with accurate measurements of the space is a great start.
  2. Functional Requirements: Make a list of how many offices or rooms you need, what they’ll be used for (e.g., intense focus work, team meetings), and if you have any specific acoustic needs.
  3. Budget Considerations: Have a realistic budget range in mind. This helps your partner zero in on the best solutions that won’t break the bank.
  4. Aesthetic Preferences: Collect some inspiration photos or make notes on the look and feel you’re going for—think colors, materials, and finishes.
  5. Technology Needs: Think about where you’ll need power outlets, data ports, or any other tech hookups for your new private offices.

Frequently Asked Questions About Modular Walls

As you start exploring modular office walls, it’s completely normal to have a few questions. Getting a handle on the specifics of cost, performance, and day-to-day practicality is the key to making a decision you’ll feel great about. We’ve pulled together the most common questions we hear to give you clear, straightforward answers.

This is all about tackling the details that matter most when you’re weighing modular solutions against old-school drywall construction. Our goal here is to clear up any confusion and show you how these adaptable systems can be a genuinely smart move for your workspace.

How Does the Cost of Modular Walls Compare to Drywall?

At first glance, the material cost for a modular office wall might seem higher than drywall. But when you look at the total installed cost, it’s often a different story—frequently comparable or even lower. Why? Because you’re saving a ton on labor, the construction timeline is drastically shorter, and there’s almost no waste to haul away.

The real financial win, though, comes in the long run. Modular walls are assets you can use again and again. You can reconfigure them or even pack them up and move them to a new office, completely wiping out future demolition and construction costs. On top of that, they may qualify for tax benefits through accelerated depreciation, which makes them a much savvier financial choice over single-use drywall.

Are Modular Walls as Soundproof as Permanent Walls?

Yes, absolutely. A high-quality modular system is engineered to meet—and often beat—the acoustic performance of traditional walls. It all comes down to the design and the specific materials used to build each modular office wall.

By using components like double-paned glass, acoustically rated solid panels, and specialized seals at all connection points, these systems can achieve excellent Sound Transmission Class (STC) ratings, ensuring speech privacy and minimizing distractions.

Working with a skilled partner like Cubicle By Design means we can help you spec out the perfect configuration to create truly quiet zones for private offices or confidential meetings.

How Difficult Is It to Reconfigure a Modular Wall System?

This is where they really shine. Ease of reconfiguration is one of the biggest selling points. The panels are designed from the ground up to be demountable. A small, trained crew can take down, move, and reinstall the walls with very little disruption to your team, often getting the job done over a single weekend.

You get none of the mess of a typical renovation. No demolition dust, no loud construction noise, and no drawn-out project schedules. This agility lets your workspace adapt on the fly to new teams, different projects, or business growth, making your office truly responsive to your needs.

Can Power and Data Be Integrated into Modular Walls?

Of course. Most modern modular wall systems are designed with built-in raceways or channels that cleanly tuck away all your electrical wiring and data cables. This feature allows outlets and network ports to be placed almost anywhere you need them along the wall.

This pre-engineered approach gives you power and connectivity exactly where it’s needed without a web of extension cords or the hassle of calling in an electrician for on-site work. It keeps everything looking clean and professional while ensuring every workspace is ready to go from day one.

Build Your Flexible Future with Cubicle By Design

Think of a modular office wall as more than just a product; it’s a genuine investment in a workspace that can actually keep up with you. These systems give businesses the power to pivot when needed, dial in the acoustics for real focus, and create a physical space that shows off their unique brand identity. It’s simply a smarter way to build, turning rigid floor plans into dynamic assets that grow right alongside your team.

We’re here to be your dedicated partner in all of this. Our team brings years of hands-on expertise in space planning, custom design, and professional installation to the table. From kicking around initial ideas with our powerful Cubicle Designer tool to the final walkthrough, we manage every last detail. We don’t just sell walls; we help you build a flexible future designed for whatever comes next.

Investing in a modular office wall system is investing in your company’s agility. It’s the framework that allows your physical space to support your business strategy, not hold it back.

Ready to see the difference for yourself? Take a look at our full range of modular cubicles and discover how to create your ideal workspace today.


Ready to design a better workplace? Cubicle By Design is your partner for planning and installing flexible office solutions, from workstation cubicles to stunning private offices. Contact us to start your project.

Read More

A Guide to Typical Cubicle Dimensions by Cubicle By Design

If you’re setting up a new office, you’ll hear one size mentioned over and over again: the 6×6 foot cubicle. It’s the industry’s go-to standard for a reason. Hitting that sweet spot of 36 square feet, it gives an employee a respectable amount of personal space without eating up your entire floor plan.

But treating the 6×6 as a one-size-fits-all solution is a rookie mistake. The world of office design is full of options, each tailored to different job functions, team dynamics, and company cultures.

Why Cubicle Dimensions Matter More Than You Think

Picking out cubicle sizes isn’t just about playing Tetris with your floor plan; it’s a critical decision that directly influences how people work, how happy they are, and ultimately, your company’s bottom line. Think of it like outfitting a kitchen. A tiny galley kitchen is fine for a single person grabbing a quick meal, but a big family needs an open-plan space with a proper island to function.

It’s the same in an office. A high-volume call center has completely different needs than a team of architects who need to spread out massive blueprints. The right dimensions give each employee the physical room and psychological comfort they need to do their best work. This guide will walk you through the whole spectrum, from compact “touchdown” spots to spacious private office cubicles, so you can make a choice that actually works for your team.

Key Factors in Your Decision

Before you start measuring out squares on a blueprint, take a step back and think about what you’re trying to achieve. Are you aiming to:

  • Boost collaboration? If so, lower walls and shared spaces are your friend.
  • Protect focused work? Taller panels and bigger individual footprints are the way to go.
  • Accommodate specific gear? People with multiple monitors, drawing tablets, or stacks of paperwork need more surface area. It’s that simple.
  • Ensure accessibility for everyone? This isn’t optional. ADA compliance and clear walkways are a must.

Answering these questions first will help you zero in on the perfect setup. Whether you’re looking at standard workstation cubicles or a more complex, hybrid layout, getting these fundamentals right is the first step toward an office that people actually like working in.

A well-planned office layout is a strategic asset. When you match cubicle dimensions to job roles, you’ll see real improvements in workflow, morale, and output. That’s how a simple furniture choice becomes a smart business investment.

To help you get a quick handle on the most common options, here’s a look at the standard cubicle footprints and where they fit best.

Quick Guide to Common Cubicle Footprints

This table breaks down the typical dimensions you’ll encounter, from compact setups to more executive-sized spaces. Use it as a starting point to figure out what makes sense for different roles within your company.

Cubicle Dimensions (Feet) Total Square Footage Best For
5′ x 5′ 25 sq. ft. High-density roles like call centers or temporary “touchdown” spots.
6′ x 6′ 36 sq. ft. The all-purpose standard for administrative staff, accountants, and developers.
6′ x 8′ 48 sq. ft. Mid-level managers or employees needing extra space for documents or meetings.
8′ x 8′ or Larger 64+ sq. ft. Senior management or roles requiring significant privacy and storage.

As you can see, a small adjustment in dimensions makes a huge difference in total square footage—and in how the space feels to the person working in it. A 25-square-foot space is purely functional, while a 64-square-foot station starts to feel like a personal office.

Decoding Cubicle Footprints: Common Sizes and Their Uses

Figuring out the right cubicle footprint is about more than just numbers. These dimensions aren’t arbitrary; they’re designed to support specific jobs and work styles. Getting the size right is a crucial decision that affects everything from an individual employee’s focus to the way people move through your office.

Think of each footprint as telling a story. A smaller station suggests a role that’s either temporary or focused on a single, straightforward task. On the other hand, a larger footprint points to someone who needs more resources, deep concentration, or even a space for small, private collaborations.

The 6×6 Foot Cubicle: The Office Workhorse

When you picture a typical office cubicle, you’re probably thinking of the 6×6 foot model. Offering a solid 36 square feet of personal space, this size has become the industry standard for a very good reason. It strikes the perfect balance between giving an employee a dedicated area and making efficient use of your floor plan.

This size is incredibly versatile, which is why it’s the default for so many roles. Accountants, developers, administrative staff, and customer service reps all find that a 6×6 gives them enough room for their computer, paperwork, and personal items without feeling hemmed in. It’s the Goldilocks of cubicles—not too big, not too small.

Interestingly, this standard evolved over time. The 6×6 has been king since the early 2000s, shrinking from the bulky 10×10 foot setups common in the 80s when massive CRT monitors hogged desk space. As tech got smaller, so did the furniture. If you want to see how these different sizes can be arranged, you should check out our guide on cubicle configurations and their layouts.

This quick visual shows how the most common footprints stack up for different roles.

As you can see, even a small shift in dimensions makes a big difference in how the space can be used.

The 6×8 Foot Cubicle: A Step Up in Space

For employees who need a bit more elbow room, the 6×8 foot cubicle is a fantastic upgrade. That extra two feet of depth boosts the total area to 48 square feet—a noticeable 33% increase over the standard 6×6. This isn’t just wasted space; it serves some really important functions.

This larger footprint is perfect for mid-level managers, HR professionals, or anyone who often has colleagues stop by their desk. The extra room can easily fit a guest chair, creating a mini-meeting space without having to track down an open conference room. It’s also great for roles that handle blueprints, large reports, or multiple projects at once, since many 6x8s feature an L-shaped desk for maximum surface area.

By providing a 6×8 workstation, you’re sending a clear message that you value an employee’s need for both focused work and collaborative discussions. It’s a strategic investment in roles that bridge the gap between individual contribution and team leadership.

The 5×5 Foot Cubicle: Maximizing Density

On the other end of the spectrum is the compact 5×5 foot cubicle. At just 25 square feet, this footprint is all about efficiency. It’s the go-to solution for high-density environments where the main goal is fitting the maximum number of people into a space.

You’ll typically find 5×5 stations in call centers, data entry departments, or telemarketing operations. The work in these settings is almost entirely computer-based, so there’s no need for a sprawling desk. The compact layout also helps supervisors easily monitor their teams and allows for quick communication between agents.

These smaller cubicles are also finding a new life as “touchdown” stations in hybrid offices. For employees who are only in the office a couple of days a week, these unassigned “hot desks” provide a functional spot to land and work without taking up the real estate of a full-sized, dedicated station.

The Critical Role of Cubicle Panel Height

When you’re laying out an office, it’s easy to focus on the footprint—the length and width of each workstation. But there’s another dimension that’s just as critical in shaping your office environment: the height of the cubicle panels. This vertical measurement is the key dial for controlling everything from privacy and noise to collaboration.

Choosing the right panel height isn’t just a design preference; it’s a strategic decision that reflects your company culture. Are you trying to build an open, buzzing space where ideas flow freely? Or do you need to create quiet zones for deep, focused work? The answer is all about how high you build the walls.

Low-Height Panels For Collaboration

Think of a low fence between two backyards. You have your own defined space, but it’s still easy to lean over and have a conversation. That’s exactly what you get with low-height panels, which typically stand around 42 inches tall. This height is perfect for teams that need constant communication to get things done.

While sitting, employees have a clear line of sight to their colleagues, making it simple to ask a quick question or share an idea without even getting up. This setup naturally encourages a sense of teamwork and keeps the energy in the room high.

  • Best For: Sales teams, creative departments, and any group working on collaborative projects.
  • Key Benefit: Promotes open communication and a strong team vibe.
  • Consideration: Offers very little acoustic or visual privacy, which can be a major distraction for some roles.

Mid-Height Panels For Balanced Privacy

The most popular choice in modern offices is the mid-height panel, usually around 53 inches. This has become the industry go-to because it offers what’s known as “seated privacy.” It’s like having your own booth at a diner—private enough for your own conversation, but you’re still part of the room’s atmosphere.

When seated, an employee is shielded from most visual distractions, helping them focus. But all it takes is a quick stand-up to see across the office and chat with coworkers. This makes 53-inch panels an incredibly versatile solution that strikes a great balance between individual focus and team connectivity.

This height is the perfect compromise for many businesses. It respects the need for personal space without creating the total isolation that can come with high walls, making it a cornerstone of effective office design.

Getting familiar with the different parts of a cubicle, like panels and work surfaces, can be a huge help. For a deeper dive, exploring common cubicle terminology will clarify what each component does and how they all fit together.

High-Height Panels For Deep Focus

For any role that demands confidentiality and serious concentration, high-height panels are the only way to go. At 65 inches or taller, these walls create a space that feels more like a private office than a standard cubicle. It’s the office equivalent of a personal library carrel, designed specifically to shut out the world.

These panels are ideal for people in legal, HR, or finance, where conversations and documents need to stay private. They’re also a lifesaver for writers, programmers, or researchers who need long, uninterrupted stretches of quiet to be productive. The tall panels drastically cut down on both visual and auditory distractions, creating a true sanctuary for focused work.

Ultimately, picking the right panel height comes down to understanding how your team actually works day-to-day. By matching the vertical dimension to the job function, you can create a workplace that is more efficient, comfortable, and productive for everyone.

Designing for Different Work Styles: From Call Centers to Private Offices

Knowing the basic cubicle footprints and panel heights is the first step. But the real magic happens when you combine them into a functional workspace that actually helps people do their jobs better. This is where design stops being about furniture and starts being about productivity, perfectly matching the space to the role.

There’s no such thing as a “best” cubicle. There’s only the best configuration for a specific task.

An effective office layout isn’t just a uniform grid of identical boxes. It’s more like an ecosystem where different work styles need to coexist peacefully. By thoughtfully assigning specific cubicle dimensions to different teams, you can create zones that support everything from high-volume call centers to deep, confidential work.

High-Density Call Centers and Open Teams

In environments like call centers, where density and efficiency are the name of the game, the compact cubicle is king. These jobs demand the maximum number of people in the smallest possible space, all while giving supervisors an easy line of sight. Function definitely trumps privacy here.

  • Footprint: A 5×5 foot footprint (25 sq ft) is the go-to standard. It’s just enough room for a computer, a headset, and the essentials—nothing more, nothing less.
  • Panel Height: Low panels (42 inches) are key. They keep sightlines open, which helps build a team atmosphere and lets managers easily see who needs help.

This minimalist setup has come a long way. For high-density roles, it’s now common to see even smaller 2×5 foot stations with 39-43 inch glass-topped panels. As tech like VoIP headsets replaced bulky old equipment, these modern workstations have shrunk by as much as 75% from their 1980s counterparts.

Collaborative Workstations for Team Synergy

When your team’s daily routine involves spontaneous brainstorming and constant teamwork, the layout has to encourage that interaction. This is where mid-height panels and shared spaces can create a connected, energetic vibe.

For these teams, the standard 6×6 foot cubicle is a great starting point, but the key is adjusting the panel height to spark communication. We often recommend 53-inch panels to provide “seated privacy” for focus time, while still making it effortless to pop up and talk to a neighbor.

A successful collaborative space isn’t just open; it’s intentionally designed to lower the barriers to communication. Using moderately sized cubicles with mid-height walls creates neighborhood-like clusters that encourage team cohesion without sacrificing individual workspace.

If your team thrives on non-stop interaction, benching systems—those long, shared desks with minimal dividers—are another fantastic choice. They’re the ultimate in open-plan design, perfect for creative agencies or tech startups. You can find out more about setting up these efficient spaces in our article about upgrading with call center one-surface cubicles.

Managerial and Focus-Intensive Roles

As job responsibilities expand, so does the need for space and privacy. Mid-level managers, HR professionals, or anyone working on sensitive projects needs a workstation that can handle focused work, confidential chats, and small, informal meetings.

This is where larger workstation cubicles really shine.

  • Footprint: An 8×8 or 6×8 foot footprint is ideal, giving you 48 to 64 square feet. That’s plenty of room for an L-shaped desk, a guest chair, and extra storage like filing cabinets.
  • Panel Height: High panels (65+ inches) are non-negotiable. These taller walls are crucial for creating the acoustic and visual privacy needed to kill distractions and signal a zone for concentration.

For senior leaders or roles demanding total confidentiality, you can even opt for specialized private office cubicles. These are a smart, modular alternative to building traditional drywall offices. They often feature extra-tall panels and lockable doors, giving you all the perks of a separate office with the flexibility of a systems furniture layout.

Essential Space Planning Considerations and Measurements

Picking out the right size cubicles is a great start, but it’s really only half the job. To build an office that actually works for your team, you have to think about the space around the workstations. This is all about planning for traffic flow, easy access, and how people will move through the office every single day.

If you don’t nail these measurements, you can end up with a cramped and frustrating maze. Bottlenecks form, people feel squished, and not everyone can get around easily. Good space planning is what makes an office feel open, safe, and efficient.

Navigating ADA Compliance and Walkway Clearances

One of the first things to lock down in any office layout is compliance with the Americans with Disabilities Act (ADA). These aren’t just friendly suggestions—they’re legal requirements that make sure your workspace is accessible to everyone, including team members who use wheelchairs.

For instance, any main path or corridor needs a minimum clear width of 36 inches. This gives enough room for a wheelchair to pass through without getting stuck. And for someone to make a full 180-degree turn, you need a clear space of at least 60 inches by 60 inches.

Following these rules means every single employee can move around freely and safely, from the front door to their desk and to the breakroom.

Major vs. Minor Walkways: What’s the Difference?

Beyond the legal minimums, a well-designed office anticipates the natural flow of foot traffic. It helps to think of your office pathways like a city’s road system: you’ve got major highways and smaller neighborhood streets.

  • Major Walkways: These are the main arteries of your office. They connect large departments or lead to busy spots like exits, kitchens, and conference rooms. To keep things moving and prevent “traffic jams,” these paths should be generous—ideally between 48 and 60 inches wide.
  • Minor Walkways: These are the smaller paths between individual cubicles or within a team’s zone. A minimum width of 36 inches works just fine here, allowing one person to pass through comfortably.

A common mistake is looking at a floor plan on a screen and thinking it’s spacious enough. In reality, a layout that seems perfect on paper can feel claustrophobic if the walkways are too tight. When in doubt, always give people a little more room to breathe.

If you want to dive deeper into optimizing your entire floor plan, our detailed guide on office space planning and design is packed with expert advice to help you create a layout that truly works.

Calculating Your Usable Office Space

When you’re figuring out how many cubicles you can fit, you need to work with your usable square footage, not the total number on your lease. The total footage is a bit misleading because it includes things you can’t use, like structural pillars, utility closets, and wall thickness.

Your usable square footage is what’s left after you subtract all those obstructions. This is the real number you should base your layout on. As a general rule of thumb, you can expect walkways and common areas to eat up about 25-30% of your usable space. That leaves you with roughly 70-75% of your floor for the actual workstations from Cubicle By Design.

To make it easier, here’s a quick-reference table summarizing the essential clearance measurements you’ll need to keep in mind.

Minimum Space Planning Clearances

Area Type Recommended Minimum Width Note
Major Walkway/Corridor 48 inches Main path for high foot traffic; must be ADA compliant.
Minor Walkway (Between Cubicles) 36 inches Path within a cubicle cluster; allows for single-file movement.
ADA Wheelchair Passage 36 inches The absolute minimum clear width required by law for accessibility.
ADA 180-Degree Turn 60-inch Diameter Required clear space for a wheelchair to turn around completely.

Having these key numbers handy will help you avoid common layout mistakes and ensure your office is both compliant and comfortable for everyone.

Putting It All Together: Your Custom Cubicle Solution

So, you’ve journeyed through the world of typical cubicle dimensions. You know the difference between a workhorse 6×6 and the pros and cons of various panel heights. Now comes the fun part: using that knowledge to design a workspace that genuinely helps your team thrive. It all boils down to a few key decisions that balance what each person needs with what’s best for the office as a whole.

Think of it this way: you wouldn’t give a racecar driver a minivan. The same logic applies here. Match the cubicle footprint to the job. An accountant buried in spreadsheets needs a different setup than a call center agent, and a team lead requires another space entirely. Then, pick a panel height that reflects your company culture. Are you trying to spark collaboration with low walls, or do you need to protect deep, focused work with taller ones?

Finally, map everything out with plenty of room to move. Good circulation and total accessibility for every single employee aren’t afterthoughts—they’re essential.

Take Control of Your Office Design

Armed with these principles, you’re no longer just buying furniture; you’re creating a productive, comfortable environment. Don’t leave your layout to chance. As you start piecing together your ideal setup, using tools like 3D rendering for interior design can be a game-changer. It helps you see exactly how the space will feel before you commit.

A well-designed office isn’t just about furniture; it’s a strategic tool that enhances workflow and boosts morale. You now have the foundational knowledge to make smart, impactful choices for your space.

A popular go-to for team leads and mid-level managers is the 6×8 foot cubicle. This layout provides a generous 48 square feet of L-shaped workspace, giving you a 33% increase over a standard 6×6. That extra room is perfect for handling more documents, adding a guest chair, or setting up multiple monitors. The 6×8 is a flexible powerhouse that fits nicely within the typical 80-100 square foot per-person allocation many companies aim for.

Ready to bring your vision to life? Get inspired by browsing our full range of office cubicles or jump right in and experiment with our interactive Cubicle Designer tool.

At Cubicle By Design, we’re here to help you build the perfect workplace. You might also find some great ideas in our guide on creating personalized workspaces with custom cubicles.

Common Questions About Cubicle Dimensions, Answered

Once you get a handle on the basics of footprints and panel heights, the practical questions start popping up. It’s one thing to know the theory, but another to apply it to your own space. Let’s dig into some of the most common questions we hear from people planning their office layout.

What Is the Most Common Office Cubicle Size?

Hands down, the industry go-to is the 6×6 foot cubicle. Why? Because its 36-square-foot footprint hits the sweet spot between giving an employee comfortable personal space and using your floor plan efficiently. It’s the perfect all-rounder for a huge range of roles, from accountants and project managers to developers and support staff.

This size easily fits a classic L-shaped desk, leaving plenty of legroom and space for a file cabinet or two. It’s the workhorse of office design for a reason—it’s a reliable, flexible solution that just works for most general office tasks.

How Much Space Should I Leave Between Cubicles?

This is a critical one for safety, flow, and just making the office feel comfortable. You can’t have people bumping into each other all day.

For the smaller walkways between a few cubicles or inside a team pod, you need a minimum of 36 inches. This gives people enough room to walk through single-file without feeling like they’re squeezing by.

For main arteries—the major corridors that lead to exits or common areas—you’ll want to be more generous. Aim for 48 to 60 inches to handle more foot traffic. And no matter what, your layout must follow ADA (Americans with Disabilities Act) guidelines. That means keeping at least a 36-inch clear path for wheelchair access and ensuring there’s a 60-inch diameter circle somewhere for turning space.

How Do I Choose the Right Cubicle Panel Height?

Picking the right panel height is all about the kind of work getting done and the culture you want to build. This choice directly shapes privacy, manages noise, and dictates how easily people can collaborate.

  • Low Panels (around 42 inches): Perfect for high-energy, collaborative teams where people are constantly talking and sharing ideas. These keep sightlines open and make the whole space feel connected.
  • Mid-Height Panels (around 53 inches): This is the most popular height for a reason. It provides “seated privacy,” which means you can focus without distraction when you’re sitting down but can easily pop your head up to talk to a neighbor. It’s the best of both worlds.
  • High Panels (65 inches or more): When you need to create a quiet zone for deep concentration or confidential work, this is your answer. Think HR, legal, or finance departments. These walls create an almost private office-like feel, cutting down significantly on both visual and sound distractions.

Can I Mix and Match Different Cubicle Sizes?

You absolutely can, and you should! A one-size-fits-all approach rarely works in a modern office. Mixing cubicle sizes is a smart strategy to create a dynamic layout that’s tailored to the actual work people are doing.

For example, you could give managers larger 8×8 private office cubicles so they have room for small, private meetings. Your general staff might be perfectly comfortable in standard 6×6 workstation cubicles, while a call center team could be set up in efficient 5×5 stations to save space. This tiered setup makes the most of your square footage and gives every employee the right environment to be productive.


Ready to design a workspace that perfectly fits your team’s needs? At Cubicle By Design, we specialize in creating functional and modern office solutions. Explore our full range of cubicles or bring your vision to life with our interactive Cubicle Designer tool.

Read More

Your Guide to Temporary Office Wall Solutions | Cubicle By Design

So, what exactly is a temporary office wall? Think of it as a non-permanent, movable partition system designed to slice up big, open office spaces into smaller, more functional areas. Whether you need a few private offices, a new meeting room, or a quiet zone for focused work, these walls get the job done. Unlike traditional drywall construction, these flexible solutions can be put up, moved around, and taken down with almost no disruption. This makes them a perfect fit for growing businesses that need to change their layout without the headaches and high costs of a full-blown renovation.

The Modern Answer to an Evolving Office

In a business world that seems to change by the minute, a static office layout can seriously hold your team back. Gone are the days of being locked into a single floor plan for years on end. Today’s workplaces have to be flexible—able to scale up for a new project team, create quiet nooks for deep work, or build a private meeting space on the fly. This is exactly where a temporary office wall becomes an essential tool for any company that’s thinking ahead.

Instead of tearing your hair out over disruptive and expensive construction projects, businesses are wising up and turning to modular solutions. These systems offer a genuinely practical way to shape your environment to fit what you need right now, not what you needed five years ago. Think of them as high-end building blocks for your office, letting you create a dynamic workspace that actually helps people be productive and work together.

Why Flexibility Is the New Standard

The need for adaptable space isn’t just a fleeting trend; it’s a direct response to how modern teams actually get work done. A growing startup might need to add five new workstation cubicles one month and then carve out a collaborative project area the next. With temporary walls, making these kinds of changes is surprisingly simple.

  • Cost-Effective Growth: You get to sidestep the huge expense of traditional construction. Adding a new office or reconfiguring a whole department can be done for a fraction of the cost.
  • Minimal Disruption: Installation is quick and clean. We’re talking hours or days, not weeks. This means your team can keep right on working without missing a beat.
  • A Future-Proof Space: As your company changes, your office can change right along with it. Temporary walls can be easily moved or reconfigured to support new team structures and workflows.

At the end of the day, embracing solutions like temporary walls means you’re investing in an agile infrastructure. It gives you the power to build an office that not only looks great but also functions as a strategic asset, ready to adapt to whatever comes your way. Here at Cubicle By Design, we help businesses discover the power of flexible office design, from individual cubicles to entire floor plans.

Exploring the Different Types of Temporary Office Walls

When you hear “temporary office wall,” it’s easy to picture a flimsy, simple screen. But the reality is a whole world of smart, flexible solutions, each designed to tackle specific challenges in the modern workplace. Figuring out which type is right for you is the first step toward creating an office that truly works for your team, your budget, and your style.

The options run the gamut, from basic dividers all the way to sophisticated systems that genuinely rival the look and feel of traditional drywall. This versatility is a huge reason why the entire movable walls market is booming right now. Valued at $4.5 billion, the industry is on track to nearly double to $8.3 billion by 2033. This growth is directly tied to the fact that 70% of global firms are now making reconfigurable layouts a priority. As businesses need to stay nimble, these walls are providing the answer. You can actually explore the full market research to see more on this industry-wide shift.

This diagram breaks down the core benefits that are driving so many companies to adopt temporary walls: adaptability, productivity, and pure versatility.

Diagram showing the adaptability, productivity, and versatility benefits of temporary office walls with relevant icons.

As you can see, these systems are about so much more than just dividing a room. They’re practical tools for creating work environments that can adapt on the fly. Let’s break down the most popular types you’ll come across.

Modular Panel Systems

Think of modular panel systems as the ultimate office LEGOs. They’re made up of interlocking panels, usually covered in fabric or a clean laminate finish, that you can click together in countless different ways. They are perfect for quickly creating clusters of workstations or sectioning off an entire department.

Because they’re so incredibly versatile, modular systems are a go-to for growing businesses. You can start with just a few panels to carve out a small team area, and then simply add more as you hire. They also play nicely with existing furniture, which makes them a really practical choice for offices that are constantly evolving.

Glass Wall Systems

If you’re going for a modern, high-end look that promotes transparency and lets natural light flow, glass wall systems are the premier choice. These systems use sleek tempered glass panels set in minimal frames—or sometimes no frames at all—to define spaces like conference rooms or private offices without making the area feel closed off and cramped.

Glass is the ideal way to strike that perfect balance between an open-plan vibe and the very real need for designated, quiet areas. While you get that great visual connection to the rest of the office, you still get a solid degree of acoustic separation. If you’re leaning toward this sleek option, you can learn more by checking out our guide on glass partition walls for offices.

The real magic of glass walls is their ability to maintain an open, light-filled atmosphere. They divide space physically without dividing it visually, which is a huge deal for fostering a collaborative and connected company culture.

Demountable Walls

When real privacy and serious sound control are at the top of your list, demountable walls are the heavy-duty solution you need. These are substantial, floor-to-ceiling systems that give you the acoustic performance and solid feel of traditional drywall. The key difference? Unlike permanent construction, they can be taken down and reinstalled somewhere else.

Demountable walls are perfect for creating private office cubicles or boardrooms where confidential conversations are the norm. They’re a bigger investment upfront, but they provide unparalleled soundproofing and a sense of permanence—all while keeping the flexibility to move when your office layout needs a refresh.

Freestanding Partitions and Room Dividers

For the ultimate in speed and simplicity, nothing beats freestanding partitions. These are lightweight screens that can be set up in minutes to create instant privacy nooks, visually separate different teams, or just guide foot traffic through a big open space.

They won’t give you the same level of acoustic privacy as a full, floor-to-ceiling system, but they are fantastic at cutting down on visual distractions. They’re a cost-effective and highly mobile solution for businesses that need to make quick, temporary tweaks to their floor plan without any real installation.

Comparing Temporary Office Wall Solutions

Choosing the right type of temporary wall really comes down to your specific needs—from acoustics and aesthetics to your budget and how often you plan to reconfigure your space. To make the decision a bit easier, this table breaks down the key features of the most common solutions.

Wall Type Best For Acoustic Rating Flexibility Typical Cost
Modular Panel Systems Creating cubicles and workstations, scaling with growth Low to Medium High $$
Glass Wall Systems Conference rooms, private offices, maximizing light Medium Medium $$$$
Demountable Walls High-privacy offices, boardrooms, soundproofing High Medium $$$
Freestanding Partitions Quick visual separation, temporary privacy nooks Low Very High $

As you can see, a simple freestanding partition is great for a quick fix, while a demountable or glass wall system is more of a long-term investment in a truly flexible infrastructure. Consider what problem you’re trying to solve today, but also think about what your team might need a year from now.

Making the Right Choice for Your Space

Moving past the different styles of temporary walls, we get into the nitty-gritty of picking the right one for your actual workspace. A successful project is about so much more than looks. You have to think about how these walls will function day-to-day. Things like acoustics, power integration, and even local building codes can make or break how well your new space actually works.

When you get these details right, your investment doesn’t just divide a room—it genuinely makes the office more productive and comfortable. The goal is to create an environment where the new walls feel like they were always meant to be there, not like a quick fix. With our free cubicle designer tool, you can visualize your layout and plan these details in advance.

Mastering Acoustics and Privacy

In any office, controlling sound is absolutely essential for focus and keeping conversations confidential. When you’re looking at temporary office walls, the Sound Transmission Class (STC) rating is the most important number to know. It tells you exactly how well a partition blocks airborne sound. The rule is simple: the higher the STC rating, the more sound it stops.

A low STC rating might be fine if you just need a visual barrier between teams, but it won’t do much to muffle a sales call. If you’re building a private office or a quiet meeting room, you’ll need a system with a much beefier rating.

A normal office conversation clocks in around 50-60 decibels (dB). A wall with an STC rating of 40 will make loud speech audible but garbled, while a rating of 50 or higher means you’ll barely hear it at all.

The wall’s material is a huge factor here. Fabric-covered panels are fantastic for absorbing ambient chatter and cutting down on echo, which can make open areas feel less chaotic. On the other hand, solid-core demountable walls offer the best performance for blocking sound, making them the go-to choice for spaces where privacy is the top priority.

Integrating with Existing Infrastructure

A temporary wall doesn’t just appear out of thin air; it has to play nicely with your building’s existing systems. Before you sign on the dotted line, you need a plan for power, data, and even airflow. The good news is that modern modular systems often come with built-in raceways to cleanly hide all your wiring and cables, keeping the space looking sharp and functioning smoothly.

Here are a few key things to map out:

  • Power and Data Access: Figure out exactly where you’ll need outlets, USB ports, and network jacks. Planning this from the start with a system that has integrated cabling is a world away from tripping over extension cords later.
  • HVAC and Airflow: Make sure your new walls won’t block air vents or mess with the heating and cooling. Floor-to-ceiling walls, in particular, might require some tweaks to your HVAC system to keep both sides of the wall comfortable.
  • Lighting and Sprinklers: Double-check that your new layout won’t create dark, gloomy corners or, more importantly, get in the way of your fire suppression system. Local building codes are incredibly strict about sprinkler coverage, and you have to follow them.

Navigating Building Codes and Permits

While many temporary wall systems are considered furniture and don’t need a permit, that’s not a universal rule. The regulations can change quite a bit depending on your city and the specifics of your installation.

As a general rule, any wall that’s hard-wired into the building’s electrical system or goes all the way to the ceiling deck (which can interfere with HVAC and fire sprinklers) is much more likely to require a permit. The smartest move is to always check with your local building authority or your property manager before you start. It’s a simple step that can save you from big fines and the headache of having to tear down your work.

Aligning Aesthetics with Your Brand

Finally, don’t forget that the look and feel of your temporary walls should match your company’s culture. They’re a big visual part of your office, so design matters. Choose finishes, colors, and materials that work with your existing decor to create the atmosphere you’re going for.

Whether you want a sleek, modern look with glass and aluminum or a warmer, more collaborative vibe with fabric panels, the right choice will make your space feel deliberate and welcoming. You can explore our full guide to modular office walls to see just how different styles can be tailored to fit your brand.

Navigating the Costs of Renting vs. Buying

When it comes to temporary office walls, one of the first big decisions you’ll face is whether to rent or buy. This choice goes way beyond the initial price tag—it’s about matching your financial strategy to your company’s real-world needs. Think about your project timelines, your growth plans, and how much flexibility you really need.

The whole rent-versus-buy question often boils down to one thing: how long do you need the walls? If it’s a short-term gig, renting gets you what you need without a big capital spend. But if you’re playing the long game, buying is an investment that can pay off through ownership, tax benefits, and the freedom to change things up whenever you want.

The Case for Buying Your Walls

Purchasing a temporary office wall is definitely an upfront investment, but it’s often the smartest move for the long haul. When you buy, those walls become a company asset. That means you can depreciate them over time, which can create some nice tax advantages and ease the overall financial hit.

This is the perfect route for businesses with a clear, steady growth plan. If you know you’ll need a flexible office layout for the next few years, buying is almost always the more cost-effective choice. You get total control over your space, letting you reconfigure layouts for new teams or projects without ever having to think about rental fees.

The Advantages of Renting

For businesses dealing with short-term projects or a bit of uncertainty, renting is a lifesaver. It keeps your initial investment low, freeing up cash for other critical parts of your business. It’s a fantastic option for temporary project teams, seasonal hiring pushes, or even just to test-drive a new floor plan before you commit to it permanently.

Renting gives you maximum flexibility. If a project ends sooner than expected or your needs suddenly change, you’re not stuck with walls you don’t need anymore. Most rental agreements even bundle in the installation and removal, making the whole process incredibly simple from start to finish. For any need that’s less than a year, renting is usually the most practical and financially sound path.

A huge plus for both options is how much more efficient they are than traditional construction. Temporary walls are key to scaling your space cost-effectively. Many systems go up in under an hour, which can slash renovation costs by 30-40% compared to building fixed walls. It’s no wonder that over 2.5 million flexible workspaces worldwide are jumping on this trend. You can discover more insights about this trend on Archive Market Research.

A Practical Scenario-Based Guide

To make the decision a little easier, let’s look at a few common business scenarios. Seeing how it plays out in the real world can help you figure out which path is right for you.

  • Rent If You Are:
    • Hosting a short-term project: Need to create a dedicated space for a team for the next 3-6 months? Renting is the perfect plug-and-play solution.
    • Testing a new layout: Not sure if an open plan or a more divided office is right for your team? Rent some walls and try out a few setups with very little risk.
    • Managing a tight budget: If you’re short on upfront capital, renting lets you get the workspace you need right now without a huge financial commitment.
  • Buy If You Are:
    • Planning for long-term growth: If you expect your team to expand and your layout to change over the next several years, buying is the smarter long-term investment.
    • Frequently reconfiguring your space: For dynamic businesses that are constantly adapting their environment, owning the walls gives you total freedom to change things up.
    • Seeking to build company assets: Buying adds a depreciable asset to your books, which can offer some significant tax benefits down the road.

To get a better handle on the numbers, you can also explore our complete cubicle price guide. It will give you a much more detailed financial picture to help you make an informed decision.

Installation, Reconfiguration, and Long-Term Care

Picking out the right temporary office walls is a great start, but their real value comes to life over the entire time you use them. We’re talking about everything from a smooth, quiet installation to just how easy it is to shuffle your layout around and keep things looking sharp with minimal maintenance. The whole point is to keep your business nimble without creating headaches.

Two men in white uniforms assembling gray office partitions in a bright, modern office.

The initial setup is a breeze. It starts with a professional site visit to make sure the game plan fits your existing space perfectly. From there, trained technicians handle the assembly with as little disruption to your team’s day as possible.

This efficiency is a huge reason why the modular wall systems market hit $10.5 billion and is expected to nearly double to $20.8 billion by 2032. Businesses are jumping on board because they can slash setup time by up to 70% compared to old-school construction.

The Magic of Reconfiguration

Here’s where temporary office walls really shine: their adaptability. Your business changes, so why should your office be stuck in one configuration? When you need to spin up a new project team, add another private office, or carve out a new collaboration zone, rearranging your walls is surprisingly simple.

Unlike drywall—which means dust, noise, and a whole lot of mess—modular walls are built to be moved. The process is clean and straightforward:

  • Systematic Disassembly: Panels are carefully unlocked and taken apart without creating a construction zone in your office. No dust, no debris.
  • Easy Relocation: The parts are lightweight enough to be moved to their new spot without a major production.
  • Quick Reassembly: The system is put back together in the new layout, often in just a few hours.

This power to constantly reinvent your floor plan is what turns a temporary wall from a one-time purchase into a long-term asset. You can get a better sense of what a professional crew can do by checking out our guide on office furniture installation.

Simple Long-Term Care and Maintenance

Keeping your temporary walls looking great for years doesn’t take much work. The care instructions depend on the material, but it’s all pretty simple stuff.

  • Fabric Panels: A quick pass with a vacuum’s brush attachment handles the dust. For small spots, a gentle fabric cleaner does the trick.
  • Laminate Surfaces: These are tough. Just wipe them down with a soft cloth and a mild cleaner to get rid of smudges and fingerprints.
  • Glass Walls: Nothing fancy here. Standard glass cleaner and a microfiber cloth will keep your glass partitions crystal clear and streak-free.

If you’re looking for a deeper, chemical-free clean, methods for steam cleaning walls can be a great option for many surfaces. On top of that, any reputable manufacturer will offer a solid warranty covering material and workmanship defects, so you can have peace of mind that your investment is protected.

Designing a Truly Agile Office Layout

It’s time to move beyond the static floor plan. Let’s talk about how to transform your space into a living, breathing ecosystem that actually helps your team get work done. A temporary office wall isn’t just a divider; think of it as a strategic tool for building a truly agile workplace. This is all about ditching rigid layouts for a more fluid, responsive approach to office design.

Modern open-plan office with collaborative zones, glass partitions, and acoustic dividers.

When you place these walls thoughtfully, you can carve out specialized zones that cater to different kinds of work. Suddenly, your office goes from a one-size-fits-all box to a versatile environment that supports every task your team tackles.

Creating Purpose-Built Zones

An agile office is really just a collection of intentional spaces. With modular and demountable walls, you can build out these critical areas without the headache and dust of a traditional construction project.

  • Quiet Zones: Use demountable walls with a high-STC rating or fabric-covered panels to create library-like nooks for deep, focused work. These spots are gold for anyone needing to concentrate, shielding them from the unavoidable chatter of a busy office.
  • Collaborative Hubs: Carve out open, energetic areas perfect for brainstorming and team huddles. Low-height partitions or sleek glass walls can define these hubs without completely sealing them off, which helps maintain a sense of connection to the rest of the office.
  • Team Neighborhoods: Group project teams or entire departments into their own zones. This gives teams a home base and a sense of ownership over their space while still keeping them accessible to others.

This whole concept is the backbone of Activity-Based Working (ABW). It’s a design philosophy where employees aren’t chained to a single desk. Instead, they choose the best space for the task at hand, moving between quiet zones, collaborative hubs, and their team neighborhood as their day unfolds.

The Key to Modern Design Philosophies

Trying to implement something like ABW is nearly impossible with a fixed floor plan. Temporary office walls are the key that unlocks this level of flexibility, letting you create a workspace that responds directly to what your team needs, when they need it.

Just look at the high demand for flexible co-working office solutions—it shows how much businesses value adaptable layouts. Temporary walls let you build that same highly functional environment right inside your own dedicated space, giving your team the freedom to do their best work.

It’s time to stop thinking of walls as permanent barriers and start seeing them as powerful tools for growth. Our office space planning and design services can help you figure out exactly how to apply these concepts to your unique workplace.

Common Questions About Temporary Office Walls

Even when you think you have a solid plan, a few practical questions always pop up before pulling the trigger on a new office setup. Investing in temporary office walls is a big move toward making your space more flexible, so it’s smart to clear up any last-minute doubts. This section tackles the real-world questions we hear most often from office managers and business owners, so you can move forward with confidence.

We’ll get into the nitty-gritty of soundproofing, how these systems play with the furniture you already have, and what you can expect in terms of long-term durability. Getting these details right is the key to making sure your new walls work exactly the way you need them to.

How Good Are Temporary Walls at Soundproofing an Office

The short answer? It really depends on the type of wall you choose. The effectiveness varies quite a bit, so you have to match the wall system to the level of privacy you’re trying to achieve.

  • For Maximum Privacy: If you need a space for confidential meetings or focused executive work, floor-to-ceiling demountable walls with solid cores are your best bet. These are the champs of sound control and can achieve high Sound Transmission Class (STC) ratings, effectively blocking conversations.
  • For Reducing Ambient Noise: In a lively open office, fabric-covered modular panels work wonders. They are fantastic at absorbing that background hum and chatter, cutting down on echo and making it easier for everyone to concentrate. They won’t give you a silent room, but the improvement is significant.
  • For Visual Separation: Glass walls look sharp and modern, but standard versions don’t do much for sound privacy. If you love the look but need more quiet, you can upgrade to specialized acoustic glass, which has a sound-dampening layer built right in.

For true, library-level quiet, nothing beats a full-height system with proper seals at the floor and ceiling.

Can I Use These Walls with My Existing Office Furniture

Absolutely. In fact, that’s one of their biggest selling points. Temporary walls are designed from the ground up to integrate with the desks, filing cabinets, and especially the workstation cubicles you already own. This compatibility is what allows you to reconfigure your space without having to buy all new furniture.

You can use them to carve out a few private offices right next to your open-plan area or build new perimeters around a cluster of existing desks. For a truly seamless look, it’s a good idea to measure the height of your current furniture and pick a wall style that complements it. Companies like Cubicle By Design offer a huge selection of cubicles and wall systems that are designed to fit together perfectly.

Think of temporary walls as a modular extension of your current office. They don’t replace what you have; they enhance it, allowing you to add layers of privacy and structure exactly where they’re needed most.

Are Temporary Office Walls Durable Enough for Daily Use

Yes, without a doubt. We’re not talking about flimsy room dividers here. Commercial-grade temporary walls are built to handle the daily grind of a busy office. Reputable manufacturers use tough, high-quality materials like heavy-duty aluminum frames, scratch-resistant laminates, and tempered safety glass that can stand up to years of wear and tear.

The key to longevity, however, is using the right tool for the job. A lightweight freestanding screen is perfect for a low-traffic corner, but it’s not the right choice for a main corridor. For high-use areas like hallways or meeting rooms, you’ll want a more robust modular or demountable system. When you choose the right product and have it installed correctly, these walls become a lasting part of your office infrastructure.


Ready to create a more agile and productive workspace? The experts at Cubicle By Design can help you find the perfect temporary wall solution for your needs. Explore our options and start your office transformation today at https://cubiclebydesign.com/.

Read More